
Nail Care Secrets from a Classical Guitarist
As classical guitarists, nails are an essential part of our craft. The tone, texture, and volume of our music are deeply influenced by the condition of our nails, thus nail care is a widely discussed topic among guitarists. In the quest for healthier nails, many guitarists search for products and supplements to strengthen and maintain their nails, but I've found that the key to resilient nails lies in a balanced lifestyle, proper nutrition, and sufficient sleep.

Disclaimer: Although I share my experience and observations, I am not a doctor, and the information provided in this blog post is not medical advice. It is always wise to consult with a healthcare professional before making changes to your diet, sleep habits, or lifestyle.
The Berlin Nail Saga: An Anecdote

Nine years ago, my life took an exciting turn when I moved to Berlin. However, my nails began to weaken and tear during my first year here, thanks to my less-than-ideal diet. Alarmed, I sought the help of a dermatologist who, initially attributed my nail issues to age, suggesting that I accept my nails' inevitable decline.. I was only 30 at the time! After explaining my profession and my nails' critical role in my performance, she reluctantly handed me some brochures and a list of costly vitamin pills to buy. Diet, however, was never mentioned.
On my way home, I had an epiphany: my poor diet was sabotaging my nails, not my age. Nails were just the first casualty, and a transformation was crucial. Instead of pouring money into pricey pills, I embarked on a research journey and made sweeping changes to my diet and sleep schedule. A year later, my nails had made a remarkable comeback, and after years of continued dietary improvements, my nails and energy levels are now stronger than ever.
Nutrition Guidelines for Nail Health
Biotin-rich foods: Indulge in eggs, almonds, and sweet potatoes, which are rich in biotin—a B vitamin that promotes nail strength and growth.
Protein: Since nails are primarily composed of keratin, consuming lean meats, fish, and beans can help provide the necessary building blocks.
Omega-3 fatty acids: Fish, walnuts, and flaxseeds can help moisturize and strengthen nails, thanks to their omega-3 content.
Iron: To prevent brittle nails, incorporate iron-rich foods like spinach, lentils, and red meat into your diet.
Zinc: Whole grains, oysters, and legumes contain zinc, which supports nail growth and strength.
Vitamin C: Consuming vitamin C-rich foods, such as citrus fruits, strawberries, and bell peppers, can help promote collagen production, essential for nail health.

Incorporating Healthy Foods into Daily Nutrition
To harness the full potential of these essential nutrients, I try to incorporate them into my daily meals. I practice intermittent fasting, so I eat three meals within an 8-hour window. Here's an example of my typical day:
Breakfast: Quinoa seeds, flaxseed, raw cocoa in Greek yogurt, topped with various berries, nuts, and cinnamon, plus a piece of 95% dark chocolate with my coffee.
Lunch: Grilled salmon or meat with a side of colorful veggies, ensuring I get enough protein, iron, and omega-3 fatty acids to keep my nails strong and healthy.
Dinner: A delicious omelet with mixed greens, providing a blend of biotin, iron, and vitamins.
The Power of Sleep and Balanced Lifestyle
In addition to a balanced diet, getting enough sleep is crucial for overall well-being and nail health. I aim for about 8 hours of sleep per night, ensuring I go to bed and wake up at approximately the same time each day. This consistent sleep schedule supports my body's natural circadian rhythm, contributing to better overall health, including the strength and resilience of my nails.

Furthermore, leading a balanced lifestyle, where stress is managed, physical activity is regular, and mental well-being is nurtured, plays an integral role in maintaining not just nail health but overall body health. Of course, life happens, and unexpected events can throw our schedules off balance. As a musician and father of two kids, I embrace the challenges of spending long hours practicing, traveling for concerts, and juggling family responsibilities, which can sometimes make it difficult to adhere to a perfectly balanced routine. However, I always strive for a healthy lifestyle, acknowledging that it's an ongoing process and that every effort counts towards maintaining the well-being of my nails and overall health.
Lasting Tones
The secret to strong, healthy nails doesn't lie in quick fixes or expensive supplements. It's about embracing a lifestyle that focuses on balanced nutrition, overall well-being, and sufficient sleep. In my experience, weak nails are often one of the first signs our bodies give when we're not providing them with enough nutrients and rest. By recognizing this early warning and taking action, we can ensure our nails remain strong and healthy, allowing us to continue producing beautiful tones. Keep in mind that it's always best to consult with a medical professional before making any major changes to your diet or lifestyle.

5+1 Things That Will Improve Your Classical Guitar Practising
In the first part of Things That Will Improve Your Classical Guitar Practising, I touched upon adopting new habits that can boost your efficiency. The second part elaborates on the importance of being mindful in your routine.
Time is of the essence.
Music is organised sound in time. As audiences, we experience a musical performance as it unfolds linearly; one moment leads to the next. We give meaning to the notes not only by what surrounds them and is heard concurrently but also what precedes and follows.

Listening to music is a highly complicated process. Although we are intuitively tuned to understand shifting emotional states conveyed by pitches and rhythms, a well-defined sense of beat is necessary as it seems to be conformity between musicians and listeners amongst all different cultures.
In other words, no matter how diligent was the composer when choosing the right notes and rhythms if the performer doesn't support them boldly; in that case, the music suffers.
When it comes to keeping time, the metronome is the best friend you ever had; it will never lie to you and will make sure that you respect time.

Use the metronome in your daily practice. Make sure that you understand the rhythms that the score presents to you. The key word here is understanding; solo performances don't always need to be metronomically precise. Perfect executions, metronomically speaking, depending on the style, can be uninteresting. But, if you don't learn to perceive rhythms accurately your audience will be left confused.
So, remember to keep a balance of practising with and without the metronome. Eventually, you'll need to learn how to let the phrases breath as well.
Stand on the shoulders of giants.
Sir Isaac Newton famously wrote in 1676 "If I have seen further it is by standing on the shoulders of Giants". Music might not be astronomy or mathematics, but the tradition is a well established one.
Through the aeons, teachers play the role of passing wisdom from generation to generation. And, in the age of information, books, forums, videos and blogs can give us additional insights into the music we pursue to master.
While we can take advantage of all those options simultaneously, with the danger of being overwhelmed, I would argue that nothing has more value than claiming the information ourselves. A century of recorded music gives us access the judgement, observations and vision of the great masters.

It is imperative to listen to music carefully, lots of it, various performers and interpretations. Analyse and criticise it; ask questions. Try to understand why they make the choices they do; what works, what doesn't and why. Make notes, then try to apply some of your findings to your playing.
Know thyself. Or at least try.
Psychological research suggests that we are not very good at evaluating ourselves accurately; we frequently overestimate our abilities. This is known as the Dunning-Kruger effect. The less we know, the more we think we understand; and musicians are no exception.
No matter how many times your teacher points out that your rhythm is way off, it's extremely hard to evaluate yourself objectively in real-time. Additionally, it is impossible to fix performance issues before you understand what these issues are. It is a process.
Thankfully, in our technological world, it is possible to shorten the gap between how well we think we play and how we do sound. To stare directly in the mirror and observe all our faults. We achieve that by recording our performances regularly and then listening critically. The emotional distance that is granted by becoming the audience allows us to review our playing slightly more objectively. And as we keep exercising this muscle of critical listening, we eventually learn to do it in real-time, at least to some extend.

And no, you don't need to set up a home studio, even a simple audio and video capture with your phone can have a similar effect. Admittingly, investing in some recording gear won't hurt; a pair of decent microphones and a good headphone.
A chat with the composer.

Most of the classical guitar repertoire was composed long before we were born, by composers that are not around anymore. But even for our contemporaries, we rarely have the chance to have a one on one chat about their works and intentions. In either case, they have grand us with something almost as good; the music score.
When you study a new piece of music, don't just read the notes. Study the harmonic implications, the motives, the rhythms. Break down the composition to its elements, see how they connect, ask what their purpose is. Try to understand what is their function in the micro and macro context.
Additionally, read the biography of the composer, learn about major influences, life and period. Be interested and get personal. This in-depth research is utterly inspiring and may lead to musical revelations.
Understand the notes.
"Music is a language", how many times you have heard or repeat that phrase? Well, I believe that most people don't truly understand what it means.
The most common reading of that phrase is that music can affect our feelings universally across all cultures, meaning that we can detect happiness and sadness even in unfamiliar music idioms. While that is not wrong, it doesn't even touch the surface of what makes music a fully grown language.

Pitch, tempo, rhythm, and dynamics convey shifting emotional states. In Western music, harmony gives us information about the hierarchy of pitches, their tendencies and their meanings. Even if we don't formally study music, we learn to intuitively understand these nuances by an early age with nursery rhymes, cartoon music, songs in family gatherings, etc. But, every culture has its music, and each has a language.
Study common practice harmony, study contemporary composition techniques, learn the peculiarities of different periods, learn the specifics of the culture that you come from, be interested in other traditions, and diverse musical genres. After you learn the basics, dive deep into things that got your attention, then study wide and repeat.
Be interested in the tradition; in consequence, your playing will become more engaging and individual.
Destination.
Guitar playing is one of those things that you cannot stay still; if you stop pushing forward, you roll backwards. It takes a lot of hard work and discipline only to keep one's technique, let alone advance. Although you can set goals for yourself, there is no real destination. The journey is the reward; Music is a lifetime pursuit after all. So, don't be anxious, don't rush, enjoy every step of the way.

6+1 Things That Will Improve Your Classical Guitar Practising

Playing the classical guitar can be utterly gratifying for professionals and amateurs alike; moulding unique sounds with our fingers and expressing our inner selves. Even more so, playing an instrument is a way to escape some of our everyday problems.
On the other hand, practising the classical guitar can often be frustrating; progress sometimes feels impossibly slow, and there are way too many things that need our full attention.
Adopting a new habit, or slightly shifting our mental state, can transform our practice sessions and boost our efficiency. Besides, a more enjoyable time with our instruments could only make us want to play more.
Here are a few of the things you can do to get the most out of your practice session.
Schedule your Practice Sessions

If you often postpone practising, finding yourself not having enough time for a full session. Try to organise your day better, instead of picking up your guitar every time you feel like it. Just like many other activities, set a specific time for practising, and make sure to show up on time. No excuses.
Don't Skip Days
If you can dedicate a couple of hours every day for your passion, it's excellent. But, don't skip practising for a day because you only have half an hour, thinking that it won't be enough. Decide on one thing, be it a difficult phrase or technique, you wish to conquer; gather all your concentration and dedicate your limited time on taming it.
Practice What you Can't Do - but Don't Reach Out for the Stars, yet.

I often see people with very little experience try to tackle a difficult concert piece. Usually, they try on their own for a couple of years, then frustration kicks in because they don't see any improvement, and they either quit or (hopefully) search for a teacher.
You should always practice material that is on the edge of what you can do, but not totally out of reach. Not too hard, not too easy. By building a well-balanced repertoire when the time is right, even difficult pieces will seem effortless.
Keep an Organised Space
There is no better way to lose time and kill concentration than having to search for that Bach score you wanted to work on, a metronome, a file for your nails, etc. Keep a tight and organised practice space with everything you need for the routine available at hands reach.
Do Not Disturb!

Speaking of concentration, put your phone in silent mode! You can achieve more in 30 minutes of full concentration, than in three hours full of distractions. Unless you are a surgeon, or your wife is pregnant, you can manage to stay off-line for an hour.
Don't Practice Through the Mistakes!
A common mistake that beginner guitarists do is to keep practising the same things, and usually by repeating the same mistakes, over and over again hoping that they might eventually improve.
What happens is that mistakes are being reinforced through repetition. Our muscles don't care if it sounds correct or not; if you repeat a movement a hundred times, that's what they'll learn. So, every time you make a mistake, stop right there and start again from the top.
If the mistake persists, work out the specific measures that need attention. Find out why your fingers want to play something different, practice slowly and correctly until you have it all down.
Slow. Down.

Playing classical guitar requires fine finger movements and coordination. Guess what, you cannot control those if you play at a relatively fast tempo. Work on your technique at a very slow tempo, one at which you can control all these fine movements to a great degree. Once you have the correct movement down, it's easy to increase speed.
Repeat - repeat - repeat
You managed to play that difficult Villa-Lobos part correct... once. You should celebrate!? Well, not so fast! If you cannot play it correct at least five times in a row, you probably haven't nailed that part yet, and chances are the when you'll have to perform the full score, the "wrong" version will creep into your performance. So, don't be satisfied with one correct repetition, and move on to the next part. Repeat as many times necessary until you can play it correctly every time!
Don't neglect to enjoy your sessions
I hope that some of these ideas will help you play this difficult piece you have been trying for some months, and hopefully make your practice a touch more satisfying.
Don't forget, no matter your level or your goals, be thankful for what you have achieved so far. Being able to play the classical guitar is a reward in itself.
Connecting Harmonies with Melodic Lines
An Intensive Journey to Demystifying the Fretboard - Part 6
If you haven’t read yet, make sure to check the previous segment of the series:
Part 5 - Voice Leading for Classical Guitar

Three-note voicings, like the triads, are a good starting point to work on polyphonic concepts for guitar as they are more comfortable to play and allow more freedom of movement than four-note voicings without losing any essential elements.
Hearing the Voices
The first step towards understanding polyphony is to be able to hear the voices individually and be able to create melodic lines on each one of them.
Singing is the most direct way that we experience sound as it involves the least amount of translation. Therefore it is the most efficient way to internalise sounds and understand all the different elements that create a musical experience. Even if you don't consider yourself a singer - I certainly don't think myself as one - try to sing as much as you can. Top melodies, inner voices, low voices, rhythms, everything!
Formulae
Start with a simple progression and add melodic lines independetly to the top, middle, and low voices.
Make sure that the melodies don't overlap with the other voices because:
Voices may lose their individuality.
Due to the nature of the guitar, it will probably mean that you will have to interrupt one of the other voices.
Writing Melodies
For this example, I will use the example from the lesson on voice leading. The combination of open and close voicings allows for greater flexibility of the melodic notes.

Adding a melodic line to the soprano is the obvious choice, as we are used and expect to hear music with the melody on the top voice.

To keep things simple, I only used diatonic notes with a constant eight-note value to connect the target tones. Target tones are all the important notes that are part of the harmonies at each instant, the rest of the notes are scale tones in the Key of G Major.
In a similar fashion, I created a melody for the bass.

The low part is almost as intuitive to play and hear as the top one.
Finaly, let’s hear a melody on the tenor/alto.

The middle voice is a little trickier, both in writing and in playing, as sometimes there is not enough space for an interesting melody and can easily disturb one of the outer voices. Nevertheless, adding a melody to the middle voice is equally satisfying and even more so rewarding.
Paying Attention
A couple of technical aspects that you need to be consious of when you are practising melodic lines on three voices:
Make sure that you let all the tones ring their actual values. As much as you can.
Make sure that you play the two harmonic voices a little softer to let the one with the melody stand out.
Playing all the voices and melodies individually a few times will assist you in understanding them better before you put the whole arrangement together.
Relishing Polyphony
If this is not enough for you, after practising all melodies individually, an extra step to stimulate the progression and elicit polyphony is to tweak the rhythms and combine melodic lines in all voices.

An Intensive Journey to Demystifying the Fretboard - Quick Access
Part 1 - Practising Scales with Creativity
Part 2 - Understanding Double Stops
Part 3 - Practising Triads & Inversions
Part 4 - Learning the Open Triads
Part 5 - Voice Leading for Classical Guitar
Part 6 - Connecting Harmonies with Melodic Lines

Voice Leading for Classical Guitar
An Intensive Journey to Demystifying the Fretboard - Part 5
If you haven’t read yet, make sure to check the previous segment of the series:
Part 4 - Learning the Open Triads

Voice leading is the linear movement of individual melodic lines or parts, their interaction leads to expressed harmonies. In other words, voice leading allows us to understand where voices want to go, by considering where they come from and what everybody else around is concurrently doing.
Smoothness and Indepenence
The primary interest in voice leading is to maximise smoothness and promote the independence of voices. These virtues of part-writing are satisfied when the voices move as little as possible and in different directions.
Considering these goals, we derive the following straight forward rules:
Common Note Principle; If two chords have a note in common, try to keep it in the same voice.
Contrary Motion; If not or for some reason you don’t want to keep it there, make sure that some of the voices move in different directions.
Make sure that you don’t cross voices - avoiding large jumps helps.

Three Baisc Voice Leading Rules
Agustin Barrios' Preludio Saudade from La Catedral is a perfect example of voice leading, by studying just a couple of measures, it completely demonstrates the application of these rules.

La Catedral - Preludio Saudade; Measures 10-11 and 19-20.
Diatonic Progressions
Let's examine the possible diatonic root progressions and their voice-leading options:
Chords that their roots are a fourth or a fifth apart have one common tone. Try to keep it in the same voice but if you don’t want, make sure that some of the voices move in different directions.
Chords that their roots are a third or a sixth apart have two tones in common. You can keep one or both at the same voices, or make voices move in opposite directions.
Chords with roots a second or seventh apart don’t have any notes in common, so your only option is to move all voices in different directions.

Voice Leading in Diatonic Progressions
These rules are mere guidelines and should never obstruct musical expression. Most great composers historically operate on the frontier of what is considered acceptable at any given time. It is the responsibility of the thoughtful composer though to understand, internalise and analyse the voice leading principles in part-writing in addition to important musical works.
Play and listen carefuly the following voice leading example, analyse the linear movement of the voices. Finaly, apply these simple rules to other progressions.
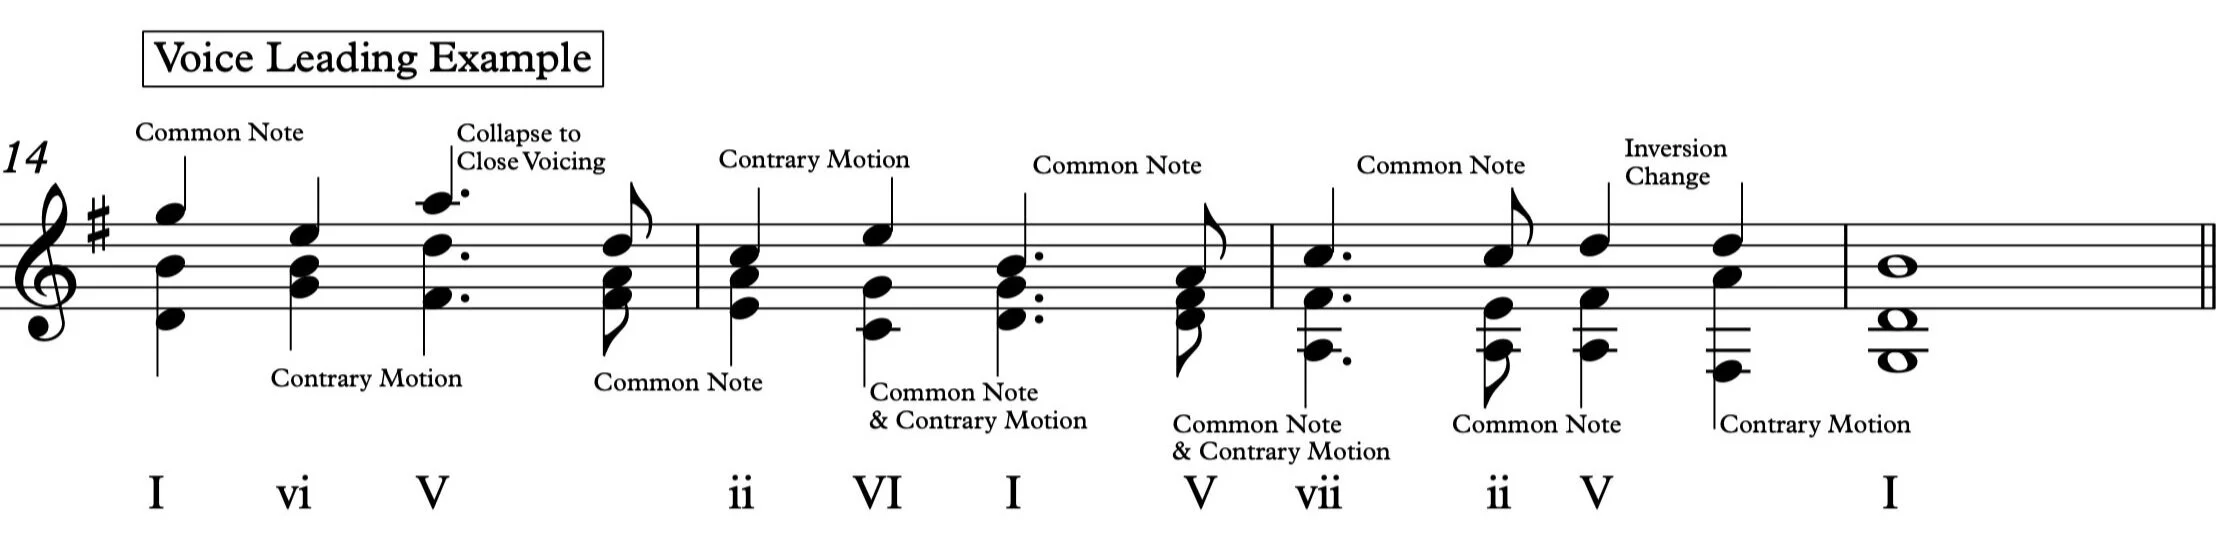
Voice Leading Example in a Diatonic Progression
Parallel Movement in Instrumental Writing
Parallel movement is generally avoided as it takes away the individuality of the voices, but in instrumental writing, it can be an effective device for underlining a melody with a greater sense of cohesiveness and density. Claude Debussy and Maurice Ravel, architects of the contemporary music, used parallel melodic harmonies extensively; but there are examples of parallel movement even in Bach.
In a contrapuntal context, parallel harmonies may provide contrast but should be only used sparingly.

An example of paraller movement can be found again in Agustin Barrios' La Catedral, in the second movement this time.
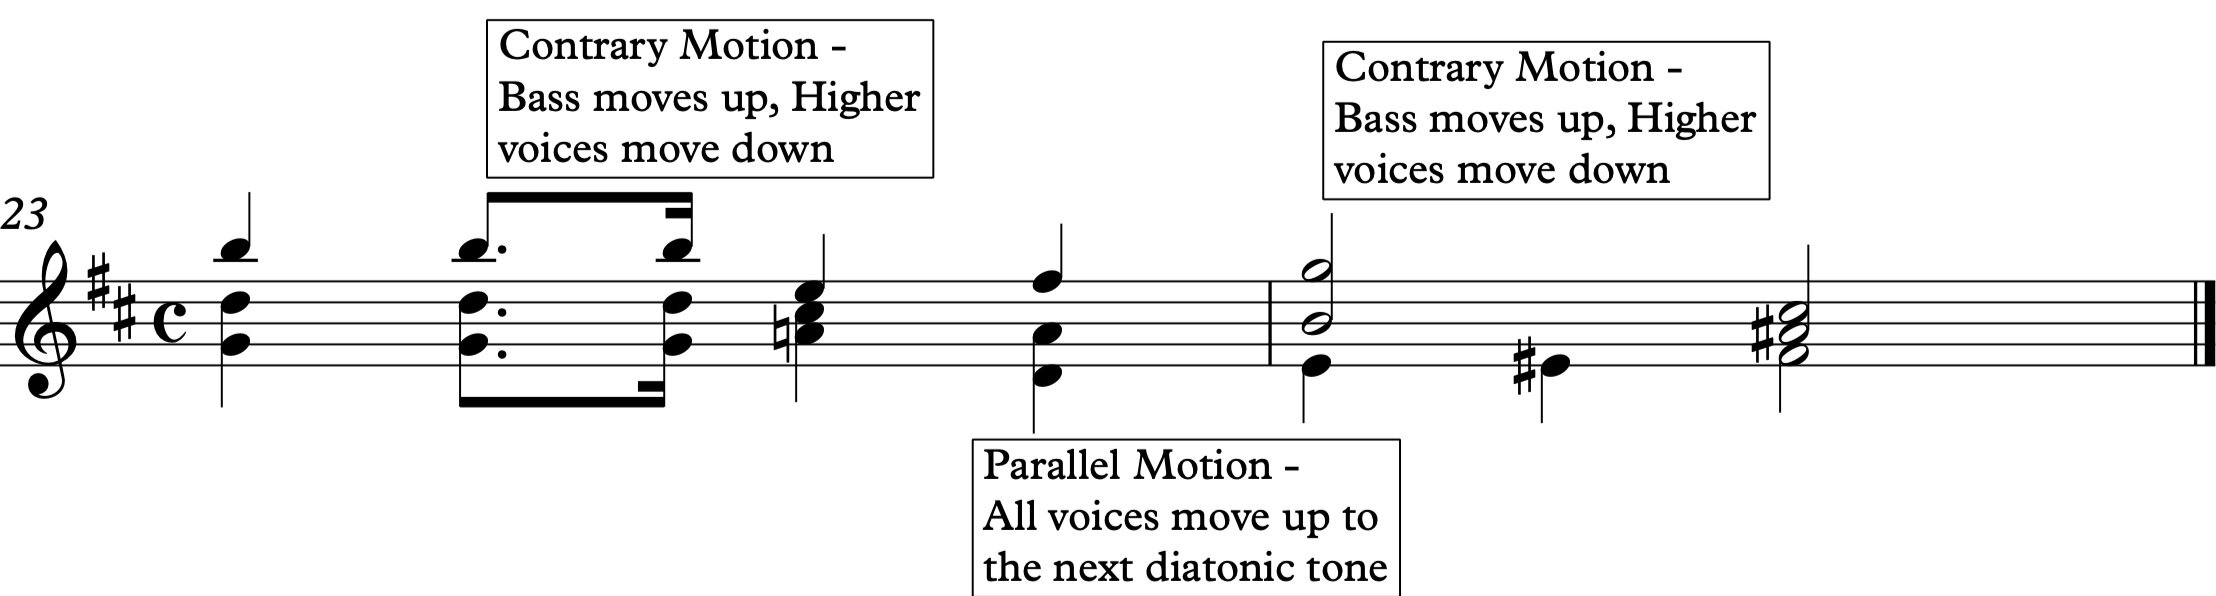
La Catedral - Andante religioso; Measures 3-4.
An Intensive Journey to Demystifying the Fretboard - Quick Access
Part 1 - Practising Scales with Creativity
Part 2 - Understanding Double Stops
Part 3 - Practising Triads & Inversions
Part 4 - Learning the Open Triads
Part 5 - Voice Leading for Classical Guitar
Part 6 - Connecting Harmonies with Melodic Lines

Learning the Open Triads
An Intensive Journey to Demystifying the Fretboard - Part 4
If you haven’t read yet, make sure to check the previous segment of the series:
Part 3 - Practising Triads & Inversions

Even a slight change in the arrangement of the notes can have a drastic impact on how we perceive their sound.
Creating Open Voicings
Open position triads are voicings of triads with an intervallic span greater than an octave; the most common way to achieve that is by raising or lowering the inner voice of a close triad by an octave. This allows for the evenest arrangement of the three voices.

G Triad in Root Positon - Close and Open Voicing
Open triads and open voicings, in general, are execllent devices because they let the individual voices sound more balanced and clearer.
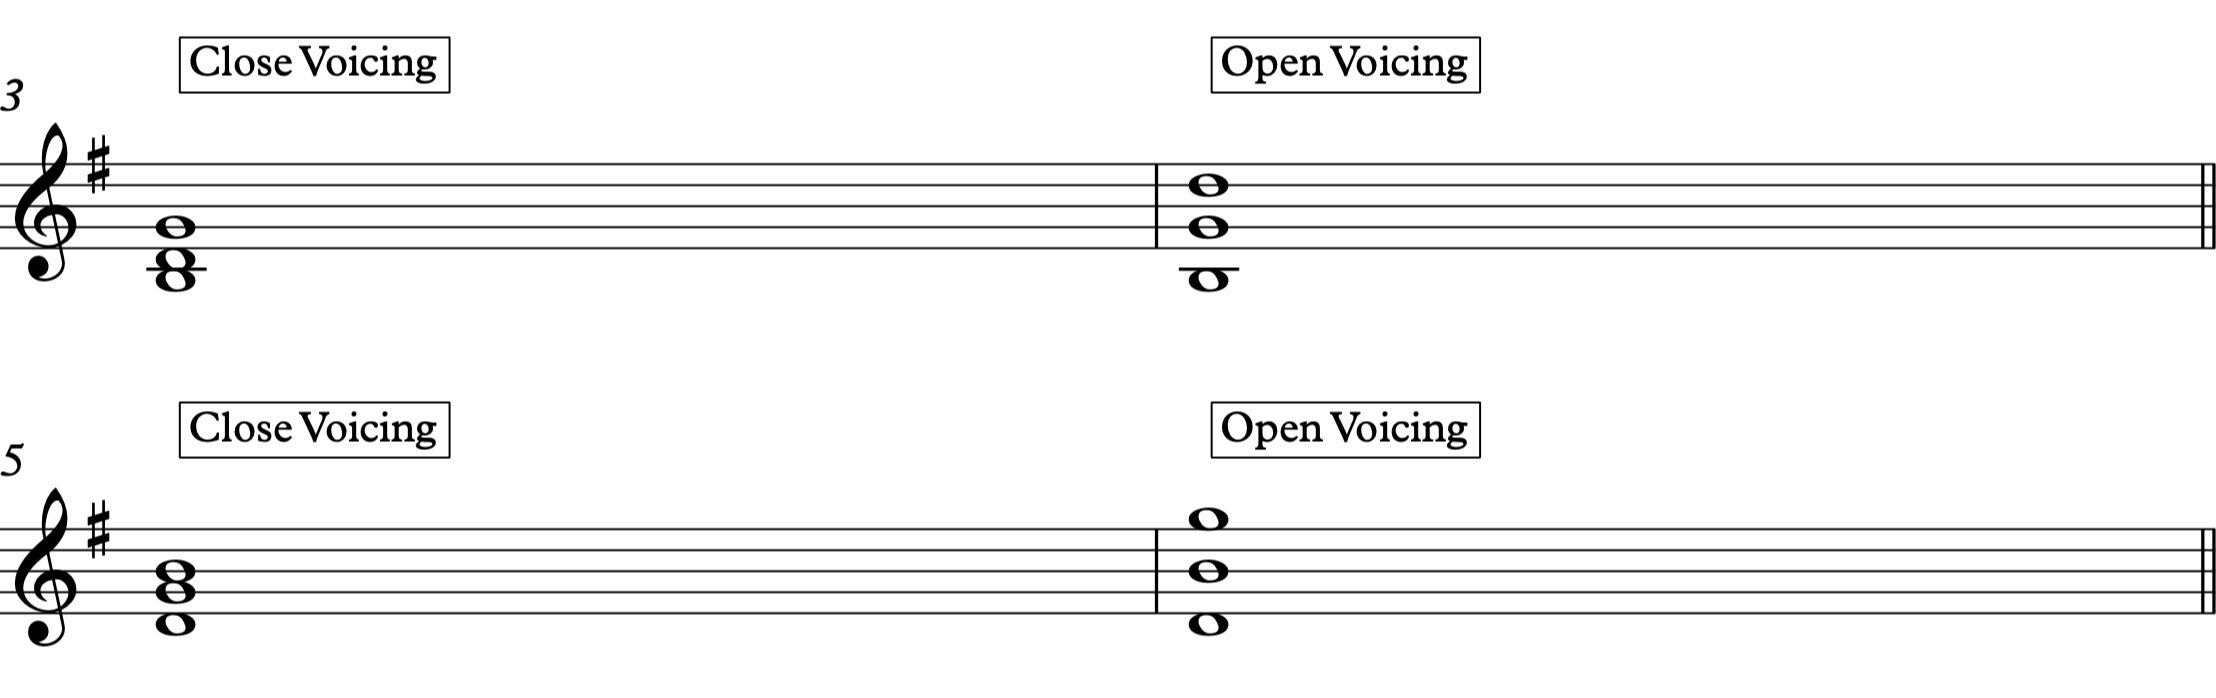
G Triad in First and Second Inversion - Close and Open Voicings
Diatonic Open Triads
Similarly to how we practised close position triads, we can arrange all open position triads in a diagonal array, covering a three-octave range.

G Major - Diatonic Open Triads in Three Octaves
Practising Open Triads in Pairs
Music carries in a forward motion, nothing stays still; this linear fashion informs our apprciation of a musical composition.
Remember, practising open triads in pairs is a useful exercise to undestand how harmonies connect as well as a way to force ourselves to practice more than one things at the same time.
For now, practice diatonic triads that their roots are:
A fourth/fifth apart - these have one note in common
A third/sixth apart - these have two notes in common
A second/seventh apart - these don’t have any notes in common

Practising Open Triads in Pairs
Practice the Open Triads and in the next lesson, we are going to put them to use.
An Intensive Journey to Demystifying the Fretboard - Quick Access
Part 1 - Practising Scales with Creativity
Part 2 - Understanding Double Stops
Part 3 - Practising Triads & Inversions
Part 4 - Learning the Open Triads
Part 5 - Voice Leading for Classical Guitar
Part 6 - Connecting Harmonies with Melodic Lines

30-minute Classical Guitar Warm-up Routine
The main reason for setting up and following a regular warming-up routine before each practice session is to you avoid muscle and tendon related injuries. A successful one will also assist in your technique development and allow you to increase your playing consistency.
Be careful not to overdo it though, you don't want to wear down your fingers before your session even begins. A common mistake among guitar students is to spend most of the practice time with technical exercises, neglecting polishing up repertoire.
By focusing on each exercise for only about 3-4 minutes, alternating hands and focus area, you can manage to tire your fingers just a little, while maintaining physical and mental stamina for the basic work-out.
Additionally, you want to work your fingers on a variety of techniques and movements, to ensure a balanced outcome, with the additional benefit of having worked and polished the basic - and most important - techniques that the classical guitar repertoire requires.
Before you begin, keep in your mind that, accuracy is extremely important. Therefore, practice at a slow and comfortable tempo, stay focused and pay attention to your tone production quality, and efficiency of movement.

ABS: Always Begin Slowly
Start with some of the basic Right-Hand attack techniques on a single string.

Although "im" is mostly used for scales and melodies, a fit “a” (RH) finger, as well as an agile “4” finger (LH), gives overall balance and control to the hand - therefore don’t skip on practising the “ma” variations.
Also, try different strings.
After a few minutes, it is time to let the RH hand rest and concentrate on the LH, slur exercises are very helpful. Pick a scale practice hammer-ons.

Keep all the fingers as close together to the fretboard as possible, and aim for a quick and accurate attack. Slurs are all about accuracy, strength is over-rated.
More RH picking exercises on a single string, this time triplets will guide us to practice sequential attacks with three fingers.

Triplet accenting slurs for the left hand. Make sure that the tone of all three notes is similar - pay attention especially to the pinky as it usually the weakest one.

Its time to introduce string crossings for the right hand, these will prepare your RH fingers for more realistic - real repertoire - requirements.

Practice descending slurs with pull-offs. I like to keep working on the same scale throughout the warm-up routine.

Tremolo is an elusive technique for many guitarists, perform these sequences, and emphasise the first finger to gain more control. Remember, repetition is the key to success.

Left-hand triplet descending slurs. Focus on the pull-offs, each note should have the same volume and tone.

We are all Drummers: when practising right-hand Patterns, like these arpeggio sequences, I usually mute the strings with my left hand, to better judge the accuracy of the individual hits.

Mixed slurs can be very rewarding, these are some examples but try to experiment with different one or two strings mixed-slur sequences.

Remember, none of these exercises is fully comprehensive, I could (and do) easily spend more than 30 mins just on each topic individually, but that's not the purpose here. So, if you have trouble with a specific technique/exercise or want to elaborate more, find a place to fit it into your regular practice routine.
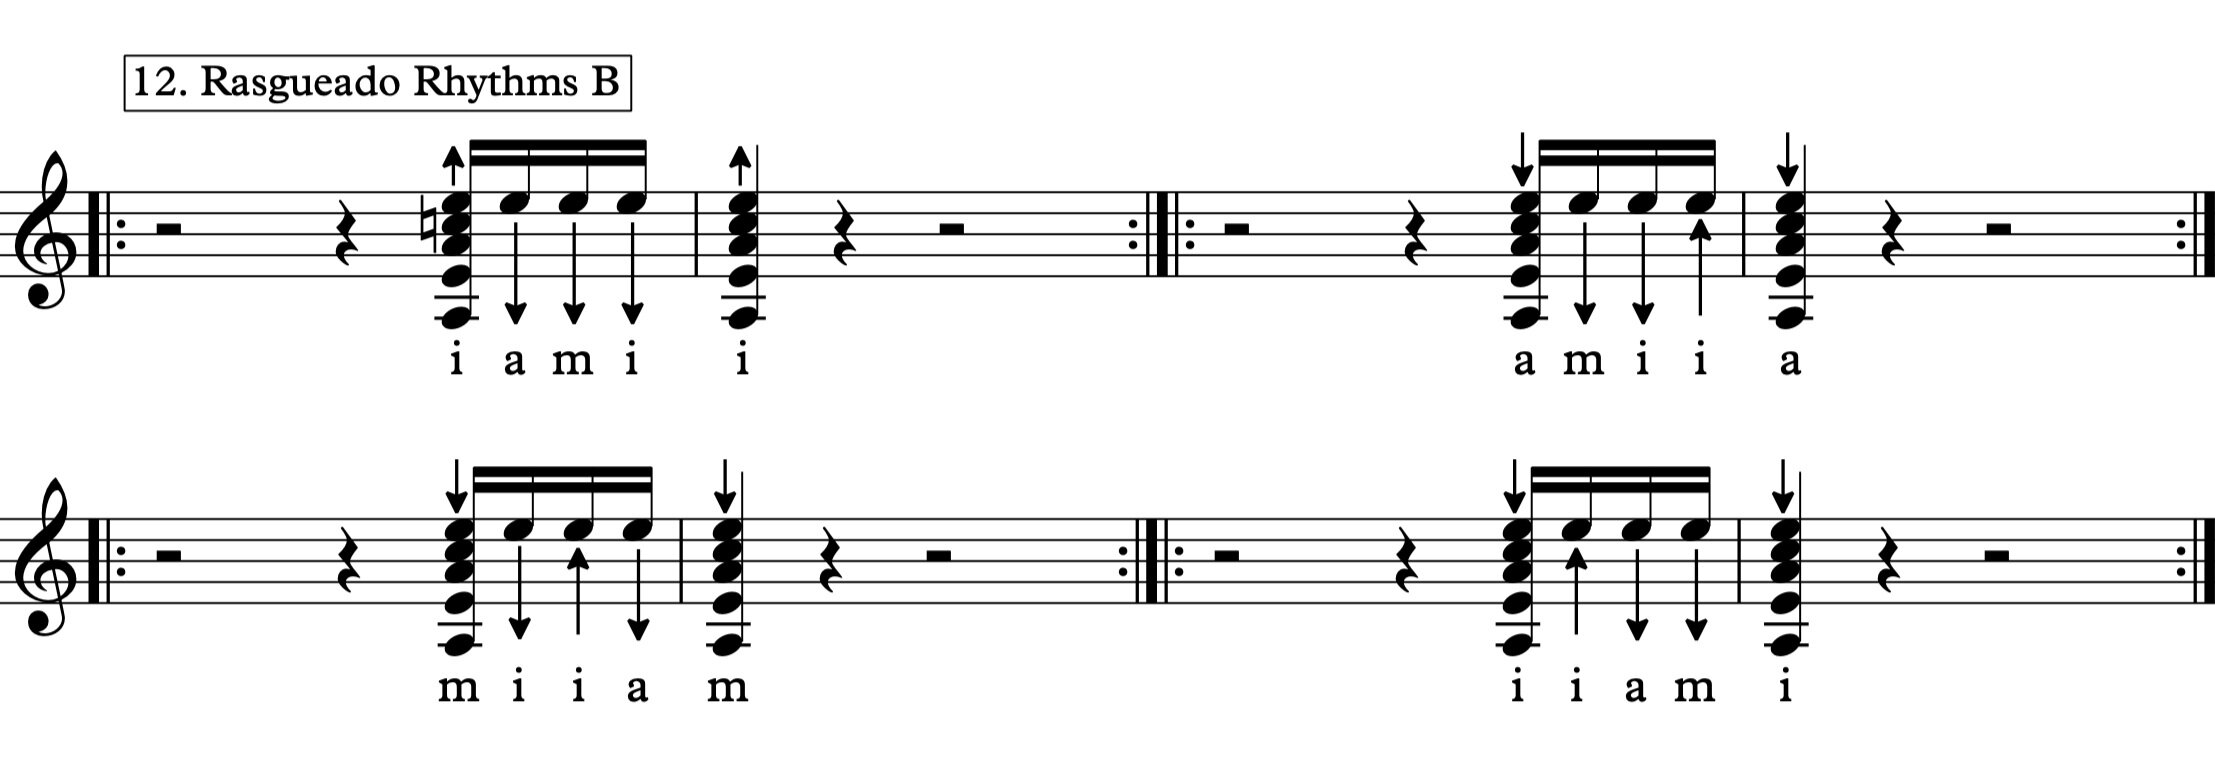
The Rasgueado exercises are useful even if you don't plan to play any flamenco, they give strength to your finger and flex them to the opposite direction for better balance.

Work on short bursts of speedy ascending lines, so that you can synchronise both hands and practice scale lines that might come up in your repertoire.

Four finger Rasgueados for more fun.
And lastly, short bursts of speedy descending lines. Push your tempo limits but don't forget that accuracy is the King.

Parting thoughts
As pointed earlier, tone production quality should always be a concern, as well the accuracy and efficiency of the movements. Try to stay focused throughout the warm-up and the rest of your session. Never practice without concentration, it leads to uninspiring performances. And don't practice without intention, because it leads to incoherent playing.
This routine might seem somewhat excessive, but the length of each repetition can be adjusted to realistically match your time. Some of the variations can be skipped, but try to cycle through all of them at decent intervals.
It is most essential to follow and repeat all the exercises a few days before a recording session or a concert, doing so, you will get to be at the top of your game.
Purposeful Practising
A Personal View on the Art of Practising the Classical Guitar
One of the most common issues that I encounter among intermediate and sometimes even advanced guitar students is that they don't know how to achieve the most with their practising. They usually try to memorise a piece, then play it from the top a few times, and move on to the next.
This approach is not what I consider purposeful practising, as it doesn't lead to the mastery of any of the aspects of performance. This epidermal handling of repertoire hinders the chances to unlock hidden details. In other words, you ought to become an expert!
Here are the steps I take when I'm learning a new piece.
The First Read

I usually read the whole piece once or twice, not only this helps to improve and maintain my sight-reading skills in the long run, it allows me to have a broader idea of what the piece is.
Finding Fingerings
After the first read, I make fixed and deliberate string and fingering choices, measure by measure and phrase by phrase. I evaluate the different options based on the character of each voice, the ability to connect with the previous and next phrases, and by ensuring finger independence at its maximum.
I take notice on published fingering suggestions, but I don't rely on them as I almost always have to change them.
Notes, Rhythms, and the Choreography of the Fingers
I go through every measure with a metronome to verify that all my notes and rhythms are correct, and make sure on the deliberate and purposeful movement of my fingers on the fretboard. I repeat the part I'm working on as many times as it is needed, establishing an exact finger choreography.
Confidence
Slow, deliberate practising and repetition are the devices that build performance confidence. What you want to avoid is to use the same tools to reinforce a faulty technique.
I practice at a comfortable tempo; from a couple of measures to a full section, and finally the whole piece. My objectives are clear tone and perfect delivery. When I make a mistake, I start over!
Building Speed

Practising with a metronome keeps us in time, and creates a reflection in our brains of what the piece is like, and how our fingers should be moving to achieve that. Therefore when it is time to start working on speed, I start at a very comfortable tempo and with small increments (around 4 to 6 BPM) I practice until the point that the piece starts to fall apart. I always push a little further than that, but at the last playthrough, I return to a comfortable tempo.
Interpretation
When notes and tempo are in place, it is time to work on phrasing and dynamics. An awfully important nuance of performance as it expands our capability for individual development, and the capacity to communicate deeper emotions with our music. Yet, it is probably the aspect of music that is the most difficult to teach, and often teachers and players don't contemplate.
Writing about phrasing and dynamics in music is like talking about a painting or a picture, but I can give you some of the processes that guide me to improve my interpretation skills.
First, I read about a specific epoch and learn as much as I can about the individual composer that I'm studying. It doesn't mean that I have to restrict myself to a clichéd way of performance; on the contrary, with a greater insight into what a piece is about, we become freer to make deliberate choices and shape or phrases.
An equally important step is that I try to listen to as many performances of this piece as I can find. I try to listen to all the small details that we generally don't pay so much attention and make notes. I ask questions, make notes. For music adapted from other instruments, I like to listen to performances on the original instrument.

The key-words here are to become informed, purposeful and conscious of all the choices you have to make to shape your interpretation.
Practising Performance
Practising and performing are two different concepts with distinct purposes. While I practice to learn how to move my fingers more accurately in an almost mechanical and unconscious motion, to minimise mistakes, and determine the minutiae, hoping eventually to become a master of a work. The focus in performance is to carry out in a focused manner the essence of a piece, have a concise and nuanced meaning, and not to allow small mistakes to destruct the cohesiveness of the piece.
After breaking up all the individual elements for better control of phrasing and dynamics, it is time a put it all together. In consequence, I conclude every practice session with an actual performance of the piece I'm learning.
I treat this final segment as a legitimate performance, one that takes place in front of an audience. If a mistake occurs, I attempt to minimise its significance. I don't stop, but I carry on until I play the whole piece - sometimes the whole programme that I decided to play. I record my practice performance for critique!
Revision
On my next practice session, I start working on the parts that were not executed well, try to understand the technical difficulties or problems that might cause that. I attack the parts in question and attempt to find solutions.
The Informal Recital

Even if you are not yet a performing guitarist, or might not even aspire to be one, I recommend that you give short informal recitals to your friends and family. Not only it is a fun way to spend a Sunday afternoon, but also nothing builds confidence in your skills more than the sound of warm applause.
Be mindful, play only the pieces that you can execute adequately; nobody wants to see you struggle with a difficult piece that is way out of your level (yet). Even if that means that your recital should only be 5 minutes long, eventually you will build on that. Lastly, don't forget to offer them a glass of wine or two before your recital.
Closing Thoughts
Practising any instrument requires a lot of time and effort, and the guitar is no exception. If you take action to make your practising more focused, purposeful and efficient; your playing with developing in a similar deliberate manner. One that leads to the immensely rewarding experience of masterfully playing the guitar.

Practising Triads & Inversions
An Intensive Journey to Demystifying the Fretboard - Part 3
If you haven’t read yet, make sure to check the previous segment of the series:
Part 2 - Understanding Double Stops
Triadic harmony is so profoundly embedded into the western culture that, even when played out of context, their sound is so powerful that our souls, minds and bodies still revert to their meanings.
Therefore, our next stop in the journey to the further demystification of the fretboard could not be anything but the Triads; regardless of how well you think you know them.
The Triad
A triad is a set of three notes that can be stacked vertically in thirds.

G Triads in Root Position.
Triad Inversions
When any note other than the root is in the lowest voice, the triad appears to be in inversion. Inversions of triads have distinct qualities and attributes.

G Triad Inversions
All Inversions
The first step is to learn the Triads and their Inversions in all positions across the different string-sets.

G Triad Inversions - All String Sets
The Diagonal Guitar
After getting comfortable with these, the next step is to practice the Triads in a diagonal array - starting on the lowest note available which is not always the root. This approach provides the most effective way to have the whole fretboard at your disposal at any time.

G Triad Inversions in a diagonal array.
Diagonal Diatonic Triads
Once you start feeling comfortable with the G major Triad, apply the same approach to all diatonic triads in the key of G major.

Practising Triads in Pairs
Triads are almost never found alone, they usually act in cooperation with other sonorities that precede and follow them. Much like all music anyway; we experience sound in time and we give meaning to it by appreciating how it unfolds.
Practising triads in pairs is a useful exercise to realise how harmonies connect as well as a way to force ourselves to practice more than one things at the same time.
For now, practice diatonic triads that their roots are:
A fourth/fifth apart - these have one note in common
A third/sixth apart - these have two notes in common
A second/seventh apart - these don’t have any notes in common

An Intensive Journey to Demystifying the Fretboard - Quick Access
Part 1 - Practising Scales with Creativity
Part 2 - Understanding Double Stops
Part 3 - Practising Triads & Inversions
Part 4 - Learning the Open Triads
Part 5 - Voice Leading for Classical Guitar
Part 6 - Connecting Harmonies with Melodic Lines

Understanding Double Stops
An Intensive Journey to Demystifying the Fretboard - Part 2
If you haven’t read yet, make sure to check the previous segment of the series:
Part 1 - Practising Scales with Creativity
I always find it fascinating how much colour we can squeeze out of combining just two notes together.
Traditionally, the most common use of the double stop is to add more weight and support to melodic lines. Therefore it’s our obligation to study them exhaustively since not only they can assist us with the further demystification of the fretboard but they are also quite useful compositional elements.
Within one octave can be found the intervals of the second, third and fourth as well as their inversions fifth, sixth and the seventh. It is very useful to think of these pairs of intervals as reflections on a mirror since their effects are similar and we deal mostly with how much space you leave between the voices.
The following happens when we invert the intervals:
Seconds become Sevenths and vice versa
Thirds become Sixths and vice versa
Fourths become Fifths and vice versa
Also:
Major intervals become Minor and vice versa
Diminished intervals become Augmented and vice versa
Perfect intervals remain Perfect
Bonus Info:
When Major or Perfect intervals become a half step larger are called Augmented
When Minor or Perfect intervals become a half step smaller is called Diminished
The diverse pool of emotions and colours that different intervals convey can be by a not so subtle margin subjective and therefore their uses differ across various cultures, centuries and genres of music.
It is generally accepted though that:
Thirds and a Sixths are consonant and colourful
Perfect Fourths and Fifths are tonally ambiguous
Seconds and Sevenths are dissonant and provide plentiful tension
Music with excessive use of dissonance can sometimes be alienating but contrarily music without tension and dissonance can quickly become boring and too convenient. A way to use dissonances in a more companionable tone is to hide dissonant intervals within a consonant texture so that they become less animating and dominant features of the overall music.

Things to do:
Explore all intervals in the same diagonal manner similar to the scales practising
Pause and try to think what each interval brings out to youCreate miniature works or improvise only with the use of double stops, why not restrict yourself to only one type of double stop
Find uses of double stops in the works of the composers you like and analyse them.
When practising intervals and double stop, my goal is to be able to recall any sound without much thinking and to be able to play anything, anytime and everywhere on the guitar!
After all, double stops are 66,6% triads.
An Intensive Journey to Demystifying the Fretboard - Quick Access
Part 1 - Practising Scales with Creativity
Part 2 - Understanding Double Stops
Part 3 - Practising Triads & Inversions
Part 4 - Learning the Open Triads
Part 5 - Voice Leading for Classical Guitar
Part 6 - Connecting Harmonies with Melodic Lines

Practising Scales with Creativity on a Classical Guitar
An Intensive Journey to Demystifying the Fretboard - Part 1
First Notes
Learning and practising all twelve (or twenty-four) scales is essential for any guitarist, as it is an efficient way of building technique and developing awareness. But, practising doesn't have to be a purely mechanical exercise.
My main objectives in the way that I approach the instrument are:
to be able to see all notes across the whole fretboard and how they relate,
to stop relying on fingerings as much as possible as they can easily become a prison the more one relies on them,
be able to sing or hear a melody and play it without much fuzz.
Practicing with Games

What I found useful was to treat practising as distinct small games that have different rules.
Some examples of different games:
Starting on the lowest note of the scale, play four notes per string up to the highest
Do the same with starting on the next note - that will create a different path to follow, so that will make it impossible to start memorising fingerings
Do the same by using only one finger on the left hand - again it works against memorising patterns
Start on a different but higher position and play two notes per string - that will lead to a different kind of diagonal path
Play only specific intervals - like only 3rds or specific up-down combinations
Exploring the fretboard
Additionally, a different type of game is what I would call Explorative Improvisation, where I thoughtfully improvise with a specific objective.
Here are some rules:
You are only allowed to use the notes of a specific scale
You can put range restrictions as well
Every time you play anything that is something, stop and analyse it, invert it, play it in different ranges and areas of the fretboard
If you feel that you are stuck in a rut - playing the same things, again and again, restrict yourself to a part of the fretboard that you are not as familiar
Allow yourself to make melodies only with using a specific or combination of intervals - what if you could only play 4ths and 5ths
Bonus game: Take a melody or a song that you know quite well and play it in a different tonality and/or register - play it by ear or by analysing the intervallic structure of the melody - do not just move a familiar fingering pattern in a different position! Depending on your level, folk songs to Bach’s cello suites can provide a very fun game!
Remember, practice as slow or fast as you need to make it sound right!
An Intensive Journey to Demystifying the Fretboard - Quick Access
Part 1 - Practising Scales with Creativity
Part 2 - Understanding Double Stops
Part 3 - Practising Triads & Inversions
Part 4 - Learning the Open Triads
Part 5 - Voice Leading for Classical Guitar
Part 6 - Connecting Harmonies with Melodic Lines