
5+1 Gear Pitfalls to Avoid as a New Music Producer
Embarking on the journey of music production can be both exhilarating and daunting. With so much equipment, advice, marketing campaigns, and internet forums, it's easy to feel overwhelmed. These sources often make it seem like your recordings are worthless unless you're using the highest-end gear possible. These are mistakes we all make when we start (at least some of them), but it's not difficult to avoid them if you approach things with the right mindset. Here are some key points to help you navigate your early days as a music producer.
Stay tuned for Part II, where I'll cover practical tips on room acoustics, maintaining motivation, and more.

Navigating the complex world of music production starts with a clear path and the right mindset.
1. Don't invest in expensive gear right away
There are many budget options that will get you started with recording and help you gain valuable experience. As you progress, you'll start to realize what works for you and what doesn't, allowing you to solidify your preferences. Jumping into high-end gear too soon can turn into a very costly adventure.
2. Don't sidegrade
Unless you're exploring different possibilities with polar patterns and microphone techniques, or the gear you have is completely wrong for the sound you're after, avoid sidegrading. It's wiser to wait until you can upgrade to higher-end gear that will produce better recordings and serve you for many years.
When I first got started, I bought a budget 2-mic input interface. Later, I "upgraded" to several other interfaces with similar characteristics, each promising a more pristine sound. Maybe on paper they were better, but in real life, I wasn’t getting any better results. My microphone and production technique, as well as my room acoustics, were not up to par. It was a costly lesson that taught me the importance of improving my skills and setup environment rather than constantly sidegrading gear.
When you know what you need, buy the best equipment you can afford and stick with it for a long time.
3. Don't overcomplicate things

A cluttered setup can hinder creativity and productivity. Keep it simple and focus on the essentials.
A simple pair of cardioid microphones into a decent audio interface will allow you to apply the basic microphone techniques. Starting with a straightforward setup helps you focus on mastering the fundamentals of recording and mixing, without getting bogged down by technical complexities. As you gain confidence and experience in your production skills, you can gradually explore more elaborate setups, as adding more equipment and experimenting with advanced techniques will make more sense once you have a solid understanding of the basics and a clear vision of the sound you want to achieve.
4. Don't postpone your recording sessions until you can afford the next gadget
This is a never-ending process. There will always be a new piece of gear or software that seems essential, but waiting for the perfect setup can hinder your progress and creativity. Cover the basics (mics, audio interface, cables/stands, monitors/headphones) and start making music today! The experience you gain from actual recording sessions is invaluable and will teach you more about your needs and preferences than any amount of research or waiting. Plus, working within limitations often fosters creativity, pushing you to find innovative solutions and develop a unique sound.
5. Don't fall for the hype trap

Avoid getting caught up in the hype. The newest gear isn't always necessary for producing great music.
The gear market is constantly evolving, with new products being released all the time. It's easy to get caught up in the hype of the latest equipment, as well as the allure of vintage gear that promises a unique sound. However, the newest gear isn't always necessary for producing great music, and while vintage gear can have its charm, it is not essential.
When I first started, after getting my first decent pair of microphones, I fell into the hype of tube preamps. I bought a budget preamp, but as you might guess, budget and quality in tube preamps don’t go hand in hand. The results were subpar. I sold it and searched for a better-specced one, which was quite expensive. Still, I was not happy with the results. I found the coloration almost unnoticeable at low levels and completely undesirable at high levels for my taste and uses. There was also more apparent noise at any level than even my onboard interface preamps. Eventually, I learned that I could achieve the results I was after with solid-state preamps, but it was a costly lesson.
Focus on learning and maximizing the potential of the gear you already have before considering an upgrade. Remember, great music comes from skill and creativity, not just from high-end or vintage equipment.
Bonus - Don't get a loan to finance an expensive gear purchase
Taking out a loan to finance expensive gear might seem like a way to get ahead, but it's a terrible idea. You risk ending up in debt without any guarantee of earning more from your music. It won't really matter if your first recordings are done with Neumann microphones and Grace preamps. There are budget alternatives that can give excellent results for the price and allow you to put your music out there without the financial strain. Focus on building your skills and portfolio first; the high-end gear can come later when it's truly needed and affordable.
Conclusion
Remember, while good equipment can enhance your recordings, the true essence of music production lies in creativity and skill. Starting out with the right mindset and a focus on essentials will help you build a strong foundation. What you have is probably enough. Focus on developing your abilities and understanding your tools. Build your way up, making each step count.
What do you think about the points I'm making? Do you have any experiences or tips you'd like to share? Leave a comment below and let's discuss! And don't forget to check out Part II for more practical tips on room acoustics, staying motivated, and more.

A Comprehensive Guide to Gain Staging, Recording, Mixing, and Mastering Levels for Classical Guitarists, Part II
Part II - Mixing & Mastering Levels
Embarking on the musical voyage of recording classical guitar involves numerous steps, each with its own significance. We've previously explored gain staging and setting recording levels - fundamental processes that lay the groundwork for a pristine, high-quality recording. Our focus now turns to two intricate yet essential aspects: setting the mixing and mastering levels correctly.
The mixing phase is where we ensure each microphone used in capturing the performance is balanced and clear, contributing to a rich and harmonious soundstage. Following this, we dive into mastering - the final step that optimizes the recording's levels and tonal balance for various playback systems and streaming platforms.
In Part II of this series, we'll delve deep into the processes of mixing and mastering levels, providing insights to help you polish your classical guitar recordings to their fullest potential.
Mixing Levels
In the mixing stage, we blend and balance the individual elements of our recording. This stage is critical in ensuring the complete richness of the guitar is captured, with no aspect dominating the others. This balancing act becomes especially crucial when recording classical guitar, where we often employ multiple microphones to capture a comprehensive sonic image of the instrument.
Balancing the Multiple Microphones
During my recording sessions, I often employ multiple microphones, each positioned at different locations to capture a broad spectrum of the guitar's tonality. Each microphone contributes a unique facet to the overall sound, and blending these distinctive 'voices' is key to creating a robust and rich recording.
When using the AB Stereo technique, I often process both microphones together, maintaining the natural balance they create. However, it's not uncommon that I might apply additional EQ or other treatments to each microphone separately, if there is a problem that stands out.

M/S Stereo with Neumann TLM 193 & 170, each microphone gets different treatment
For more complex microphone arrays, I apply thorough care to each microphone, treating each channel individually. This might involve applying EQ adjustments or other processing to each track separately, to ensure they blend harmoniously together. For a classical guitar, I aim for a mix level of around -18 dBFS, with peaks no higher than -6 dBFS.
It's crucial to monitor each channel's levels, ensuring that none are too loud or overdriven. This helps prevent potential distortion and maintains the integrity of the recording, leading to a balanced and natural-sounding result.
Using Reference Tracks to Maintain Perspective
Working extensively on my mixes sometimes makes me overly familiar with the material, leading to a potential loss of objectivity. To counter this, I utilize reference tracks. These are, essentially, sonic benchmarks that guide me in crafting the depth, presence, and dynamic contrast of my guitar recordings. My advice is to make a list of your favourite-sounding classical guitar recordings and occasionally compare them to your mix.
While the aim is not to mimic these references, juxtaposing my mix with these standards helps regain perspective and fosters fresh insights. This practice ensures that my recordings can confidently stand alongside commercially produced tracks, adding an invaluable layer of quality control to the mixing process.
Preserving the Dynamics: Taming Peaks Without Sacrificing Expressiveness
Classical guitar draws much of its expressive power from subtle variations in loudness and intensity. To honour this characteristic, I strive to preserve the instrument's natural dynamic range as much as possible in my mixes, generally avoiding the use of compression, which can flatten these dynamics and yield an unnatural sound.
In some cases, however, a track may have rogue peaks that cause distortion. To prevent this, I turn to a limiter, specifically the FabFilter Pro-L2. This limiter tactfully reins in these peaks, maintaining the overall dynamic shape of the performance without introducing the potential adverse effects of compression.

High-quality studio monitors for accurate listening
There are exceptions, of course. If I'm faced with a subpar recording that needs salvaging, or if the classical guitar is part of an ensemble mix, I might cautiously introduce compression to help the guitar find its place among the other instruments. But for solo classical guitar recordings, my preference is always to allow the instrument's natural dynamics breath. The true beauty of the classical guitar, after all, resides in its subtleties and nuances.
Mastering Levels: The Final Adjustments to Your Classical Guitar Recording
Mastering is the last but certainly not the least important stage in music production. It's in this phase that we delicately adjust the overall levels and tonal balance of the mix, making sure it's polished and cohesive for listeners. In classical guitar recordings, mastering's primary goals are to ensure that the recording sounds its best across various playback systems and to prepare it for distribution on streaming platforms. While mastering doesn't drastically transform the recording, it refines it, solidifying its sonic integrity and ensuring it's ready for the world to hear.
Deciphering LUFS for Consistent Perceived Loudness
A significant aspect of mastering is understanding and correctly using LUFS, or Loudness Units relative to Full Scale. Unlike Peak or RMS levels, which measure the absolute values of audio signals, LUFS take into account the human perception of loudness. In other words, they measure loudness as our ears perceive it.
This is based on the fact that human hearing is frequency-dependent. We are more sensitive to some frequencies compared to others, especially in the mid-range. LUFS measurements integrate these psychoacoustic principles, providing a more accurate measure of perceived loudness. This ensures recorded music retains its intended impact, regardless of the playback scenario, providing consistency across different platforms and distribution methods.

Youlean Loudness Meter is an essential tool
A reliable loudness meter is a vital tool for effective mastering. My choice is the Youlean Loudness Meter, a free tool that's become an invaluable asset in my mastering toolkit as it provides accurate LUFS measurements, peak levels, and true peak readings, all crucial for mastering.
The Youlean Loudness Meter also gives us the ability to monitor the loudness over time, providing a clear, visual representation of the dynamic range throughout our recording. This information is crucial when making adjustments during mastering.
Aiming for Optimal Loudness
Mastering is not about winning a loudness war. Instead, it's about achieving a comfortable and consistent listening level that provides an enjoyable experience across various listening scenarios. I typically aim for a loudness level of -14 LUFS. In addition, I ensure that my recordings remain below -1dB True Peak. This practice avoids potential clipping and distortion, preserving the natural dynamics and integrity of the recording.
Striking the Right Tone, One Level at a Time
The journey towards a professional-sounding classical guitar recording is a meticulous one. It calls for a keen eye (and ear) at every stage of the process, from capturing a clean signal, through balancing your recording and mixing levels, to the final act of polishing your track through mastering.
But it not just about mastering the technicalities. It's a delicate dance between the science of sound and the artistry of music. We're not simply chasing perfect readings on a meter. Our true pursuit is to transpose the nuances, emotions, and soul of the performance into a recording that touches the heart of the listener.

A Comprehensive Guide to Gain Staging, Recording, Mixing, and Mastering Levels for Classical Guitarists
Part I - Gain Staging & Recording Recording
As we, classical guitarists, have ventured into the world of recording, we've faced the intriguing challenge of capturing our instrument's perfect sound. After meticulously learning about different microphones, mastering the art of microphone arrays, and optimizing our room for the ideal recording tone, we often feel ready to immortalize our masterpiece. Yet, beneath this readiness lies a vast universe of elements that we need to fine-tune to achieve an optimal recording. Among these, understanding gain staging, recording levels, mixing, and mastering levels is crucial.
While there's a plethora of information available on the internet, it can often feel like trying to find our way through an intricate maze, riddled with confusing technical jargon and conflicting advice. In light of this, I've decided to consolidate my personal insights, specific tips, and favorite tools into this comprehensive guide. My aim is to shed some light on these crucial aspects and assist you in capturing and polishing your classical guitar recordings to perfection.
dB Trivia
But first, we have to familiarize ourselves with decibels or dB. These logarithmic units are used to measure the intensity of audio signals. The world of digital audio can be treacherous if you're not careful - one misstep could lead to clipping or distortion, which occurs when the audio signal exceeds 0 dBFS (decibels relative to full scale). Attention to detail is pivotal.
Recording Levels & Gain Staging: Laying the Foundation for a Great Recording

The journey to a great recording begins with understanding gain staging. Gain staging is a process that ensures a clean, distortion-free recording while leaving enough breathing room for further processing during post-production. This involves setting optimal levels of audio signals at each stage of your recording chain. In the context of home studios, this often involves just your instrument, an audio interface, and perhaps some ITB (In The Box) processing.
However, even in this simplified chain, ensuring good gain staging remains crucial. This starts with the sound of your instrument in the room. You'll need to ensure your guitar's sound is clear, resonant, and free from any unwanted noise or interference. Careful placement of the microphones is also key.
Each microphone and each placement will give a different color and character to your recording. When setting up my microphones, I experiment with different placements and distances. Finding the sweet spot is an art - it should capture the guitar's natural tone while minimizing room noise. Adjusting the distance and angle of your microphones can help control not only the tone but also the levels: too close and the sound might be overly loud or boomy; too far and the signal could be weak, leading to a noise-prone recording when amplified. Have a look at my Stereo Microphone Techniques for the Classical Guitar guide..
The next step in the chain is the audio interface. This is where the acoustic energy, the sound waves your guitar produces and your microphones capture, are converted into digital signals your computer can understand.
Your audio interface typically has preamps which amplify the microphone's signal to a level suitable for the Analog to Digital Converter (ADC). The gain knob on your interface controls this amplification. It's crucial to find the right balance here: a signal that's too weak may introduce noise when you try to increase the volume later, while a signal that's too strong risks clipping, distorting your guitar's natural sound.

Once gain staging is properly set, the next crucial part of the process is managing your recording levels. Recording levels refer to the strength or amplitude of the audio signals being recorded in your DAW. In other words, it’s about how loud the recorded audio will be.
For classical guitar, I aim for an average level (or RMS level) around -18 dBFS to -12 dBFS, with peaks not exceeding -6 dBFS. This ensures a healthy signal level without risking distortion or clipping. These values might not mean much if you're just starting out, but understanding them and using a metering tool to monitor your levels will make a big difference in the quality of your recordings.
For those of you who, like me, prefer to use an external preamp along with a separate ADC, the gain staging process involves an additional step but the principle remains the same. Using an external preamp like the AEA TRP2 or SPL Crescendo duo, allows for even more control over the tonal characteristics and the level of the signal coming from your microphones.
Once the signal is conditioned by the preamp, it then goes into a separate ADC, such as the RME ADI-2 Pro FS in my case, which converts the analog signal into digital. Adjusting the input level on the ADC is equally crucial as on the audio interface's preamp for those who use an integrated solution. The goal is the same - ensuring a healthy signal level without risking distortion or clipping, which for me is around -18 dBFS to -12 dBFS RMS, with peaks not exceeding -6 dBFS.
This might seem like an extra layer of complexity, but in my experience, the flexibility and control provided by separate high-quality preamps and ADCs can lead to even better results, and it's worth considering if you're serious about recording.
To sum up, good gain staging for a classical guitar recording involves capturing a clean signal from your guitar, through the air, into your microphones, then into your audio interface, and finally into your DAW. Each step requires careful attention, but with practice and patience, the results can be immensely rewarding.
Additional Tips for Optimal Gain Staging:

I mainly use Vovox Sonorous and Sommer Epilogue cables for a peace of mind
Starting with a Clean Signal: The quest for the perfect recording begins long before hitting the record button. I ensure that my guitar is properly set up and my strings are in good condition to minimize extraneous noise and to allow for effecient dynamics.
High-Quality Cables: Cables can often be overlooked, but they are a critical part of the signal chain. Investing in high-quality cables can prevent unwanted noise and interference in the signal.
Room Acoustics: The room's acoustics can impact the recording significantly. A quiet and sonically balanced room can help ensure a clean, high-quality recording.
Monitoring the Signal Chain: Vigilance is key throughout the recording process. By continuously monitoring the levels throughout my recording chain, I can prevent unexpected overloads or distortions and ensure the best quality recording.
Using Metering Tools for Precision
Youlean Loudness Meter is an essential tool
For those of us who want to be precise with our levels, I highly recommend using metering tools. One of my favorite tools is the Youlean Loudness Meter. This handy software allows me to monitor not only the loudness of my recording but also the dynamic range. The free version is good enough for most cases, and you can support the developers by purchasing the pro version which provides some additional features.
Maintaining Dynamic Control
Classical guitar's essence lies in its subtleties and nuances. Dynamics - the interplay between the quietest and loudest notes, crescendos, decrescendos - bring the music to life, allowing your listeners to connect more deeply.
When setting my recording levels, I always leave ample headroom for these dynamics, striking a balance so that the louder sections don't cause distortion or clipping and the quieter parts remain clear and noise-free. Remember, amplifying a quiet, clean recording is always preferable to fixing a loud, distorted one.
Additionally, transient details - quick, high-energy moments - require careful attention to avoid distortion or getting lost in the mix. Proper recording levels ensure these moments are accurately captured, adding to the richness of the final recording.
Striking the Right Tone
In conclusion, understanding and managing recording levels, along with proper gain staging, can make a significant difference in capturing a perfect performance. It can be the difference between a recording that sounds amateur and one that stands up to professional scrutiny. With careful attention to detail, patience, and practice, you'll be on your way to making recordings that you can be proud of.
Stay tuned for Part II of this series, where we'll dive deeper into the realm of audio recording as we explore the importance of levels in the post-production stages - mixing and mastering. This is where your carefully recorded tracks are polished into a cohesive, balanced, and compelling final product. Until then, happy recording!
Crafting Your Sound: Shaping Classical Guitar Recordings with EQ
Part I - High-pass, Low-Pass Filtering and Shelving EQ
Many guitarists - and I plead guilty - spend a lot of money on new equipment to improve the sound of their recordings. I'm not suggesting that decent equipment isn't helpful, but the truth is that it's certainly easier to buy new stuff than to learn how to make the most of what you already have. In this article, I'm going to focus on a cheaper and more effective way to improve the sound of your classical guitar recordings: EQ.
Equalization is a powerful tool that allows you to boost or cut specific frequencies in your recording, which can drastically change its overall tone and character. Mastering EQ can help you create recordings that bring out the unique qualities of your guitar and playing technique. Instead of constantly buying new equipment, invest in experiences that enrich your musical journey, such as attending concerts or workshops.
Disclaimer: No two Classical Guitars are the same
One of the beautiful things about classical guitars is that each instrument has a unique voice. No two classical guitars are the same, therefore it's essential to choose an instrument that complements your playing style and taste. Besides, different genres require distinct guitars to sound authentic. Take the time to experiment with a diverse range of guitars and find the one that feels and sounds right for you, as, without doubt, it will have the most significant impact on the final result of your recordings - after the guitarist. Likewise, every recording space is unique. Your room will impose its character on the recording, so before even pressing the record button, make sure that your guitar sounds the way you want in your room.

Disclaimer: No one-size-fits-all
While it's helpful to learn from other guitarists and recordings, it's unlikely that you'll get the same results by blindly copying EQ settings or microphone techniques. Instead, it's crucial to develop the ability to identify what EQ is doing to the sound and use that knowledge to shape the recording to your liking. This means listening closely, experimenting, and learning to trust your ears. As you become more familiar with how different frequencies interact, you'll be better equipped to make informed EQ decisions that complement your music.
Also, take a look at the Best Studio Monitors for Classical Guitar guide, as they are essential to make reliable decisions regarding EQ.
Everything should work in tandem
Having a clear artistic vision is essential when using EQ. For example, if you're aiming for an intimate sound, you'll want to choose a microphone placement and EQ settings that complement each other to create a warm and cosy tone. In this case, you may want to experiment with mic placement options that bring the microphones closer to the guitar and EQ settings that emphasize the low-mid and mid-range frequencies. Microphone choice is also critical, as overly analytical microphones or ones designed for free-field use would capture too much detail.
On the other hand, if you're going for a concert hall experience, you'll want to experiment with microphone placement and EQ that gives the audience perspective and create a sense of space and depth. In this instance, you may want to use a pair of microphones further away or employ multiple microphones to capture different aspects of the guitar's response. Then, use complimentary EQ to shape the sound as though your guitar was captured in a larger space.
To get some inspiration take a look at the Three-Microphone Setup for Recording the Classical Guitar.
Using High- and Low-Pass Filters

High-pass and low-pass filters should be the first things you apply, even before you make any other decision on how you want to EQ your recording. Ideally, if your preamp or microphone has a high-pass filter, you should engage it. A gentle roll-off of low and high frequencies will remove unwanted sounds and give you a cleaner recording. Additionally, you will be able to make more informed EQ decisions. In some occasions, no further equalisation is necessary to achieve a well-balanced recording.
For classical guitar, I always start with a mild high-pass filter at about 60Hz (-6dB/Oct) and a low-pass filter at about 18KHz (-6dB/Oct), and then I work from that. You may need to apply sharper high-pass filter settings if your room isn't as quiet and noises such as street rumble creep into your recording. You could either adjust your settings to a higher frequency, use a -12dB/Oct slope, or try both). Similarly, to eliminate some of the finger-moving sounds or chair squeaks, you might need to set a lower low-pass frequency and a sharper slope.
Make sure to find a balance between removing unwanted frequencies and preserving the natural character of the recording. Overuse of these filters can lead to an unnatural, thin sound.
Shelving EQ

Shelving EQ allows us to adjust the amplitude of all frequencies above or below a certain point and is another extremely effective tool in our EQ toolkit. It can be useful for creating a more balanced sound or giving a subtle shape to the recording.
For example, if you find that the low end of your recording is overpowering, you can use a low-shelf filter to reduce the amplitude of all frequencies below a certain cutoff point (usually around 200-250Hz) a couple of dB. Thus, effectively reducing low-end boominess. Conversely, if your recording sounds somewhat thin, a low-shelf filter boost of a couple of dB at around 125Hz should rectify that.
Furthermore, if your recording sounds too bright or harsh, you can cut frequencies above about 3.5 kHz by a few dB with a high-shelf filter. Or boost all frequencies above 8-10Khz if the recording lucks brilliance and air. Be especially careful when boosting high frequencies, because they can expose the poor sound of your room or your playing.
Tip - And while most guitarists don't really like boosing the high-end as this might emphasize mechanical sounds, I find that a subtle boost of frequencies above 2,5KHz in combination with a bit more potent cut of frequencies below 250Hz, under the right circumstances, result in a very classy sound. Provided the recording isn't too sharp or harsh and the playing is short of non-musical sounds.
My Secret Weapon: The FabFilter Pro-Q3
One of my favourite plugins for classical guitar recordings is the FabFilter Pro-Q3. Admittedly, not much of a secret if you have been here for a while (read the Three Most Essential Plugins for the Classical Guitar) . The Pro-Q3 offers precise control over the frequency spectrum with a range of filter types and is easy to fine-tune via the graphical interface.
To make my life easier, I have created a set of custom presets that I use as a starting point for different recording scenarios. These presets are designed specifically for classical guitar and can save me a lot of time when mixing. My custom presets pack “EQ Essentials” is available in the CGT store, so if you also have the FabFilter Pro-Q3, you could use my presets in your workflow. But it's important to remember that there is no one-size-fits-all solution and that you'll need to adjust them for your recordings.
Final thoughts
In conclusion, EQ is an essential and powerful tool for creating professional-quality classical guitar recordings. However, it's important to remember that EQ is just one part of the recording production. Don't underestimate the quality of your recording space and microphone placement. Keep in your mind, creating great recordings is a journey. With practice and patience, these guidelines can help you enhance the sound of your recordings and capture the beauty and nuance of the classical guitar.
In part II of this series, we will delve deeper into the use of Parametric EQ to further enhance your recordings. Parametric EQ offers even more precise control over frequency adjustments, allowing you to zero in on problematic frequencies and carve out a more refined sound. We'll discuss how to identify and address problem areas in your recordings and provide tips for using the parametric EQ to shape the sound of your guitar. And finally, in part III, we will explore some of the more advanced settings of FabFilter Pro-Q3. Stay tuned!

A Beginner's Guide to Home Recording for Classical Guitarists
Home recording technology has come a long way in recent years, and it's now easier than ever for classical guitarists to record high-quality audio from the comfort of their own home. If you are a classical guitarist looking to record your music at home, you may be wondering where to start. In this beginner's guide, I will go over the essential tools and techniques you'll need to get started with home recording for classical guitarists. From choosing the right microphone and recording software to setting up a recording space and editing and producing your tracks, I will cover everything you need to know.

Choosing the Right Equipment
The first step in setting up a home recording studio for classical guitar is choosing the right equipment. There are a few key pieces of equipment that every home recording studio should have:
Microphones: A good pair of microphones is essential for recording the classical guitar. There are many different types of microphones to choose from, each with unique characteristics. I often like to employ large diaphragm condensers for their low self-noise.
Read the buyer's guide on the Best Microphones for Classical Guitar.
Audio interface: An audio interface is a device that connects your microphones to your computer, allowing you to record audio digitally. Besides, an audio interface allows you to connect your headphones and studio monitors.
Read the buyer's guide on the Best Audio Interfaces for Classical Guitar.
Studio Monitors: Studio monitors are specialized speakers that are designed for use in recording studios. They differ from regular home speakers in that they have a relatively flat frequency response without boosting or attenuating any particular frequency. Studio Monitors are ideal for mixing and mastering music, as they allow you to hear the true sound of your recordings.
Read the buyer's guide on the Best Studio Monitors for Classical Guitar.
Headphones: Headphones are an important part of any home recording setup, as they allow you to hear all the nuances in your playing and recordings. I prefer open headphones for mixing, editing and music listening, while closed headphones are necessary if you want to do overdubs.

Setting up a Recording Space
Once you have the necessary equipment, the next step is to set up a recording space that will allow you to produce high-quality audio. Here are a few things to consider:
Acoustics: The acoustics of your recording space will have an immense impact on the sound of your recordings. A room with decent acoustics will produce a balanced and natural sound, while a room with poor acoustics can produce a boomy sound and introduce flutter echo to your recordings. To improve the acoustics of your recording space, you can use acoustic treatment products such as acoustic panels, bass traps and diffusers to absorb or diffuse sound waves.
If you are on a tight budget, you can read my post on Three Ways to Improve your Recording Space Without Spending Any Money.
Organization: Keep your recording space organized and ready to use at any time. This means having all your equipment in position and easy reach, so you don't have to spend time searching for things when you want to record. Furthermore, a cluttered and disorganized space can be distracting and make it difficult to focus on your playing. By setting up your room in a functional and organized way, you'll be able to focus on your playing and create better recordings.
Lighting: Good lighting will set the mood and create a comfortable practising recording environment. Natural light is usually the best choice, but if you don't have access to natural light, you can use artificial lighting to create a similar effect.

Getting Started with Recording Software
Once you have your equipment and recording space set up, the next step is to choose recording software. There are many different options available, ranging from free software with basic features to professional-grade software with advanced capabilities. Some popular DAW (Digital Audio Workstations) for recording classical guitar include:
Audacity is a free, open-source recording software popular with many classical guitarists. It offers a range of basic recording and editing features and is easy to use especially for beginners.
Apple GarageBand is a digital audio workstation that comes pre-installed on many Apple computers. It offers a range of basic recording and editing features and is suitable for beginners.
Apple Logic Pro is a professional-grade recording software widely used by music producers. It offers a wide range of advanced features and includes the most complete library of virtual instruments and a comprehensive set of plugin effects of any DAW.
Steinberg Cubase is another professional-grade recording software and a great alternative to Logic Pro if you are a Windows user. Cubase Elements is powerful enough for most classical guitarist applications and is affordable for those just getting started on recording.
Recording Techniques
Once you have your equipment and software set up, you are out of excuses; it's time to start recording! Here are a few tips for achieving the best sound from your classical guitar recordings:
Experiment with microphone placement: The position of the microphones relative to the guitar will have a huge impact on the sound of your recordings.
For a detailed description of various microphone techniques, read my post on Stereo Microphone Techniques for the Classical Guitar.
Set up the gain on your audio interface: The gain control on your audio interface determines the level at which your guitar is recorded. Set the gain to a level that avoids clipping (distortion) or a weak signal. Set the peaks (loudest parts) to reach around at around -6dB, so that you'll have plenty of headroom.
Have the right mindset for recording: An often overlooked aspect of the recording is the mindset and mood you bring to the recording. Be relaxed and focused when recording, so that you can capture the best performance possible. Take breaks as needed to ensure that you are feeling fresh and energized.
For more suggestions, read my post on 5+1 Things You Should Do Before You Press the RECORD Button, from the perspective of a Classical Guitarist.

Editing and Producing Your Recordings
Once you've recorded your classical guitar tracks, the next step is to edit and produce your recordings to create a professional-sounding final result. Here are a few things to consider:
Be conservative with editing: Editing audio has become pretty simple, but too much editing makes your recordings end up sounding lifeless.
Use plugin effects wisely: While it's necessary to use EQ and Reverb plugins to fine-tune your recorded sound, create the right mood for your music, and enhance the sound of your tracks. Try not to overprocess the recording. Aim for a natural sound for your solo classical guitar music. For further information on plugins, read my post Three Most Essential Plugins for the Classical Guitar.
Set the levels correctly: Make sure that the volume of your music is loud enough but doesn't clip (distort) the outputs. Leaving about 1 dB of headroom is a good practice.
Exporting your music: When you're happy with your produced recordings, it's time to export them as a final audio file. Make sure to save your tracks in a high-quality format, such as WAV or AIFF, to preserve the sound quality of your recordings.

Conclusion
In conclusion, recording your music at home can be a rewarding and fulfilling experience, and it's easier than ever to get started with the right equipment and software. By following the tips and techniques outlined in this guide, you'll be well on your way to creating recordings you can be proud of.

5+1 Things You Should Do Before You Press the RECORD Button, from the perspective of a Classical Guitarist
The expeditious progress of technology since the dawn of the millennia has allowed musicians to be more self-sufficient than ever before. We can record, produce, and distribute our music without ever having to leave the house. Concert guitarists have always been masters of the art of independence; we perform solo most of the time, use only our instruments always, and are responsible for keeping them fit (string changes, tuning, cleaning, etc.). It comes with no surprise that guitarists have jumped the wagon of self-recording. Besides not needing much gear-wise, a couple of microphones, an audio interface, some headphones, and the recording setup is complete.
Managing all these duties is hard enough. On top, there is also the infamous red light syndrome that haunts musicians. It sometimes seems that the weight of this endeavour is too high to overcome. Discipline, dedication, and a good routine are prerequisites. In this post, we will not discuss the best microphones or plugins; I want to prepare you rather for the recording date with a few easy-to-follow suggestions to ensure that you will put your best performance on tape.
1. Have a plan

It is always a good practice to write down what you want to record and how your plan to go about it. If you are going to record multiple pieces, will you record several takes of each piece, or will you play the whole program several times? What is the order? What is the purpose of the recording? Documenting and archiving, or an upcoming album?
Make a plan. Then follow it, or don't. It is okay to change it as it is beneficial to remain flexible. Au contraire, without one, to begin with, it can quickly get too chaotic.
2. Setup in advance
Switching between putting on the performer, engineer, and sometimes even the videographer hats is not to be taken lightheartedly. The different tasks not only require respective skills, they also demand enough time to fine-tune all the details. Anticipate for quite a few trials until you have configured everything to taste. Going back and forth between setting up microphones, camera angles, and playing bits of music for the tests, can quickly wear you down. Therefore, if possible, set up everything the day before, thus on the recording day, you can focus only on the performance.
If this is not an option, reevaluate the length and goals of the recording session and add the necessary setup time. And before you jump into the recording, make sure to take a break. You will need a few moments to recenter yourself. Try to relax, get mentally prepared for the mission: to record your masterpiece.
3. Be prepared

Unless you are recording to document your progress, you will need to know your pieces inside out. The choreography of your hands should be practised to perfection and beyond. Allow your body to move with the pace of the music; freely, effortlessly. Study each element of the score meticulously, and memorise it if you can. Know how you articulate every phrase, each voice, how long is the fermata on the 10th measure, and express the difference between P and PP in each section. Be diligent. Again, allow for the unexpected. While playing, the piece might want to lead you to a different place; embrace it. Follow your instincts. But, start with the confidence of control.
4. Establish a routine that gets you in the zone
I could argue that recording should not be too casual, much like preparing and giving a recital. Depending on your goals and time, though, sometimes one has to squeeze a few recording moments into a rather busy schedule. Getting motivated and focused can get tricky under such circumstances. Besides, not every day is the same, so we are not always as inspired.
Observe and explore a few mechanisms to assist in getting in the zone quicker. Weather is meditation, fasting, listening to music, or pouring caffeine into your bloodstream, only you can decide. Find out what works for your lifestyle and establish a routine around it. Preferably, you should find a few alternative options.
5. Do not compare yourself
We do not live in a bubble, and neither does our art. We evaluate our efforts in context. Listen to your favourite recordings, and get inspired. Take notes on the performance subtleties, and try to imitate aspects of it in your practising. But, you must forget everything at some point. On the day of the recording, it is just you and your guitar; no time for self-doubt. So, be yourself, and allow the things that make you unique to manifest themselves. There is no other way to do it anyway.
Bonus - If you are recording on location, make a list, and write down all the essential gear you need to have with you. Do not forget the extra cables and batteries, SD cards, some tape and a Swiss army knife. A faulty cable or missing a 3/4" adapter can be a reason to end the session prematurely. Embarrassingly.
Closing Thoughts
Whether you are recording for professional purposes or yourself, remember to enjoy each and every part. If you follow the above guidelines, chances are that you will go home with a fantastic recording. If not, there is always another day, a second chance to conquer the session. After all, the path to greatness is always in constant dispute.

Three Ways to Improve your Recording Space Without Spending Any Money
Let’s talk about the room - Part I
When we think about improving our recorded sound, we usually think about upgrades in gear; we lust for new microphones, interfaces, guitars, etc. We don't want to buy new things; we absolutely need them. Sometimes, we even postpone recording altogether until we have the budget for purchasing said gear.

The harsh truth that we sometimes don't want to admit is that spending more money on gear will not fix fundamental issues. Getting a good sound in the room before we hit record is essential, as essentially, this is the sound that our microphones hear and our interfaces capture. Fix it in the mix does not apply with classical guitar recordings wherein room and performer are equally exposed.
Having used all sorts of gear in all possible situations, I rank all the elements of the recording chain in this order: guitarist, guitar, room, microphones, engineer, playback system, post-production skills, preamps, converters, cables. Leaving everything else aside, in this article, I examine a few ways to get the best out of a typical residential room without spending any money.
Disclaimer - room treatment can be approached from a more technical standpoint which I plan to discuss here in the future. Contrarily to what the vendors of acoustic panels will say, household items can be used as a pragmatic alternative, even more so considering the singular commitment of a classical guitar recording space.

First. The sitting position.
Sometimes out of being lazy or just practical, we set up everything as is and keep the room as we would normally use it, especially if we don't have a dedicated music room. Considering the degree that the room affects the recorded sound, searching for a suitable sitting position should not be overlooked.
Before all else, when I enter a new space for a session, I try to figure out the best sounding position in the room. This habit applies both for on-location to home recordings and even concerts to some degree. I'm not getting into detail about on-location recordings and big spaces now, as this goes beyond the purpose of this text.
I have assembled a few guidelines to help you search for the perfect sitting position in your room but keep in mind that every room has unique sound properties.
First of all, you want to avoid sitting close to the walls and most definitely steer clear of the corners; the build-up of low frequencies and the early reflections will cloud the direct sound of the guitar. Also, the centre of the room is far from an ideal sitting position, especially in a room with parallel walls.
In an ordinary rectangular room, if possible, you'd want to sit alongside the long walls about three-fourths to two-thirds of the length of the room. In addition, I find that sitting a bit off-centre and facing the front wall at a slight angle towards the longest distance produces the best results; this modest break of symmetry helps.
Nonetheless, you need to experiment with your space as every room is different. Perhaps asking someone else to play your guitar in a couple of different positions and try to listen is not a bad idea. If this is not possible, pay attention to the sound while you play; singing can also assist you in identifying the room modes. Moreover, you'll need to record yourself in various spots and listen critically; recording the same piece can make comparisons less ambiguous.
What you are looking for is the most balanced sound; play all notes of your guitar in sequence as well as your favourite piece, and if it gets boomy or any frequency stands out a lot, try a few different angles or move a little. If the room is untreated, which probably is, the result will not be outstanding, but in any case, it is worth finding the position where standing waves are not encouraged, then acoustic treatment can be employed.

Second. Other uses for your books.
Speaking of acoustic treatment, this goes without saying, at least to some extent. But, as our rooms usually serve (at least) a dual purpose, a playing/recording space along with a listening/production room, some compromises have to be made. Critical listening requires a controlled environment, while what makes a good room for recording acoustic instruments can be partially subjective.
I have recorded in all sorts of situations, from big halls with a vast reverberation to heavily treated studios with no ambience at all as well as everything in between, thus I have concluded that I genuinely don't enjoy playing in an acoustically dead room. Even if the captured sound in such a controlled room is somewhat easier to handle, the performance and feel of the music always take a big hit. Clever microphone placement and good post-production skills can make almost any room sound acceptable, contrary there is nothing we can do to improve an uninspiring performance.
Thankfully, the classical guitar is not the loudest instrument around, with a lot of its energy residing is in the mids and highs, so it is not impossible to minimize the small room sound signature. Whilst is more convenient to record at home, on-location recording is never out of the question; I could always visit one of the exceptional sounding halls in Berlin or elsewhere when absolute sound is required. It is also refreshing to work on other rooms.
Wherein large rooms we have to deal with diffuse sound fields, which pose their challenges anyway, small rooms suffer from early reflections and resonances associated with standing waves. Dealing with the low frequencies below 300Hz is rather troublesome as wavelengths are large and spread omnidirectionally, while higher frequencies behave more like rays.
The key here is to use a combination of diffusion and absorption strategically. Since broadband diffusers and absorbers can get expensive fast and need to be quite thick to have any effect at the low-mid and low frequencies, there is a free alternative you can use effectively: books.
Books placed on shelves create an uneven surface, forming some sort of diffuser from which sound waves are reflected in different directions. Moreover, paper absorbs some of the sound energy, so a bookshelf works in addition as an absorber.
Gather your books and build a bookshelf on the front-facing wall (in the typical control room, the front wall is considered the one where the monitors are placed, here I use the term to indicate the wall you face when you play your guitar). Use different book sizes and thicknesses, and experiment on the relative depths; this bookshelf will absorb and scatter the sound in the room while maintaining some liveliness.
Admittingly, a bookshelf won't do much to the lower frequencies, and its properties will be somewhat random. However, you probably have plenty of books in your household already, and a bookshelf is more eye-pleasing. Plus, they are nice to read from time to time.

Third. The floor.
Since the guitar hangs in closer proximity to the floor than any other reflective surface around you, bouncing frequencies would cloud the direct sound. Also, the somewhat low ceilings and small dimensions of residential rooms dictate for closer and lower microphone positioning that say a concert hall, thus heightening the problem.
To tame the room ambience to a certain degree, place a rug between your guitar and the microphones. Avoid covering the whole room with a carpet, but rather use a small to medium-sized one.
Experiment with a few different sizes and thicknesses until you find what works in your space. Your goal is to allow the microphones to capture a cleaner sound while maintaining the room ambience. The absorption will only be effective at the high frequencies. I use a woollen rug of medium thickness that extends from just under my seating position to a bit further than the position of the microphone stand.
Closing
With the advancement in technology over the last twenty years, quality recording equipment has become pretty affordable consequently capturing compelling recordings at home is no longer impossible. However, we should not forget that the microphones capture the sound of our guitars in our rooms. So, be intentional and learn trust your ears.

Stereo Microphone Techniques for the Classical Guitar
Stereo recording is the technique that involves two microphones that due to the captures the time differences of sound waves coming from a source, which gives depth and space to the recording. Similar to how our ears and brains record and process sound.

The Classical Guitar, albeit small, is an instrument with a complex sound and subtle peculiarities; and as such, it sounds better when is captured in stereo. Various stereo recording techniques have been developed since the early 1940s; each with distinct advantages and disadvantages.
If you ask, which is the best microphone technique for capturing the classical guitar in stereo, I'm afraid that the answer is not so simple. Room size, acoustics, the instrument, and the purpose of the recording, play a significant role; as well as our individual preferences.
In this article, I describe the most common stereo techniques from the point of you of a classical guitar recordist. I discuss their strengths and weaknesses, as well as prefered uses for each setup.
Note: This article is a work in progress; X/Y, M/S, and NOS setups will be added in the following weeks.
Spaced Pair Setups
AB Stereo

AB Stereo Array
The AB Stereo recording technique is based on a pair of spaced Directional or Omnidirectional microphones and provides in a pleasing and accurate capture with useful spatial information.
For home recordings, AB Stereo is one of the best options as it is easy to implement and get a consistent sound. A pair of Cardioids is usually preferred as they can successfully attenuate the room ambience.
Omnidirectional microphones capture the true low-end of the instrument though and have no proximity effect. You can position them closer to the source in a small room, or further away if the acoustics allow.
Application
Use a (minimum) distance of 20cm between the microphones for the most natural result. You can use a greater width, as the distance from the instrument increases, for a wider capture. I prefer a width between 30 and 40cm, for small/medium rooms, and up to 60cm for large halls.
If you position the AB Setup close to the guitar, you should avoid placing any microphone opposite to the soundhole, to prevent boominess. A microphone on each side of the soundhole will give the most balanced sound, off-axis towards the fretboard for more articulation or opposite of the bridge for a fuller sound.
The microphones are most commonly parallel to each other; but, since most microphones show a degree high-end directivity, we can fine-tune their response by angling them on the horizontal plane. If you aim them slightly outwards, you can attenuate some of the unpleasing mechanical noises of the guitar (fretting noises, squeaking, nails, etc.) You can also angle them slightly inwards to reject some of the room reflections.
The directional information as captured by an AB Stereo is not as accurate as of the coincident and near-coincident setups. This attribute can be an advantage if the performer moves a lot and assists in avoiding off-balanced results. I hardly ever pan the channels hard left and right, to preserve the integrity of the central image of the classical guitar.
The biggest drawback of the AB Stereo is its leaser compatibility with MONO playback (for example, a youtube video played on a smartphone); as a result, comb-filtering may be introduced.
Suitable Polar Patterns: Omni, Cardioid
Advantages
Easy implementation
Pleasing sound
Useful spatial information
Control of room ambience
Disadvantages
Playback in MONO may introduce comb filtering
Not the most accurate directional information
And here is a real-world example of the use of AB Stereo on Classical Guitar in a professional setting. I used a pair of Austrian Audio OC818 microphones set in a Custom Polar Pattern that combines the best of Cardioid and Omni qualities. The spacing of the microphones is 26cm. The goal was to capture the pure tone of my Angela Walter guitar together with the incredible sounding main hall of the Musikbrauerei in Berlin.
Near Coincident Setups
ORTF Stereo Technique

ORTF Stereo Array
Developed in the 1960s by the Office de Radiodiffusion Télévision Française, the ORTF is a stereo microphone configuration that with the use of two near coincident Cardioid microphones mimics the human ears.
The spacing of 17cm and 110° angle emulate respectively the distance between our ears and the shadow effect of the human head. The result is a realistic depiction of the sound field, both in directional and spatial areas, as well as a reasonable Mono compatibility.
Application
A pair of first-order Cardioid condensers is required for a proper ORTS, 17cm between the capsules and 110° angle. Other directional patterns can be used with respective changes in the width; for example, Schoeps suggests a distance of 21cm for the MK22 Open Cardioid capsules. You can also adjust slightly both the spacing and angle for the best sound.
The most critical aspect of ORTF is to balance the direct and diffuse sounds, as there is not much you can do in post-production afterwards. As always a minimum distance of 50cm is advised to avoid boominess, but I have had better results with a distance of 80cm to 110cm. At greater distances, a low-end boost might be required to compensate for the loss of low-end of directional microphones.
The ORTF main application is for large-scale sources, like orchestras and choirs. If positioned in a close distance, you might experience loss of focus with a perceived hole in the centre.
Consequently, depending on the room acoustics, the ORTF stereo array may be proved problematic in a home recording setting. As you might either have to place the microphones further away from the instrument, capturing the unattractive ambience of a small room, or suffer a smeary sound if you position the array closer.
Suitable Polar Patterns: Cardioid
Advantages
Realistic stereo field
Reasonable Mono compatibility
Disadvantages
Perceived Hole in the middle and loss of focus if positioned close to the source
Coda
Distance

The distance of the microphones to the source depends purely on the room size, the instrument, and the setup. As a rule of thumb, keep it smaller than that of the microphones to the front and side-walls. But never closer than 50cm.
Directional microphones have a sweet spot where the proximity effect eliminates, and the low-end frequency response becomes linear. If the microphones are not in the ideal position, you might need to apply a Low-Shelf EQ (boost or cut). Omnidirectional microphones have a better low-end response regardless of the distance but capture sound from all directions. So, be careful not to end up with an overly roomy recording.
Height
Most classical guitarists angle their guitars somewhat upwards to push the sound further back (and fill a concert hall). Correspondingly, the height of the microphones depends mainly on the distance to the guitar. The closer they are to the instrument the lower they need to be. If you place the microphones further away from the guitar, they need to be higher to retain definition and accuracy.
The sound travels as an impulse rather than a beam though, so there is some room for experimentation. If you prefer a fuller sound, you can position the microphones slightly lower. Contrarily, you can increase the clarity if you put the microphones higher. Use your ears and taste.
Vertical Angle
You can also exploit microphone angles in the vertical plane; you can increase clarity if they are on-axis with the top of the guitar, or aim them at a higher point to attenuate some of the high-end and undesired mechanical noises from the strings and nails.
About the Samples
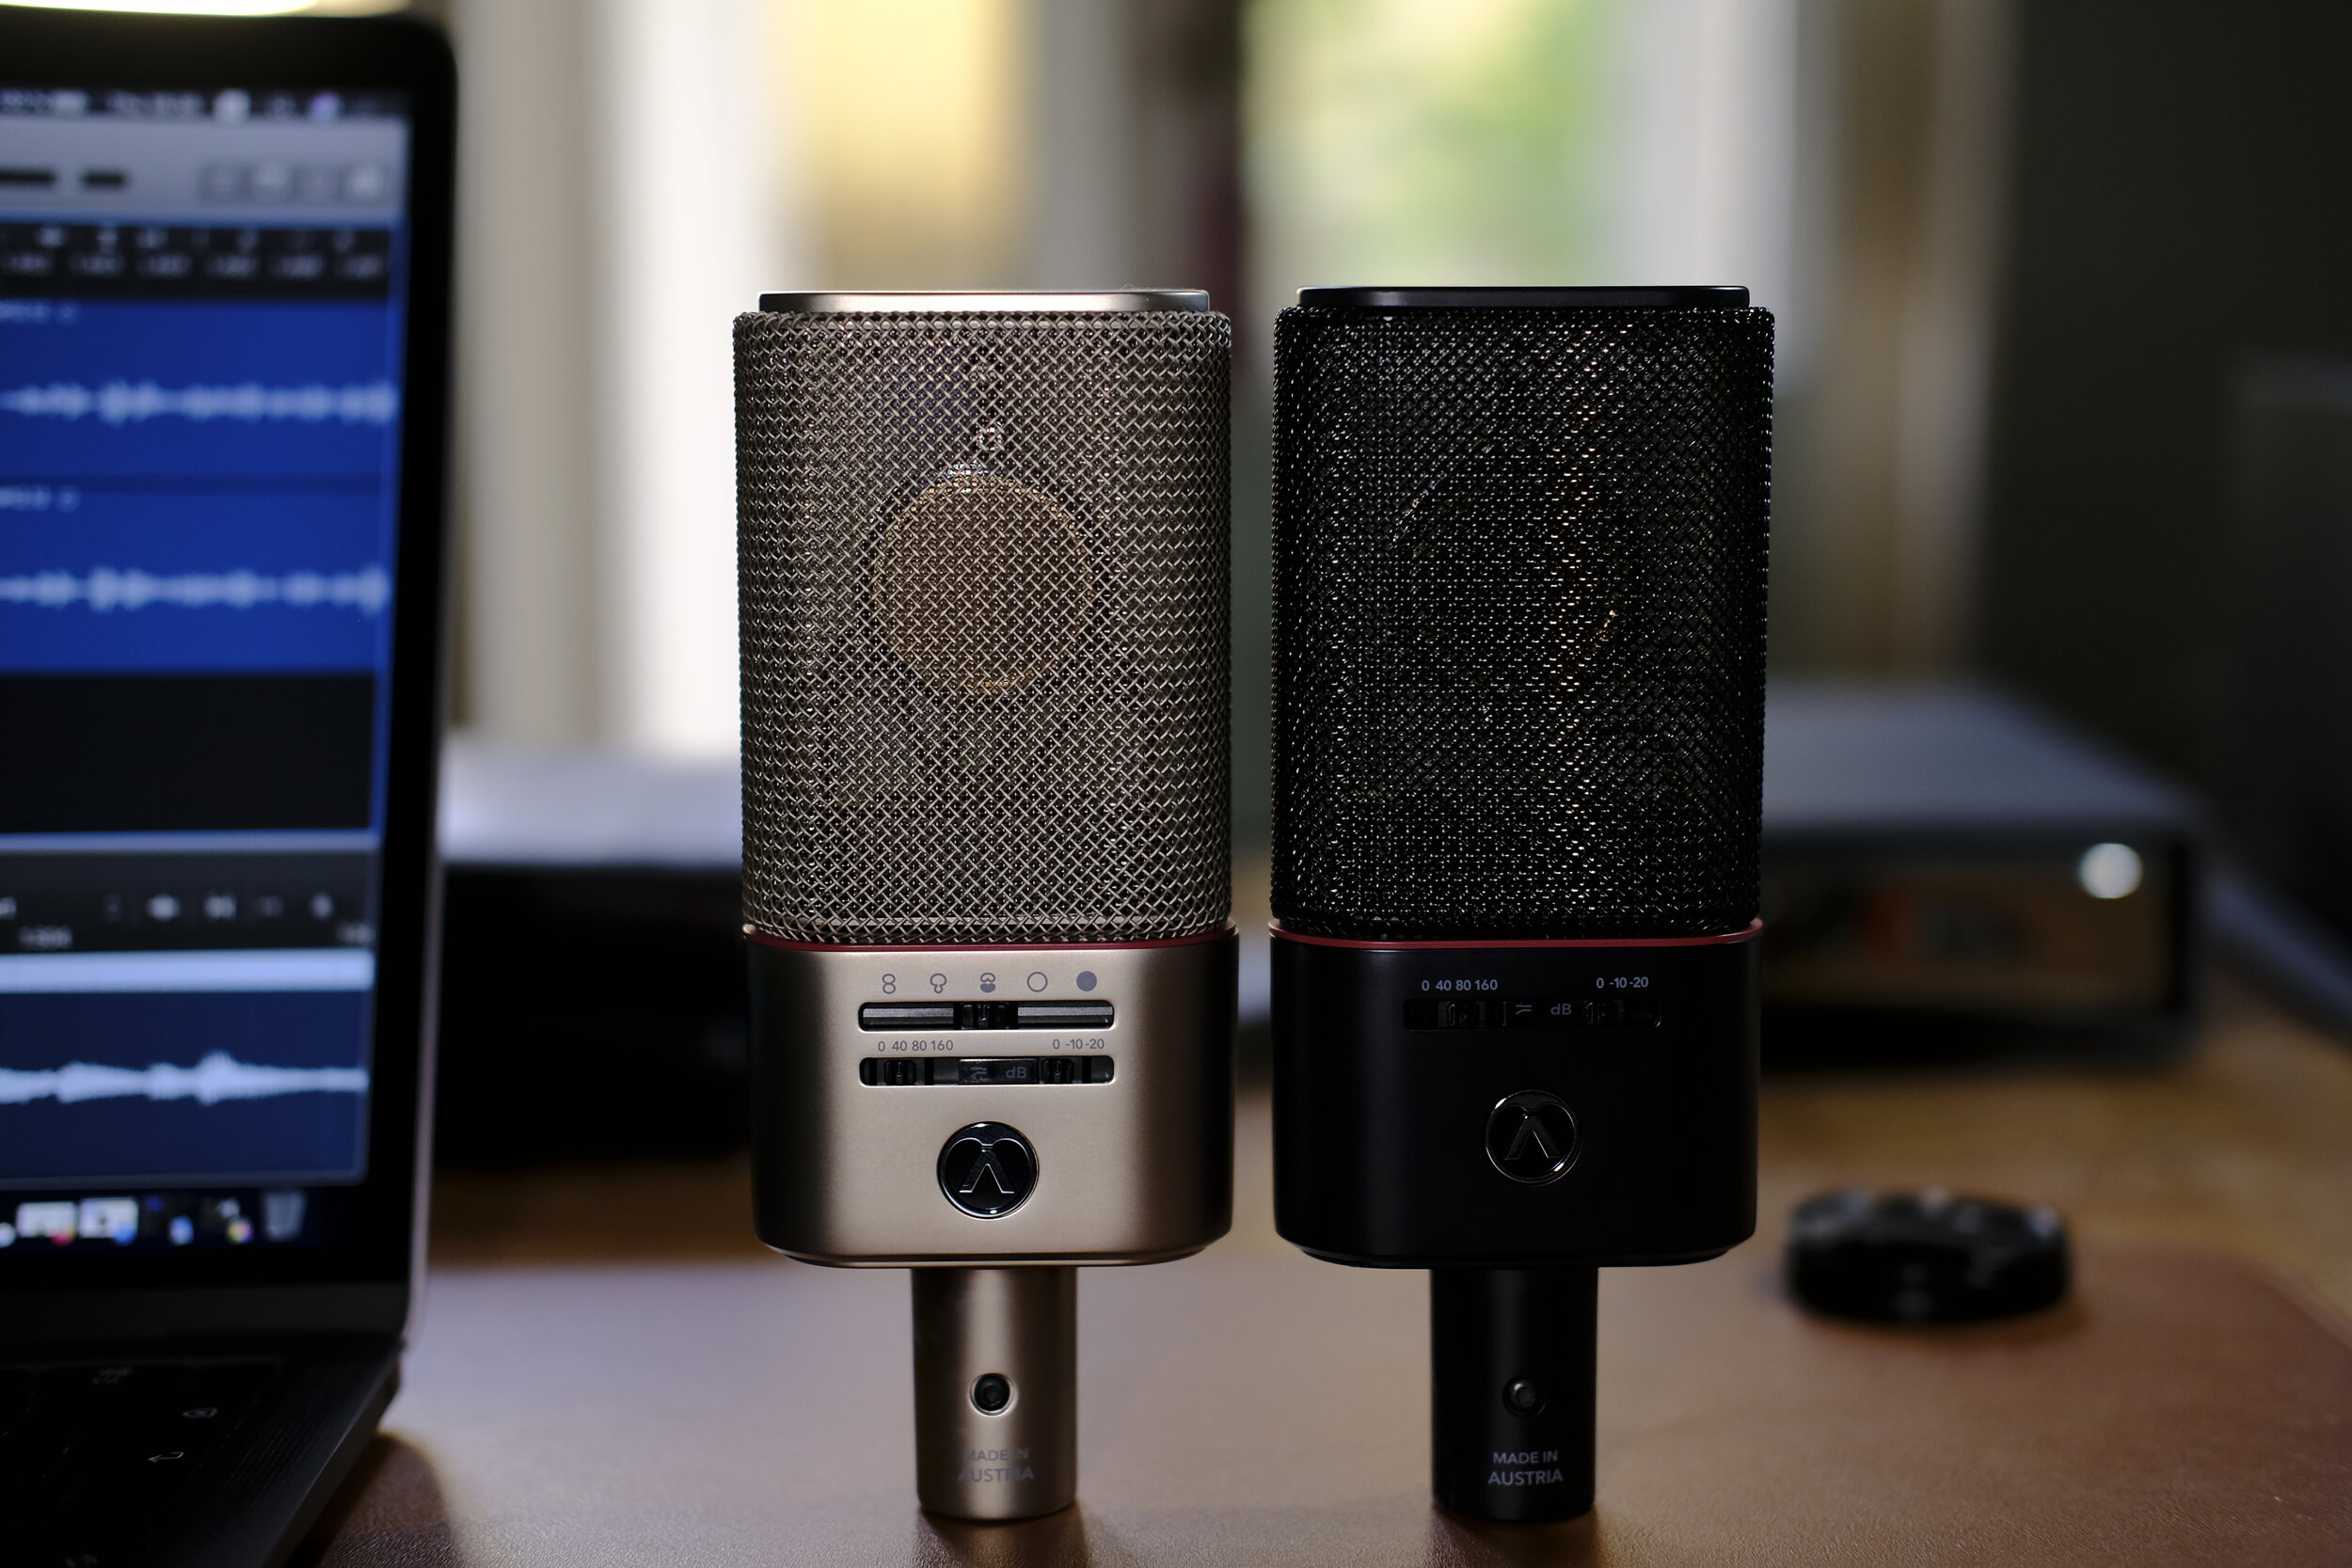
Austrian Audio OC818 and OC18
I recorded all the examples with a pair of Austrian Audio OC818. I choose the OC818 for their clear sound, low self-noise, and multi-pattern options. The height of the microphones was 103cm (centre of the capsule), and the distance from the guitar was 90cm.
The signal chain was an AEA TRP2 Microphone Preamp into an RME ADI-2 Pro FS ADDA Converter.
I didn't provide samples in other distances as they would only give cues about my room and instrument, without adding value to you.
Closing thoughts
Recording the classical guitar is a meticulous exercise. Regardless, if you want to record your next album, a video for youtube, or your performances to share with your friends, it is an utterly satisfying process. It is also a reason to practice harder and become a better guitarist.
Before your press "rec" for the first take, allow some time to find the best position, height, and angle. It can be a matter of having an excellent recording or rendering the whole session useless. Small changes in this context may have dramatic results; they act as a physical equalizer.
There have been quite a few times that I had to re-record a performance because of a poor decision, or having to rely on heavy equalization to make it acceptable when it was (almost) impossible (or expensive) to record again at the same location.
I hope that this guide will be helpful in your recording adventures in the quest of capturing the best qualities of your instrument and room.

6 Common Mistakes When Recording the Classical Guitar at Home, Part II
Part II - Post Processing
Professional sounding classical guitar at home is not a fantasy anymore or at least achieving a recording quality that is not embarrassing to share. Affordable audio interfaces, preamps and microphones have flooded the market these last decades, with increasing performance and processing power. Rooms, recording techniques and mixing are holding us back.
In the first part on the 6 Common Mistakes When Recording the Classical Guitar at Home, I tried to encourage you to try out different microphone positions and to study your room acoustics.
The second part focuses on some of the common mistakes of beginner classical guitar recordists on utilizing a proper signal chain and achieving satisfactory results in post-processing.
Mistake no.1 - Improper gain staging

AEA TRP2 Gain Knobs
The fear of clipping the converters leads some amateur recordists to use too little gain, resulting in recordings that are low in level. Without adequate signal-to-noise rations, these recordings will become noisy when any attempt is made to bring them at a normal level during mixing or playback. Contrarily, recording too “hot” will possibly clip the converters and can introduce nasty sonic artifacts to the audio. In either case, the recording will suffer from a limited dynamic range and high noise; attributes that we don't usually associate high-quality classical guitar recordings.
My advice is to aim between -6dB to -12dB as a maximum peak level (not average), per channel. Therefore, when you are happy with the placing and distance of your microphones, do a couple of test recordings, play as loud as you would normally do and set the gain levels accordingly. If you set the levels correctly, you will have a healthy and strong signal, but even if you (or another guitarist you are recording) eventually get carried away during the performance, you still have enough headroom to avoid digital clipping.
Mistake no.2 - Unrealistic panning
Classical guitar is a small instrument, radiating sound from a definite point in space. One of the worst choices you can make if you record in stereo (which you should) is to use a too wide panning. Regardless of if the listener is an audiophile type, sitting on his couch perfectly balanced in front of a pair of top-tier speakers, or a regular person listening to music with earbuds. A hard-panned left and right guitar will sound unnaturally wide and cloudy.

Proper panning of Stereo AB channels
A realistic classical guitar recording is one that creates a phantom image of the instrument right in the middle of the speakers, but with some space around it. Such recordings can remove the playback medium and transport the listener in the room with the player.
In typical AB Stereo scenarios, I pan one channel at 3 o'clock and the other at 9 o'clock. I fine-tune the panning according to the polar pattern of the microphones, how apart they are set, and the distance from the guitar.
Mistake no.3 - Limiting dynamics
Classical guitar is not the most dynamic instrument, and if anything, we should strive to capture as much dynamic range as possible (it starts from the player, so we should also prioritise dynamics in performance). Compressors, on the other hand, are designed to do just the opposite; minimize the dynamic information of an audio track by limiting the loudest notes and boosting the softest signal.
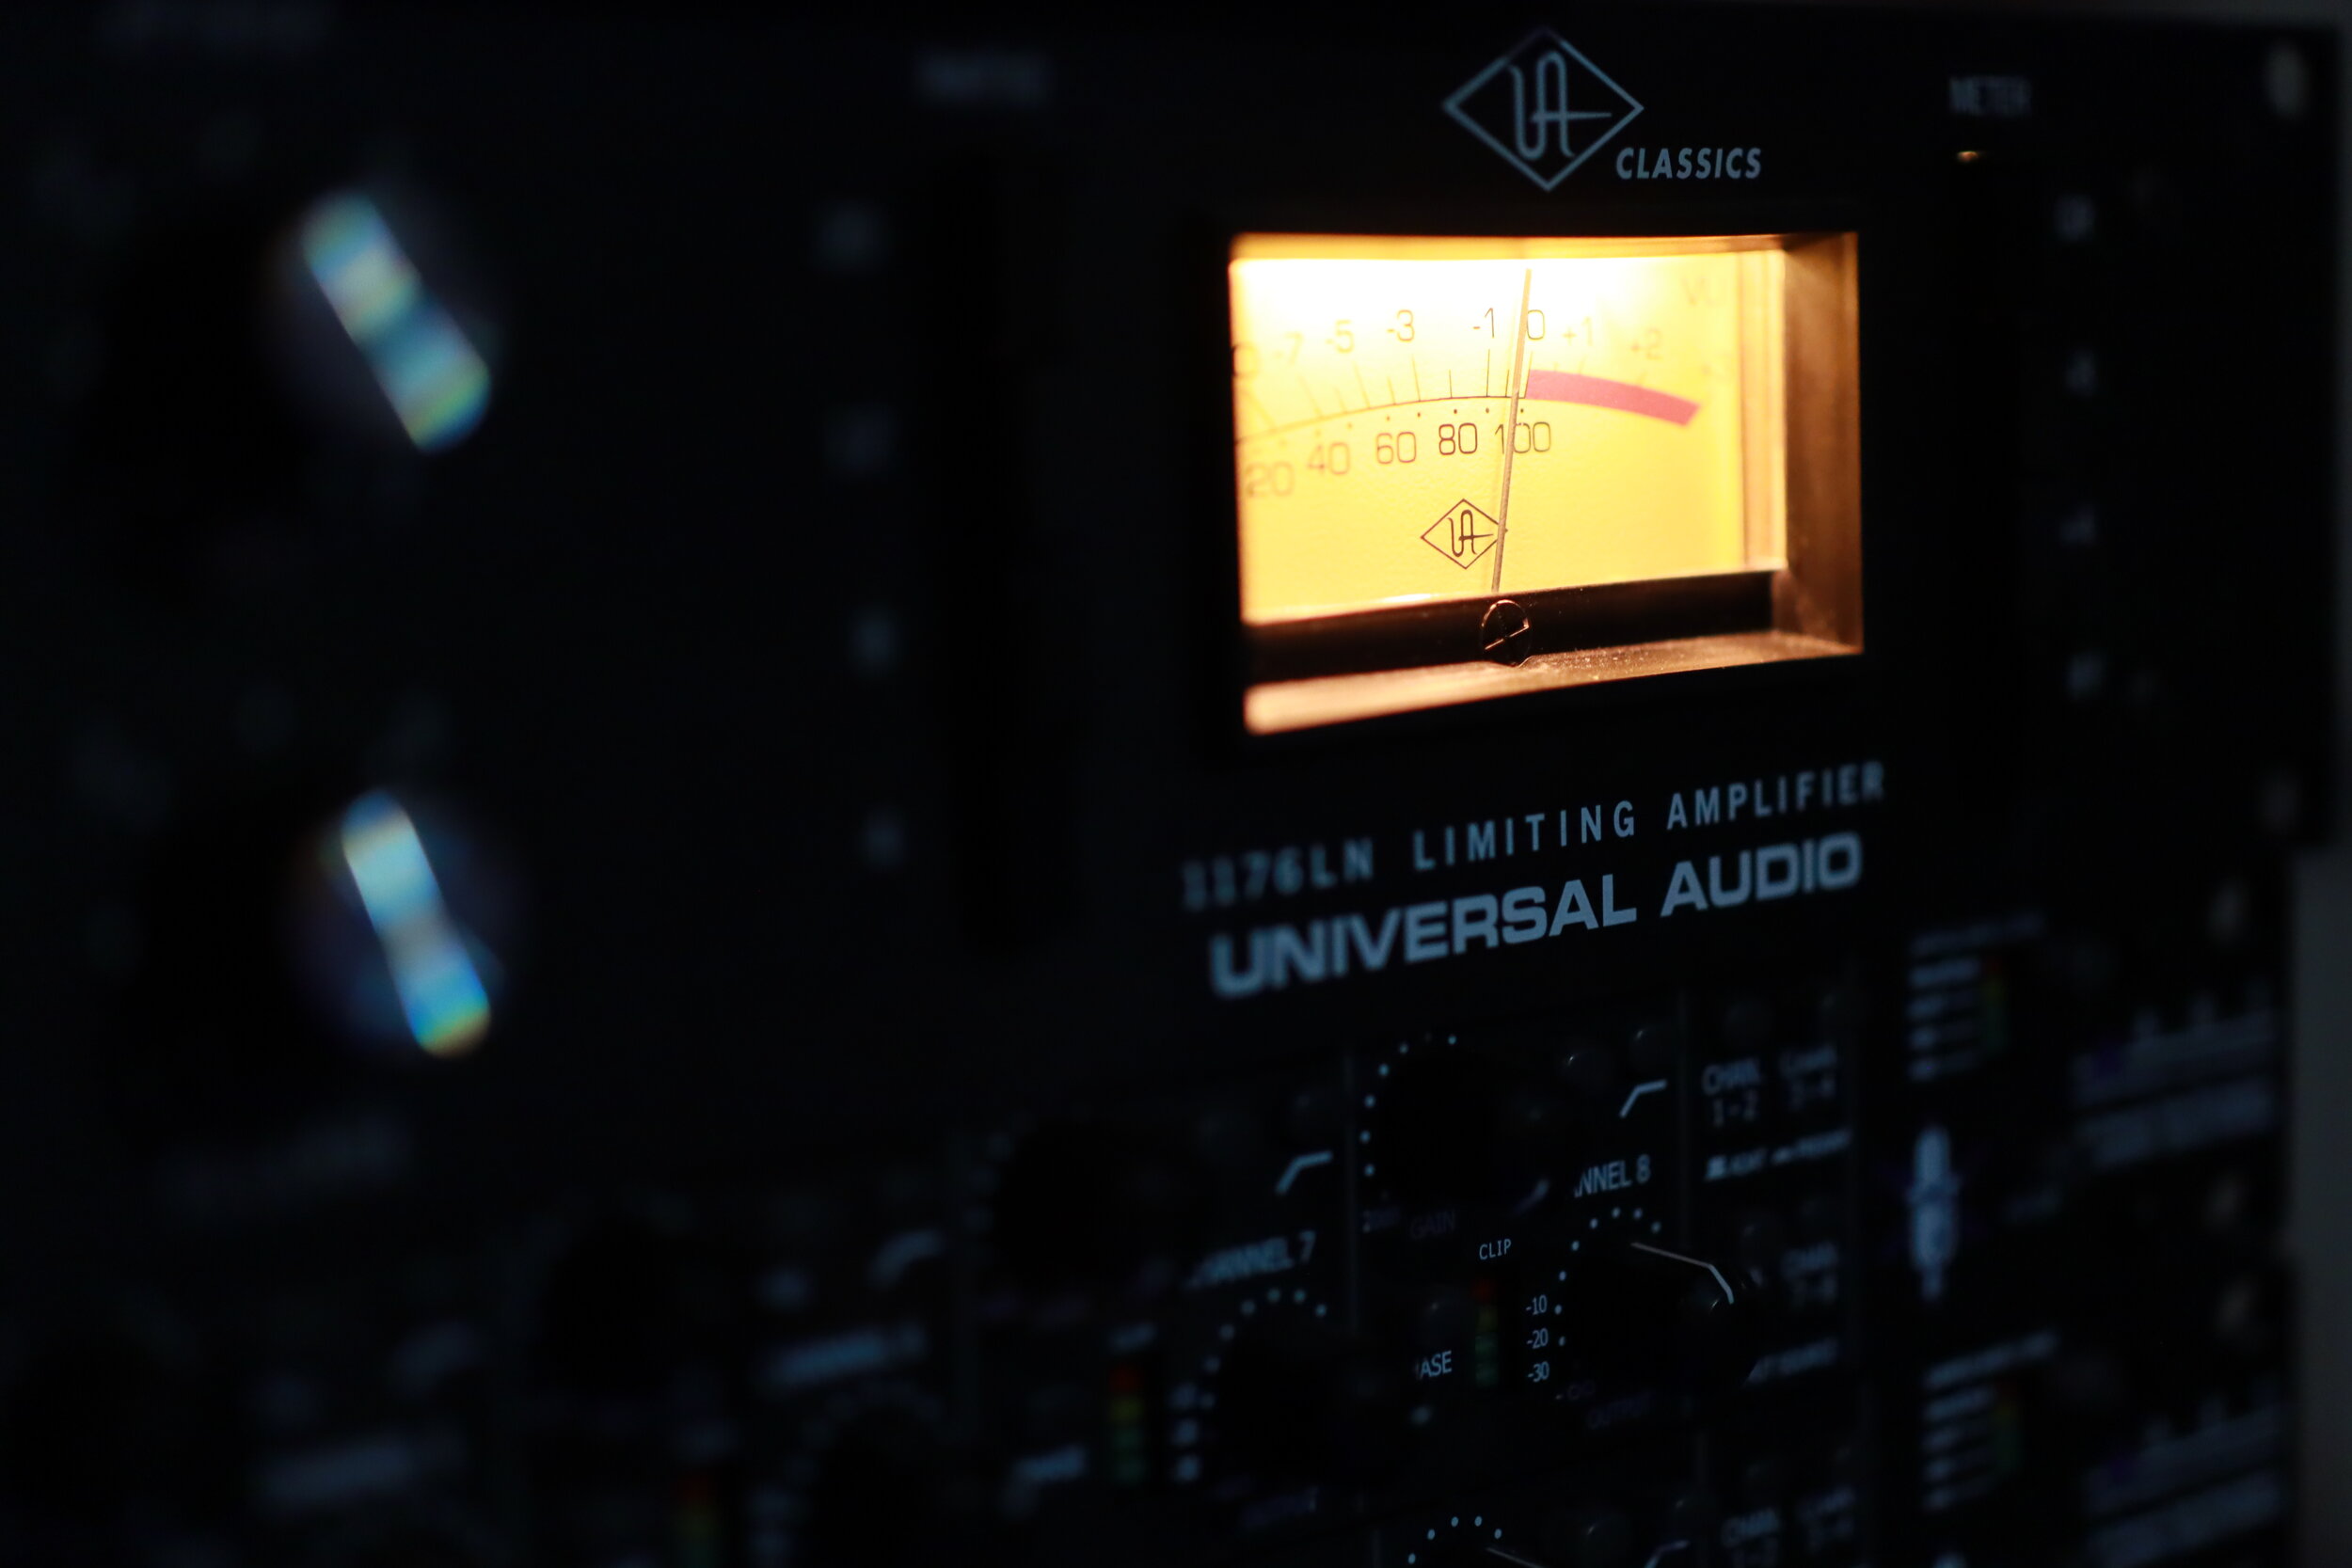
The classic Universal Audio limiting amplifier
Compressors do make the initial playback sound more exciting and powerful… for a few seconds, but in my opinion, it never pays back. Some of the problems that are introduced with the use of compressors in solo classical guitar recordings are squeezed dynamics, increased noise level and altered instrument tone.
Cross-genre guitarists employ compressors more often, as they learn that they can be invaluable in a dense mix. But I haven't found any use for dynamic limiting in a properly captured classical guitar recording.
Therefore, unless you have to deal with issues of the room or improper microphone positioning, don't use compressors on classical guitar recordings.
Mistake no. 4 - Being afraid of using filters

High-pass filter’s switch on an Austrian Audio OC18
Many microphones feature high-pass filters, the most common are 40Hz, 80Hz and 120Hz; the same is true for some dedicated outboard preamps. But many beginner recordists are afraid to take advantage of them. The truth is that in the context of the classical guitar, not much musical information is presented at the low-end frequencies. Most of what is below around 80Hz is unwanted room rumble and weird resonances; therefore by attenuating them, we end up with a cleaner recording. Capturing what is essential and leaving out the rest.
As low frequencies can have a lot of energy, it is preferable to cut undesirable low-end before the signal hits the converters, if possible. This tactic allows us to set the gain and levels appropriately and leads to better signal-to-noise ratios. But even if your microphones or preamps don't have any filters, you can still apply a high-pass filter in your DAW to remove non-essential information.
I also like to use a low-pass filter to remove high-end information that is inaudible, so that my audio consists of only the frequencies I can hear. A gentle roll-off of the low (below 50Hz) and high frequencies (above 18000Hz) is a good starting point. An EQ plugin with these basic filters is the first plugin I load on every track. You can read more on the article Three Most Essential Plugins for the Classical Guitar.
Mistake no.5 - Not learning how to use an equalizer
Other than the low- and high-end unwanted information that we can simply remove with the appropriate filters, undesirable resonances can occur in the audible range as well. These can be caused by the imperfect rooms that we are recording in, our instruments or our technique. Obnoxious resonances can and will distract the listener.
Learning how to use an equalizer to detect and attenuate or eliminate such issues will make the listening experience much more pleasurable.
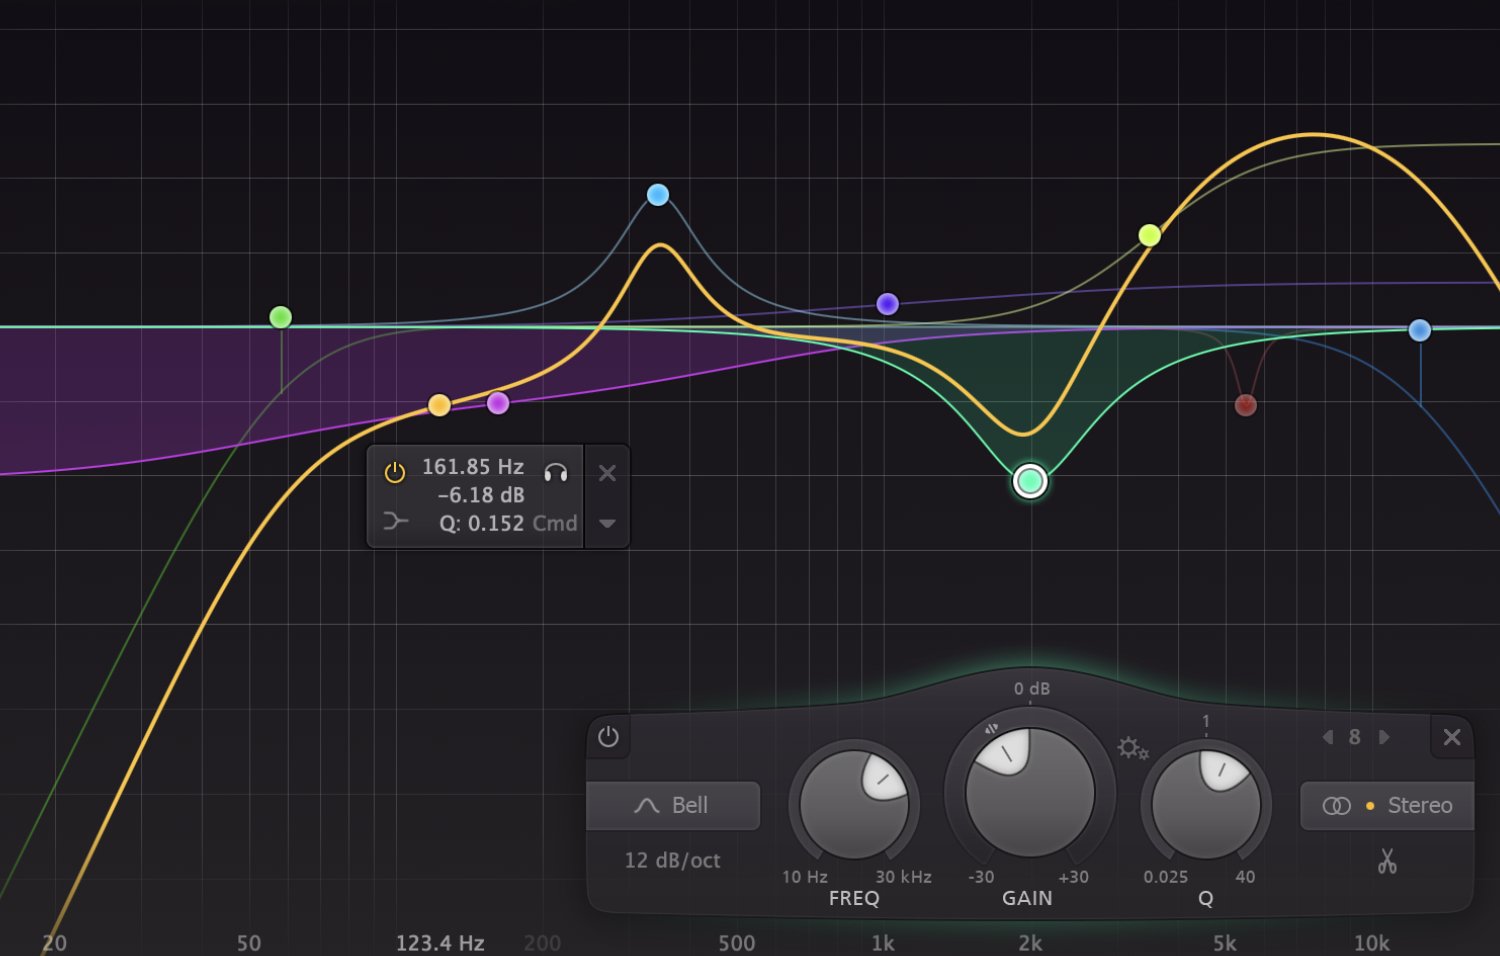
The best way to identify an offending frequency is by using your ears. I know that this doesn't sound like great advice, but keep reading. When you detect something that you don't like, add a bell-shaped point on your EQ with an extreme boost and search through the suspected range, like dialling in an analogue radio.
Once you find the irritating frequency, the sound should be quite disturbing at that point, apply a notch or a generous cut with a narrow Q. Toy around with the Q value to find the sweet spot; a setting that makes the problematic sound disappear but lets the rest of the audio unaffected.
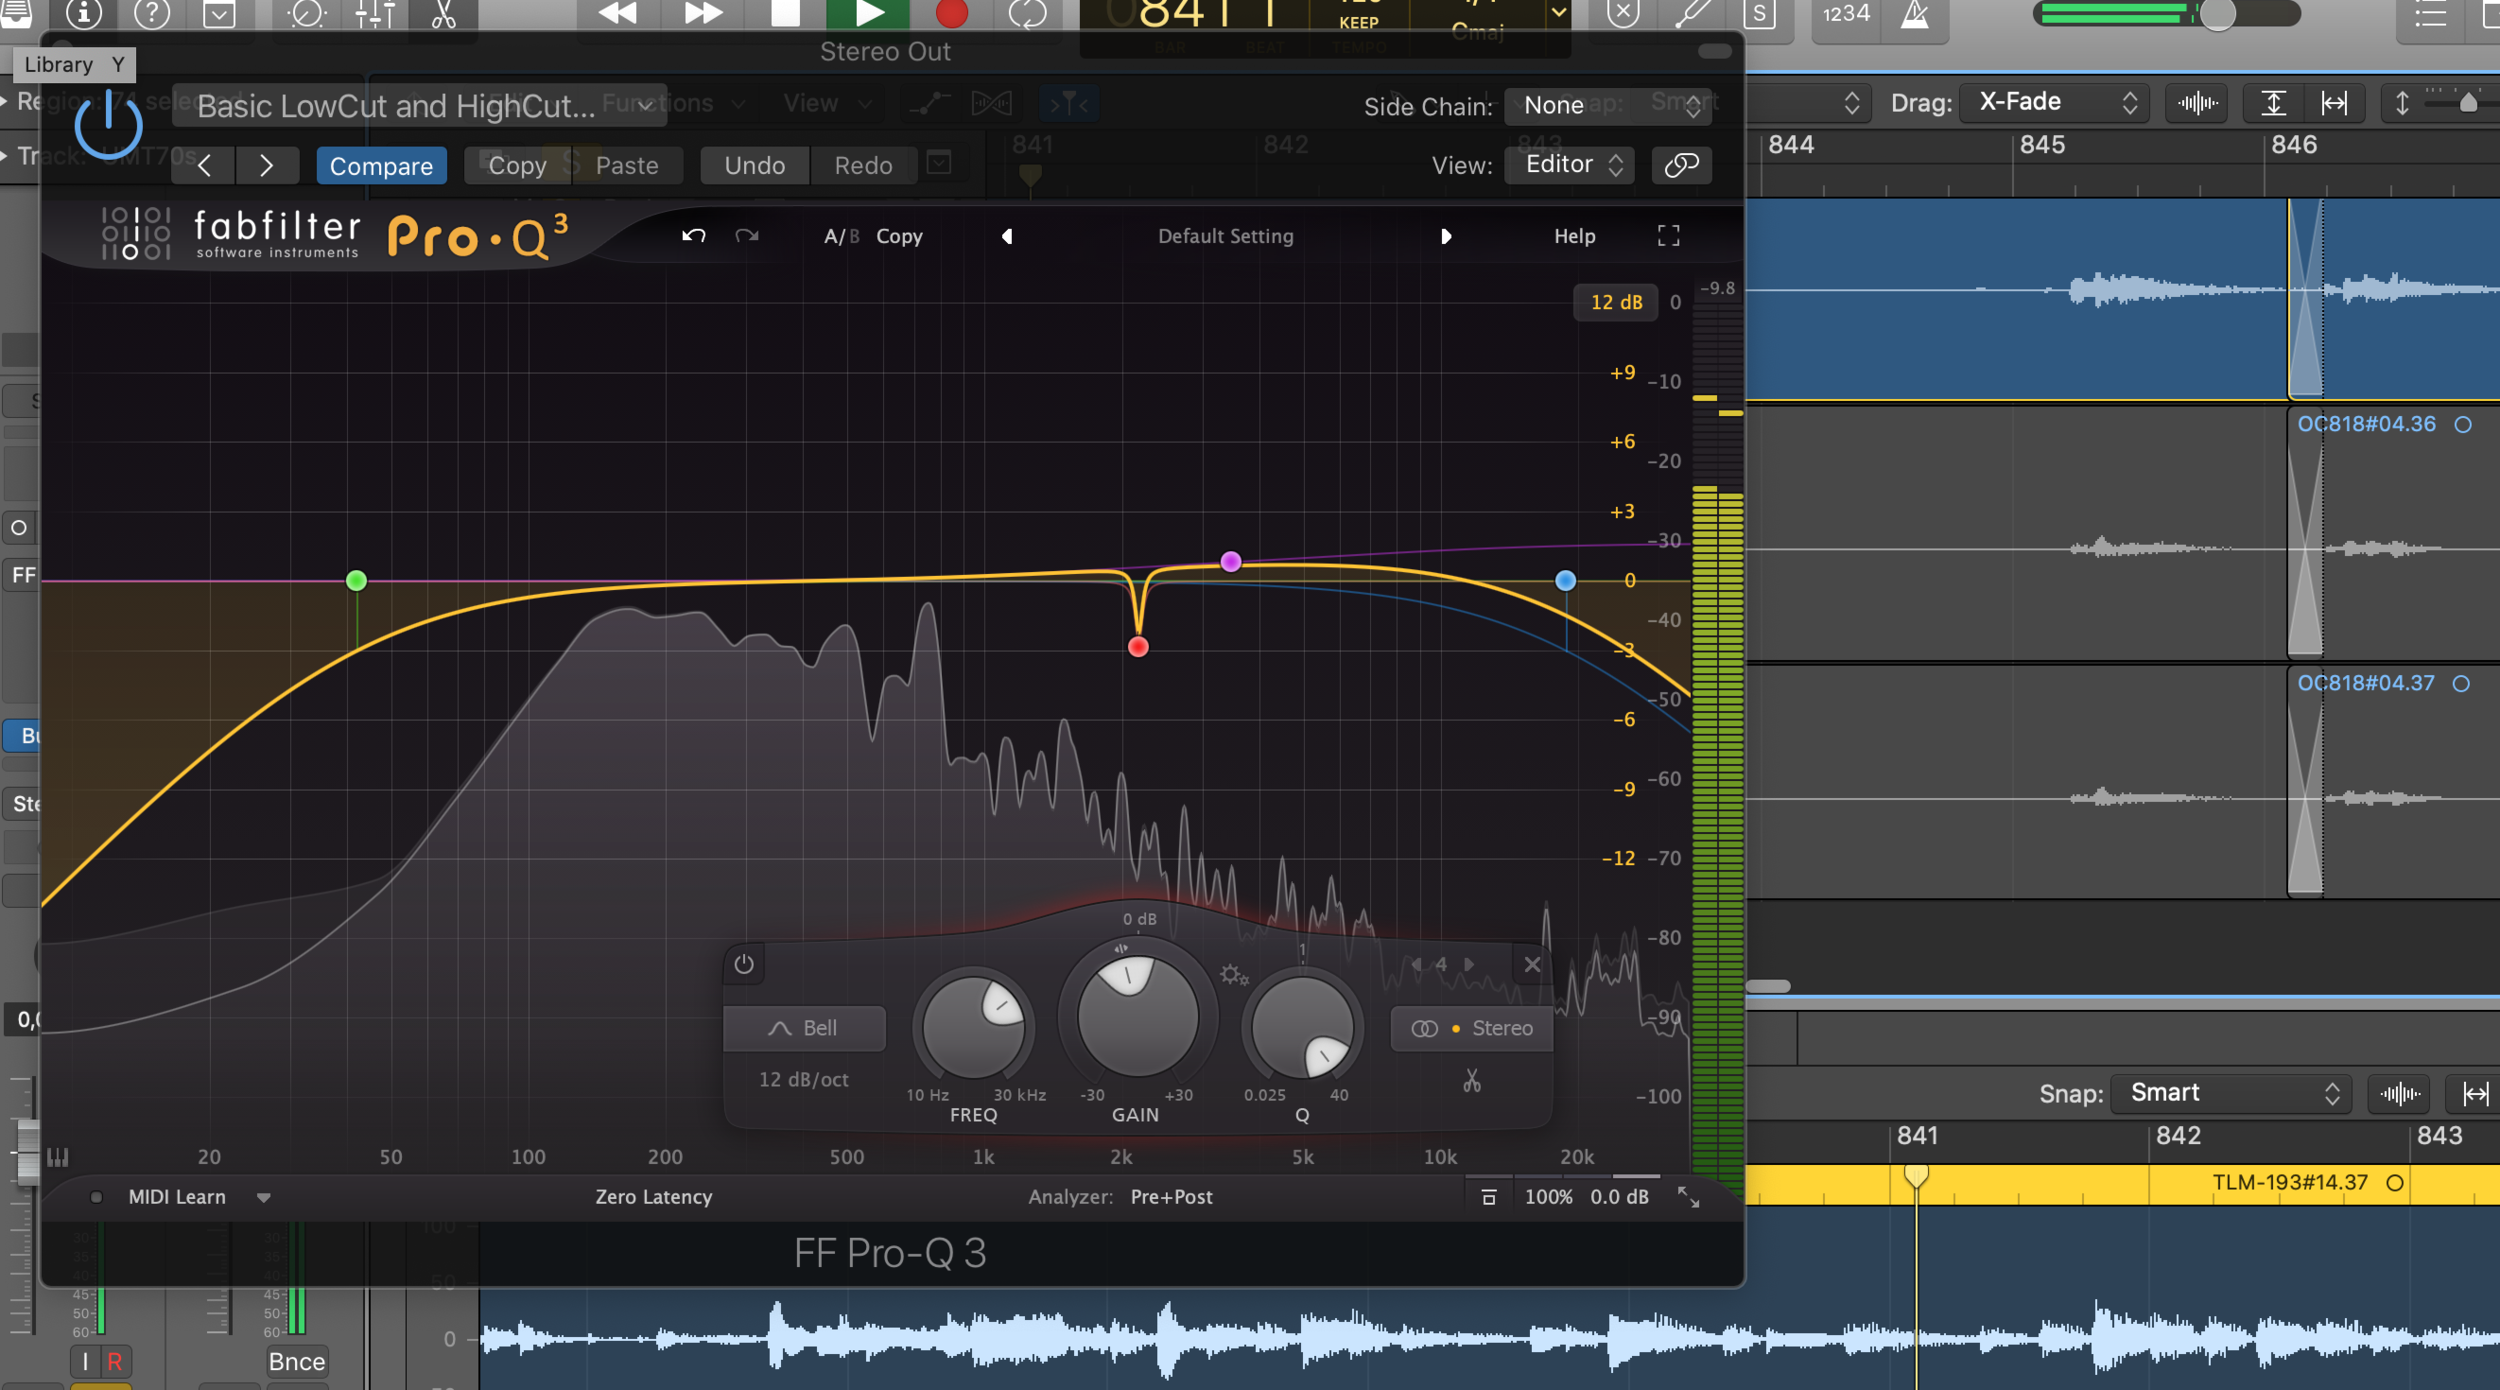
FabFilter Pro-Q 3 with HP & LP Filters, a narrow Q Cut and a High Shelf Boost
Another use for an EQ is to change the overall balance of the recording. Sometimes you'd prefer a slightly fuller recording, or there is just a bit too much low-end. Perhaps the treble is a bit piercing, or you'd like to add some more clarity and articulation. Making gentle adjustments like these are generally uncomplicated with the use of Low or High Shelf adjustments. Just a couple of dB's can make a drastic difference to the evenness and impact of our music.
Just be careful not to overdo it, and always compare your mixes to your favourite recordings.
Finally, you can also use an equalizer to completely change the sound of an instrument and shape it to your liking. But if you've been diligent with the microphone positioning, and you like your guitar sound, you won't have to.
Mistake no.6 - Too much reverb

Placing the music into an artificial hall is a necessary lie
As I write on the Three Most Essential Plugins for the Classical Guitar article, nothing will affect the listener more than the physical space that the music takes place.
When we record at home, most rooms are not interesting enough, and so we need to enhance their sound with artificial reverb. But it is easy to overuse reverb, as it makes everything sound "better". Or so we think when we first enter the home recording world.
Most beginner recordists tend to choose a random church preset without any consideration to requirements of the music, tempo and other aesthetic choices. The result is a flood of unnatural and unattractive recordings which instead of sounding realistic or enchanted, they feel cheap.
Learn how the Time, Size and EQ settings found on your reverb plugin of choice to fine-tune the sound the ambience. Then turn down the Mix a little bit more than what you think it should be. Lastly, compare your efforts to commercial recordings (not that those are not guilty of overusing fake church algorithms).
Closing thoughts

Proper mixing can turn a decent recording into a great one
I hope that this article will make you more conscious of your post-processing choices. I need to write dedicated articles for the use of equalizers and reverb as there is a ton of things to discuss.
I know that many guitarists don't want to fuzz around with plugins, but proper audio processing can transform a recording. Mixing is an art in itself; a necessary evil that can turn a decent recording to a great one. Quality classical guitar recordings are important for your audience and benefit the classical guitar community as a whole. Thus, it's definitely worth the time and effort to learn how to mix your audio. Alternatively, you may search for someone else to do that for you.
Tip: You don't have to mix every track from scratch; after all, you probably record the same instrument with the same microphone technique and in the same room all the time. Create a template in your DAW with your basic panning, filter and reverb settings. You'll still have to tweak around a bit, as not every piece favours the same settings, nor every day is the same. Templates are great time savers.

A Three-Microphone Setup for Recording Classical Guitar
An M/S Stereo alternative
Classical Guitar is a complex and rich sounding instrument; as such, it sounds better when is recorded with at least two microphones. A statement that you must have read several times already if you hang out at this site. Some engineers argue though that guitar is a relatively small instrument which tends to sound too "wide" when recorded with the most conventional stereo techniques; thus sounding unrealistic in playback.
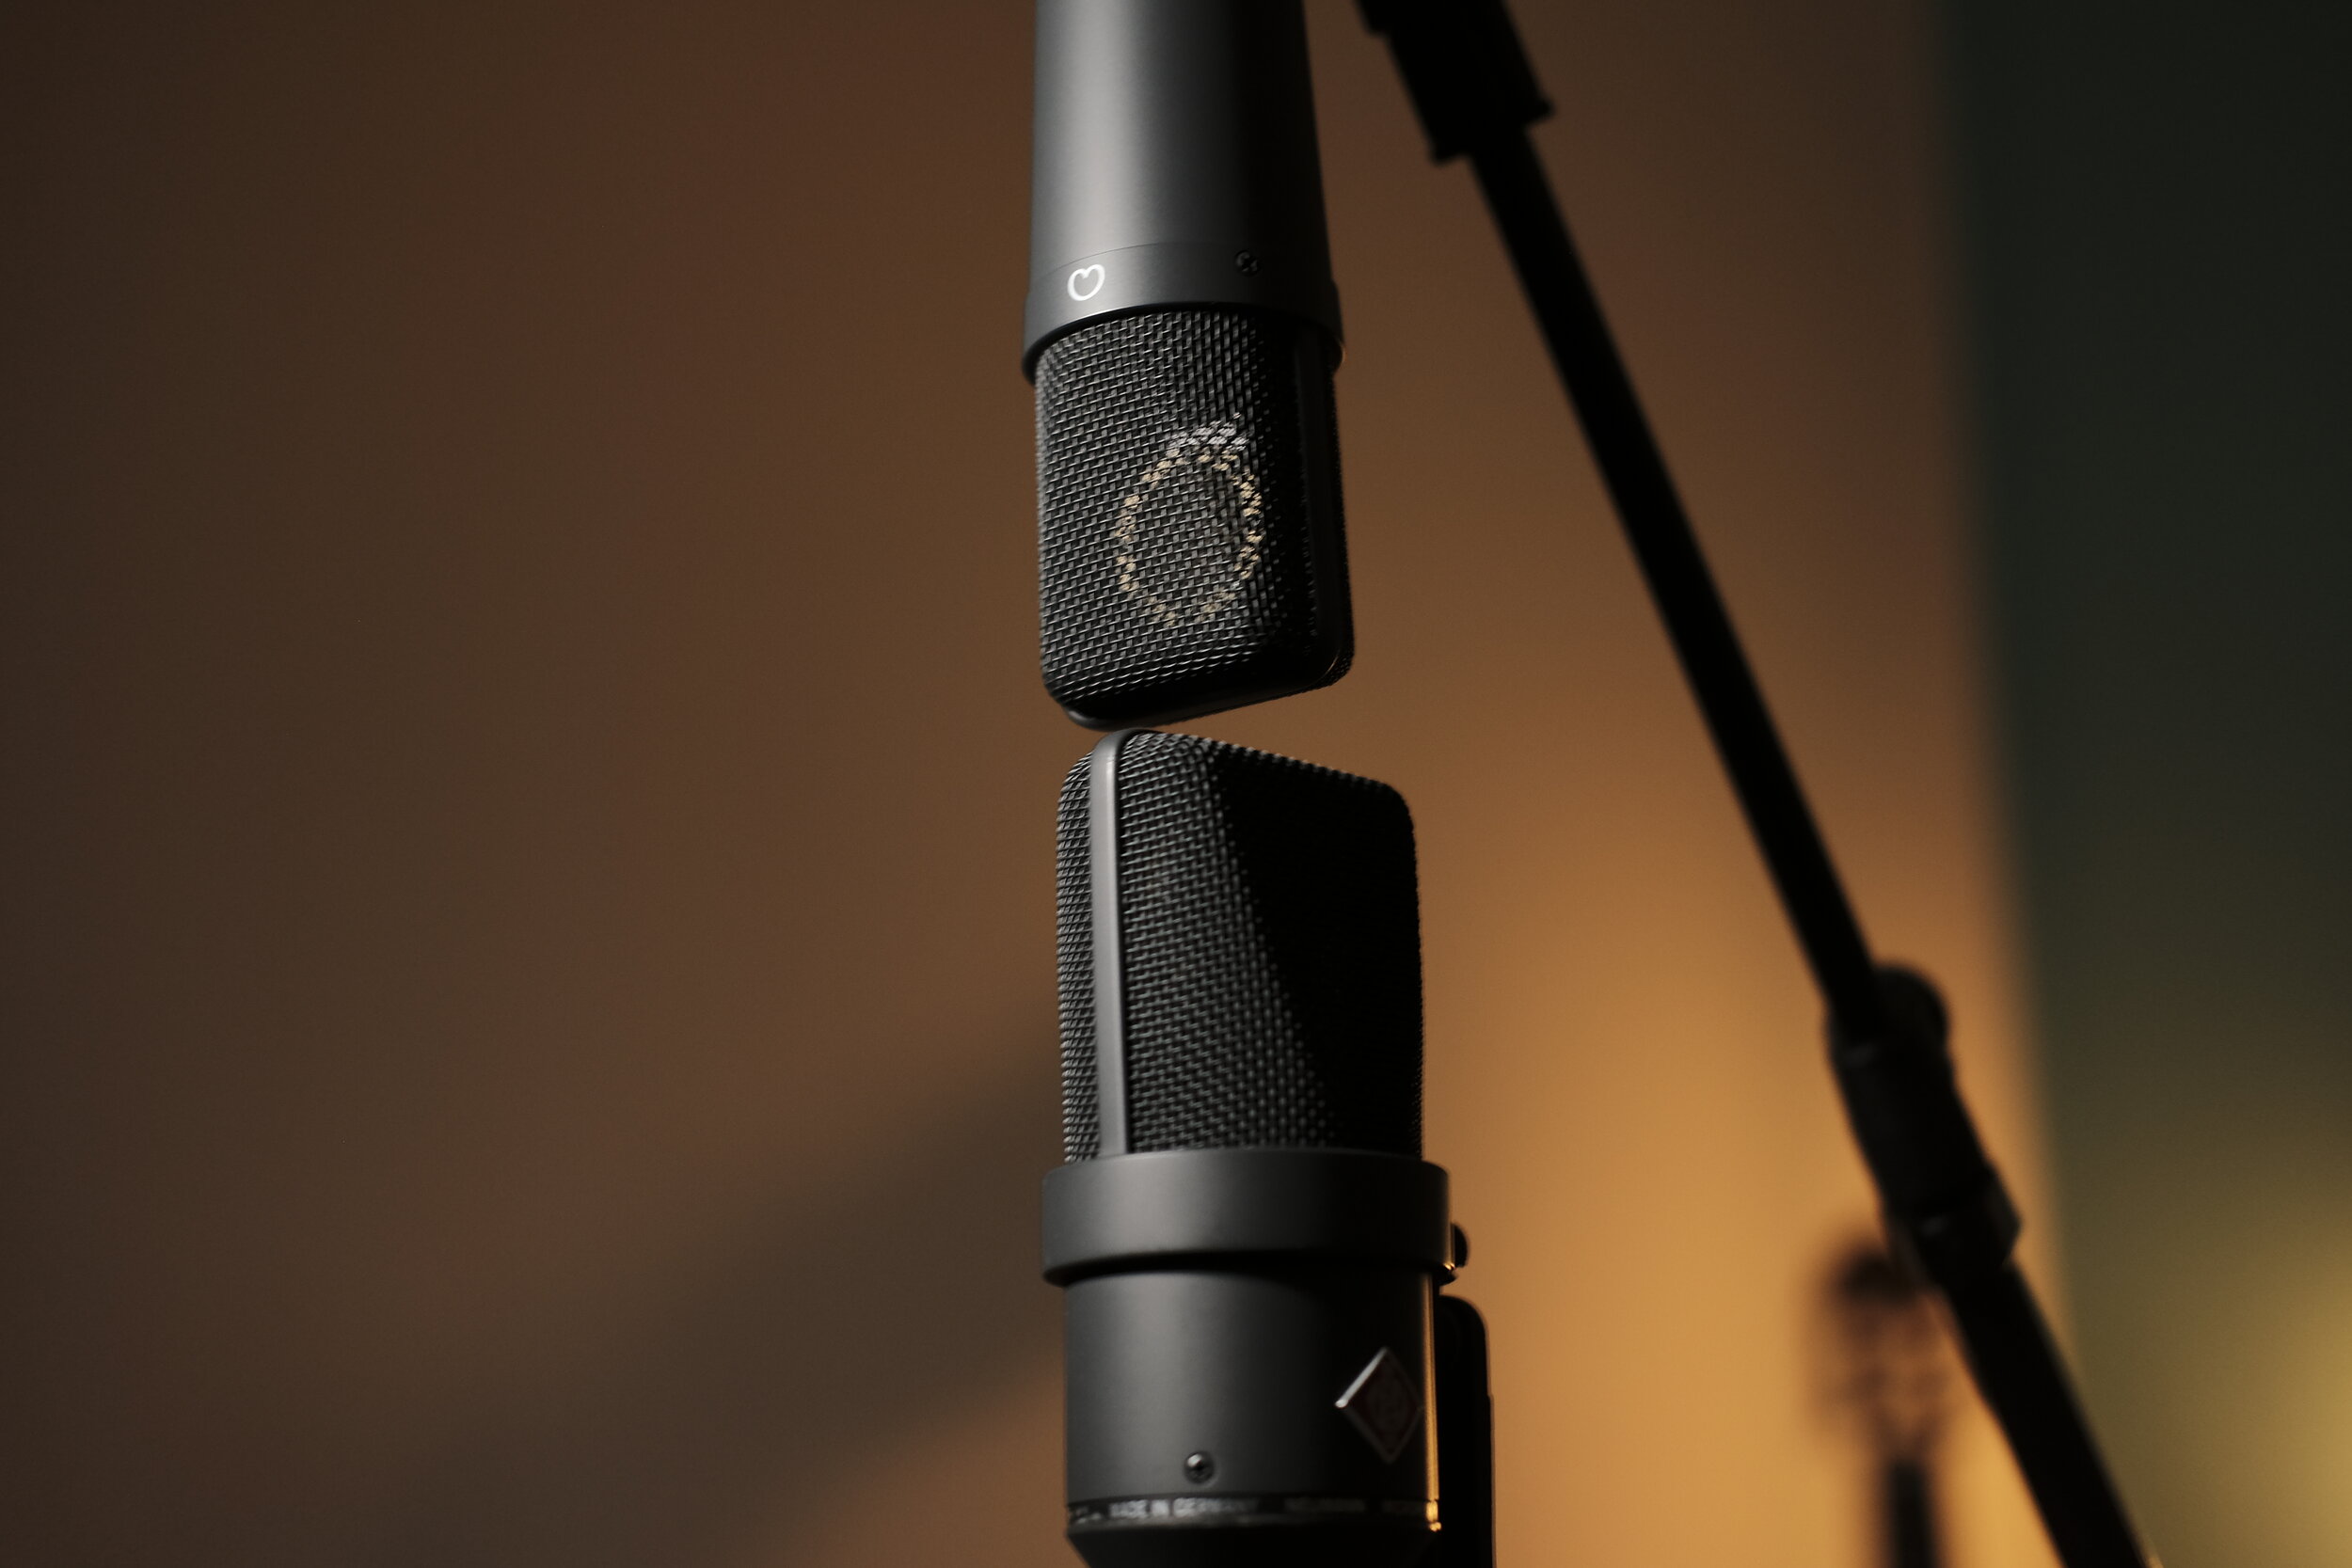
Neumann TLM 193 and TLM 170 in M/S Stereo Configuration
Mid/Side stereo, which I discuss in my Three M/S Stereo Setups for the Classical Guitar article, is usually praised for its truthful representation of the classical guitar. The elimination of phasing problems and the flexibility it offers during mixing are additional important advantages, however, it is not immune to potential issues. Namely, the collapse of the room information in mono reproduction, and the inability to hear the resulted-combined sound without some processing to the channels (or the use of an M/S matrix). Lastly, symmetrical Figure-8 microphones, required for the "Side" channels, with a balanced response are generally expensive.
Alternatively, the combination of a "Mono" microphone placed at close-proximity and a "Stereo Pair" at some distance, shares some similar advantages without the drawbacks of M/S Stereo. Hence the Three-Microphone Setup is an appropriate option for capturing the subtleties of the classical guitar.
Purpose in position
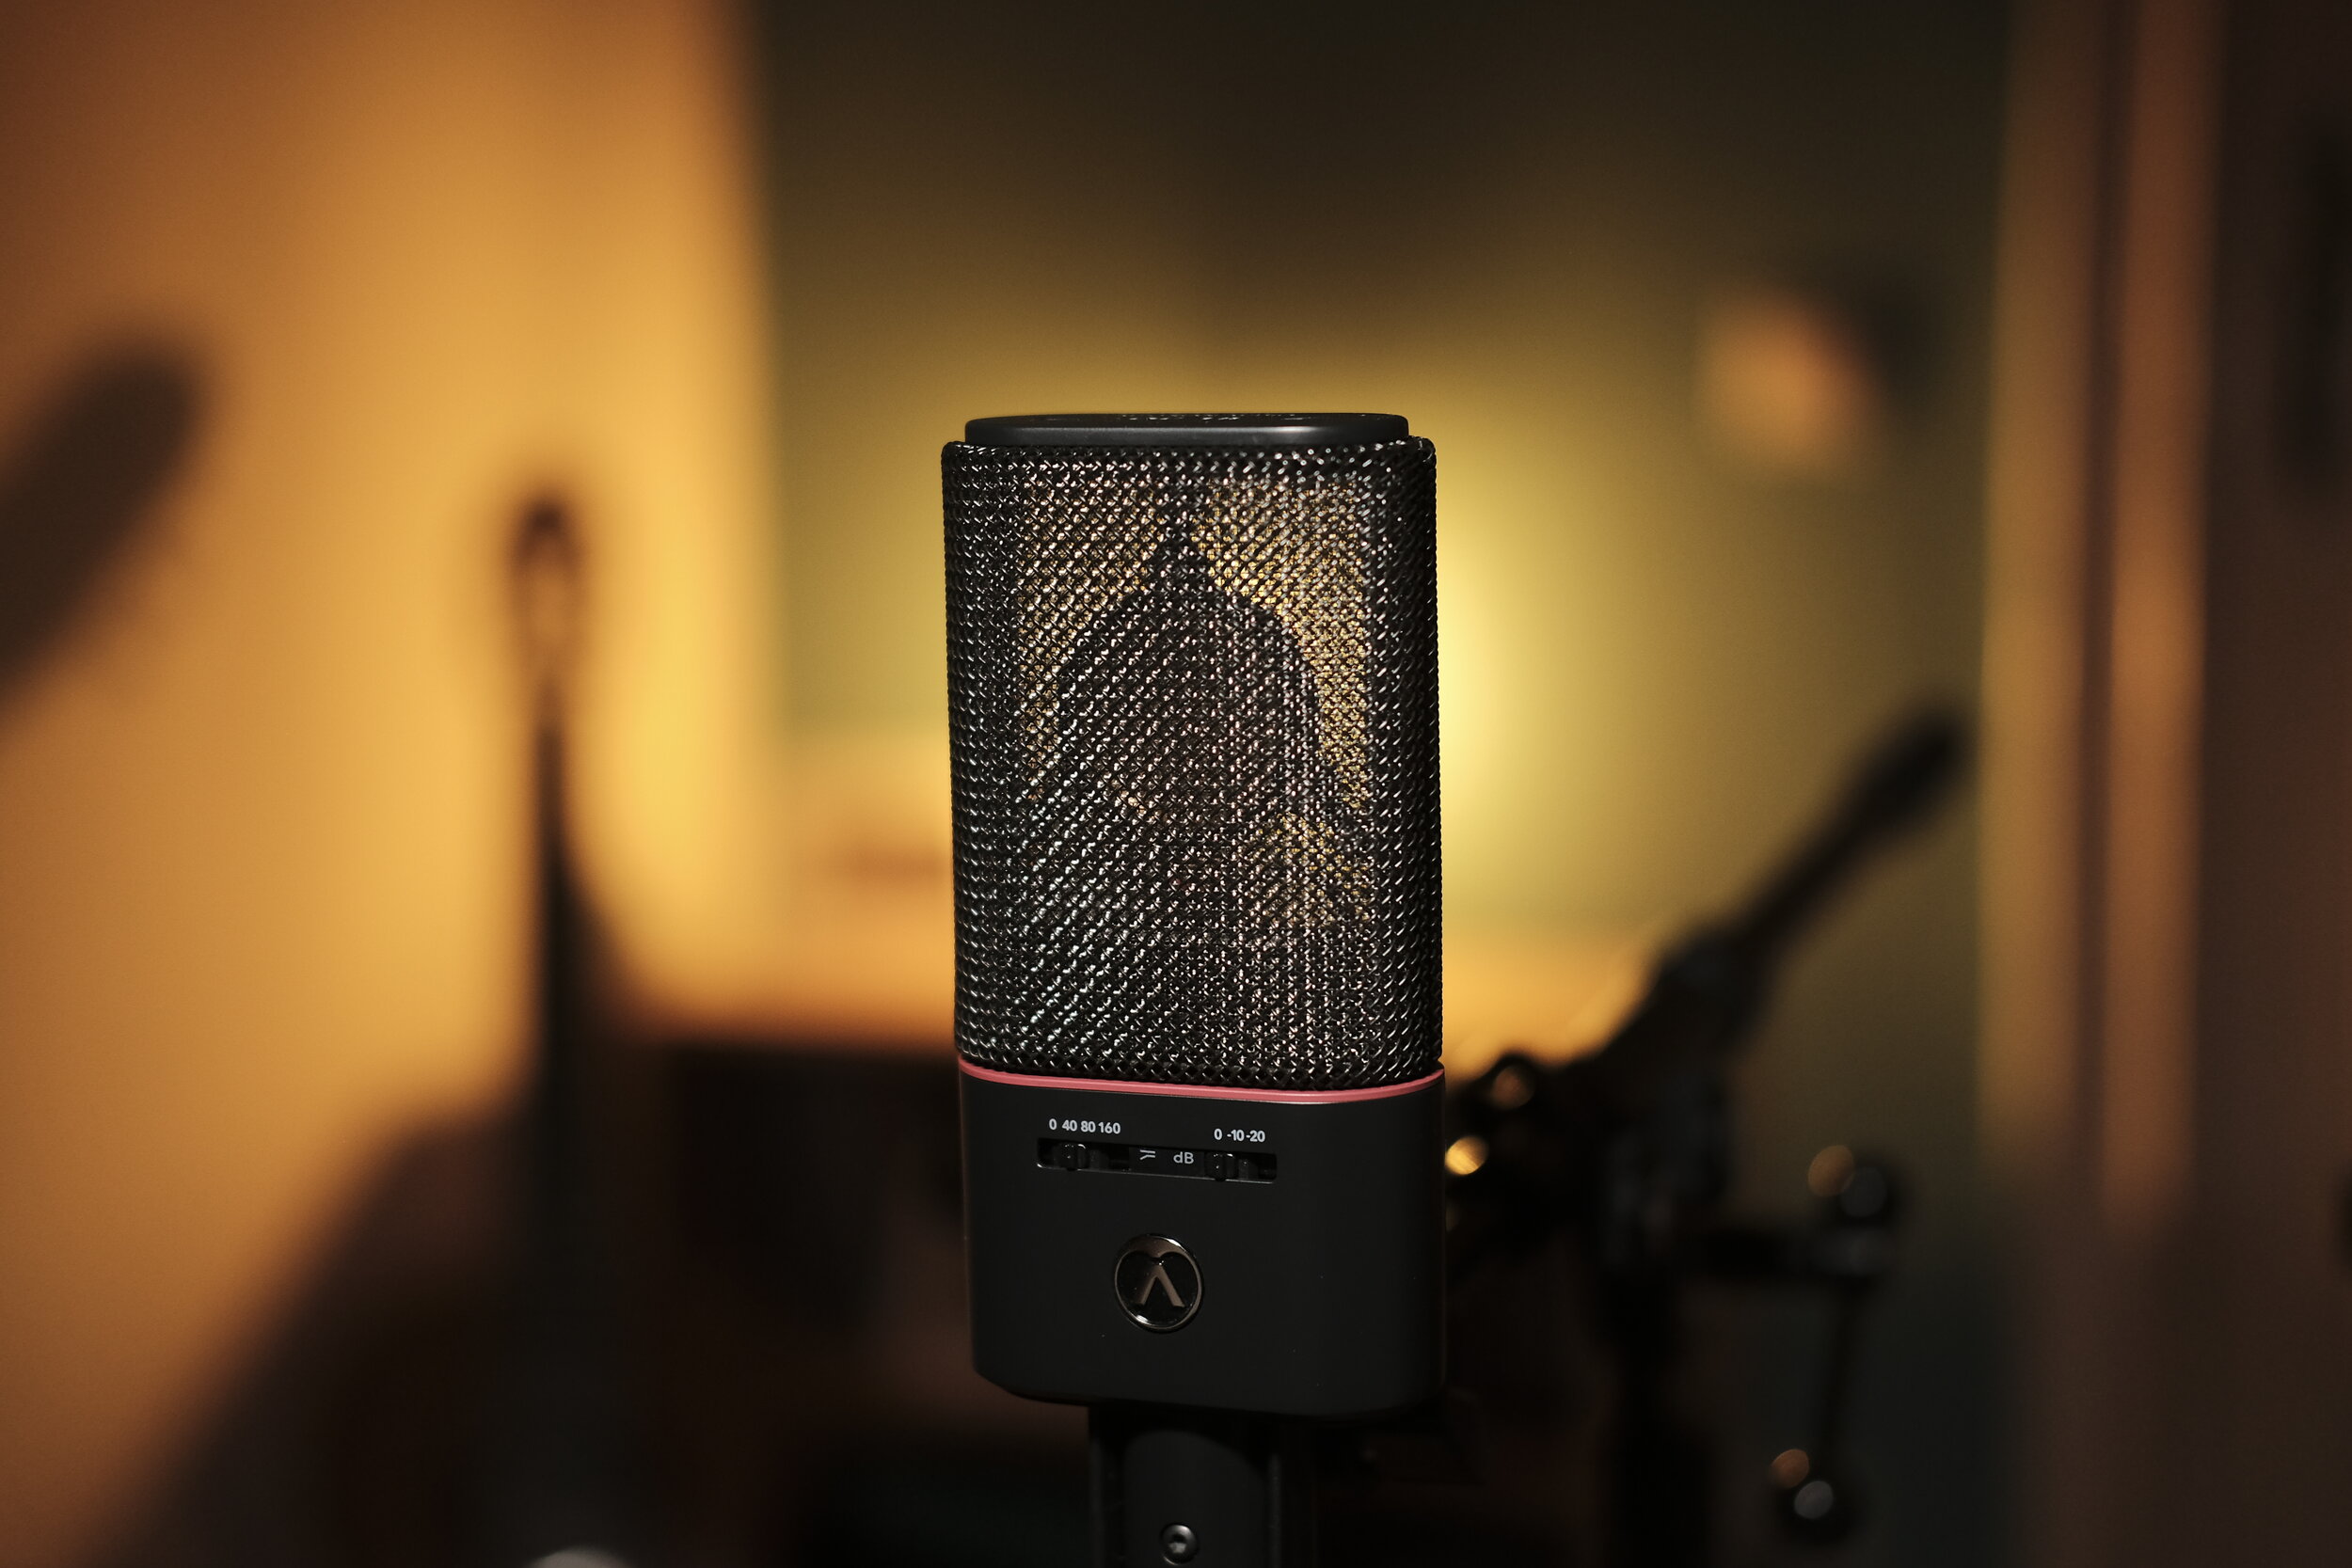
Austrian Audio OC18 - A Large Diaphragm Cardioid Condenser
The "Mono" microphone is positioned close to the instrument (at about 50cm, although some could go as close as 30cm) to capture a full-bodied sound. I recommend a large-diaphragm condenser with a smooth treble response for this position; as not only it will capture the fullest sound, but the slower transient response of the large capsule will also give a less analytic, more relaxed response.
The "Stereo Pair" is placed a little further away to capture the sound of the room. A pair of small-diaphragm condensers is ideal here due to the better off-axis response and can be either Omni or Cardioid patterns depending on the acoustics. The actual distance depends mainly on the room; accordingly, as the distance increases, the height of the microphones should be increased as well. The distant pair brings to the mix crucial depth, space and some high-end articulation.
Decisions; Player vs Audience
Another way to see the three-microphone setup is as a fine compromise between the intimacy of what the player hears and the somewhat distant experience of an audience member.
During mixing, the three channels can be balanced to the desired sound; from close to distant and everything in between. Either the "mono" or the "stereo pair" can be used as the base sound. Think about a mono capture with some extra space or a distant pair with added fulness.
Examples
For the first recording, I used a Neumann TLM 193 relatively close to the guitar, and a wide pair of DPA 4011As as room microphones.
In isolation, neither the Mono signal nor the AB pair sounds particularly great. The first is somewhat plain and too direct, while body and weight are missing from the AB pair. When mixing all three microphones, the combined sound gets defined and three-dimensional; thus more real.
I made another example of the same setup and the exact same distances, this time with an Austrian Audio OC818 in Cardioid for the Mono duties. The AB pair is still the DPA 4011A. If you have read my Austrian Audio OC818 review, you already know that I love their sound, and I wanted to hear how well they can mix with the DPA microphones.
Combining M/S and Room Microphones
A few months ago, I also experimented with combining an M/S pair of Neumann TLM 193 and AEA N8 up close and a stereo pair of Austrian Audio OC818s at some distance, you can hear the result in this recording of Bach's Cello Prelude no.2.
Some things to take care of
If you want to try the Three-microphone setup, it is important to listen to the recording as a whole before committing to any microphone position. The Mono microphone may be judged alone if you plan to use for the main sound, but don't make bold decisions without listening to the combined audio.
Potential phasing nightmares is one of the biggest drawbacks of this setup, so take extra care to eliminate any issue and check with a proper phase meter plugin regularly (read my article on the Three Most Essential Plugins for Classical Guitar).
Lastly, although the recording should be evaluated as a whole, the close and distant setups might need to be EQed separately. Nevertheless, you may apply a catholic EQ with basic filters and sculpturing.
Cheaper Alternatives

Line Audio CM3 - A budget SDC with an surprisingly good sound
Apart from the aforementioned combinations, any microphone could do a decent job. If you just starting and your budget is limited, buy the best large-diaphragm condenser you can afford and a pair of cheaper small-diaphragm condensers, like the Line Audio CM3/CM4 (read my comparison of the Line Audio CM3 and DPA 4011A).
Final thoughts
I've seen mostly AB, XY, ORTF and sometimes M/S setups explored by engineers and home recordists for the classical guitar. All of which can produce excellent recordings given the right circumstances. Yet, I find that with more elaborate techniques I can capture the instrument, at home or on location, with exceptional precision, without any disadvantages. Except maybe for needing more input channels, cables, stands, and more time for the setup.
A Three-Microphone setup can shine in a very wet hall, as it allows us to capture the body and definition of the instrument while including as much ambience as desired. In a home recording of the classical guitar, it offers great flexibility, if not to provide ambience, it combines the intimacy and fullness of a close pick-up with some extra depth provided by the spaced pair.
So, what do you think? Have you tried a three-microphone setup? Which microphones have you used?

6 Common Mistakes When Recording the Classical Guitar at Home
Part I - The room and the microphones
You just bought a couple of microphones and want to start recording your classical guitar at home; share your recordings with your friends, archive your performances, or start your career as a professional guitarist or recordist. Additionally, recording yourself will force you to look straight into your flaws, thus improving you as a player.
These past few months, I have received quite a few emails and taught several Skype sessions with the focus on recording classical guitars. There are a few mistakes that seem to be common, mistakes that we all do when we first start recording.
In this article, I discuss some of the flubs of the beginner recordist that have to do mainly with the microphones and the room.
You can also read the 6 Common Mistakes When Recording Classical Guitar at Home, Part II article, where I discuss about utilizing a proper signal chain and achieving satisfactory results in post-processing.
Mistake no.1 - Not spending enough time to study the room

Julian Bream - A Life on the Road (Book, 1982)
Every room is different, and If I had to take something out of the brilliant Julian Bream’s book "A Life on the Road" is how essential is to take the extra time to find the spot of where the guitar sounds the best in the room you are; the position in the room and the angle towards the sides are some of the things to consider.
Of course, Julian Bream mainly talks about performances, but the same logic applies to the recording aspect as well. The best sounding spot in the room will allow you to play more comfortably, thus you might sculpture a nicer sound of your guitar; and depending on the microphone technique you use, added ambience or the elimination of unwanted reflections will have an enormous impact on the final recording.
Usually, most of us sit where it is convenient and don't think much about positioning the microphones, as long as they are not in the way. Some others, they like symmetry and will position themselves or the microphones in the middle of a square or rectangular room; the worst sounding spot in a room like this, introducing a plethora of problems that are impossible to remove.
So, try a few different positions, angle the guitar towards one of the sidewalls, maybe sit a little closer to the back wall, to give some space and allow the guitar to project properly. Better yet, ask someone else to play the guitar, ask them to try a few different positions and observe how it affects the sound. Use your ears as if they were the microphones.
Mistake no.2 - Placing the microphones too far away from the guitar

Norbert' Kraft’s distant miking with a spaced pair of Neumann microphones
If you have ever watched any Naxos videos, you must have noticed Norbert Kraft's distant and wide miking. Similar techniques can be seen any many famous recordings. Getting influenced by professional recordists can be inspiring, but also equally misleading as the source material is very different. Techniques that can be excellent in a church, large halls, or even a well-treated studio never apply to the smaller room reality of the home recordist.
By following such techniques you might end up placing the microphone(s) closer to the front wall than the guitar. Even when the microphone(s) are close to equal in distance, it is possible to end up with an overly diffused and roomy sound; as a result, the sound of the small room will be forever embedded in your recording. Getting too wide will also be a problem if the room is not wide enough. Also, the guitar is a small instrument and rarely benefits from a very wide pick up. Therefore, try moving the microphones closer to the guitar but not too close.
Mistake no.3 - Placing the microphones too close to the guitar

Pat Metheny - nylon string recording; don’t try this at home!
After failing with the "church-technique", many of us want to get rid of the small room sound altogether, we have amazing reverb plugins anyway, and start positioning the microphone(s) very close to the guitar, I mean really close. To a similar erroneously path can arrive those with an acoustic guitar background or those who have witnessed some terrible close-miking examples in even famous recordings.
The problem is actually... threefold:
Firstly, by placing the microphones too close, finger and other mechanical noises will creep in, resulting in an annoying and unattractive recording. You may start cutting high frequencies to remove some of those artefacts but sooner or later you'll end up with an immensely dull recording.
Then, most of us usually start with directional microphones, those exhibit a pronounced low-end frequency response due to the proximity effect. One can balance the unwanted boost with careful EQ-ing, but beginner recordists won't have the skills for that. The low-frequency boost combined with the need to cut high-end information will produce an unbalanced imitation of a classical guitar.
Furthermore, the classical guitar is a complex instrument; every part of the top projects different frequencies that they all combine at some point to create a cohesive and rich sound. Normally this point is around the length of the soundboard, about 50cm, that should be the limit of how close you can get with the microphone(s): Greater distance is preferable if the room allows, but, never record classical guitar closer than 50cm.
Remember, classical guitar needs space!
Mistake no.4 - Not experimenting with microphone height, angle and techniques
Placing the microphone(s) at the height of the guitar is a decent place to start, but as microphone height and angle influences so much the overall character of the recording, ignoring other possibilities will frustrate you as you will have to fight with post-processing to get the desired result. It is preferable to spend the extra time and set up the microphone(s) correctly.
Normally, as classical guitarists learn to project their sound slightly upwards, the further away you place the microphone(s), the higher they should be positioned. And, by allowing the microphone(s) to face a bit downwards, so to be on-axis with the guitar, you can achieve a realistic and full-range recording with great definition. This technique will capture what is usually called the "audience perspective".

Spaced AB Pair of Austrian Audio OC818 at 103cm height that point slightly downward
If you notice that the guitar, guitarist or microphones to sound a little sharp, you can angle the microphones slightly off-axis to reach a smoother treble response.
In the case of spaced pairs, it is not uncommon to point the microphones somewhat outwards so that they are not parallel to each other. But in a small room, and at greater distances, additional room reflections will soak into the recording. Thus, I've found that is more desirable to point the microphones slightly inwards or a little higher to achieve a mildly off-axis response but with less "room" in the recording.
For those who pursue an intimate and fuller sound, with a tame high-end and less room, what is called the "player's perspective"; miking the guitar a little closer and with the microphone(s) lower is a good place to start. Avoid placing any microphone opposite of the soundhole, otherwise, the recording will become boomy. For an even fuller sound, place the microphone(s) lower yet, and point them upwards.
The discussion about miking techniques is a complicated one and deserves its own article(s), but until I write it, these ideas should get you a bit more involved.
Mistake no.5 - Not checking for phase problems in stereo recordings

The 2CAudio Vector plugin includes a phase meter and its free!
The classical guitar should be recorded in stereo. Either a pair of spaced condensers or one of the several other stereo setups will do. Except for the coincident microphone techniques, like M/S Stereo and X/Y, any technique that involves two or more spaced microphones, can potentially become a phase nightmare.
Phasing has a noticeable influence on the sound quality of your recording, as due to cancellations and comb filtering it can potentially leave your recorded guitar sound thin and weak. Be sure to check for phasing problems with a proper plugin (I use the 2CAudio Vector, it has a phase meter, plus some other welcome features and its free), adjust the microphones until you minimize phase - everything higher than 80% on the meter is acceptable. You can still compensate for phasing during mixing, but it’s always better to take care of it beforehand.
Mistake no.6 - Thinking that more expensive microphones or preamps will fix all problems
Shopping for new microphones, interfaces and other toys... I mean tools... is fun; a big chunk of writings on this site is about reviewing and comparing recording equipment. But, at this age, pretty decent recordings can be made with a reasonable budget. So blaming the gear is only an excuse for not willing to go the hard way.
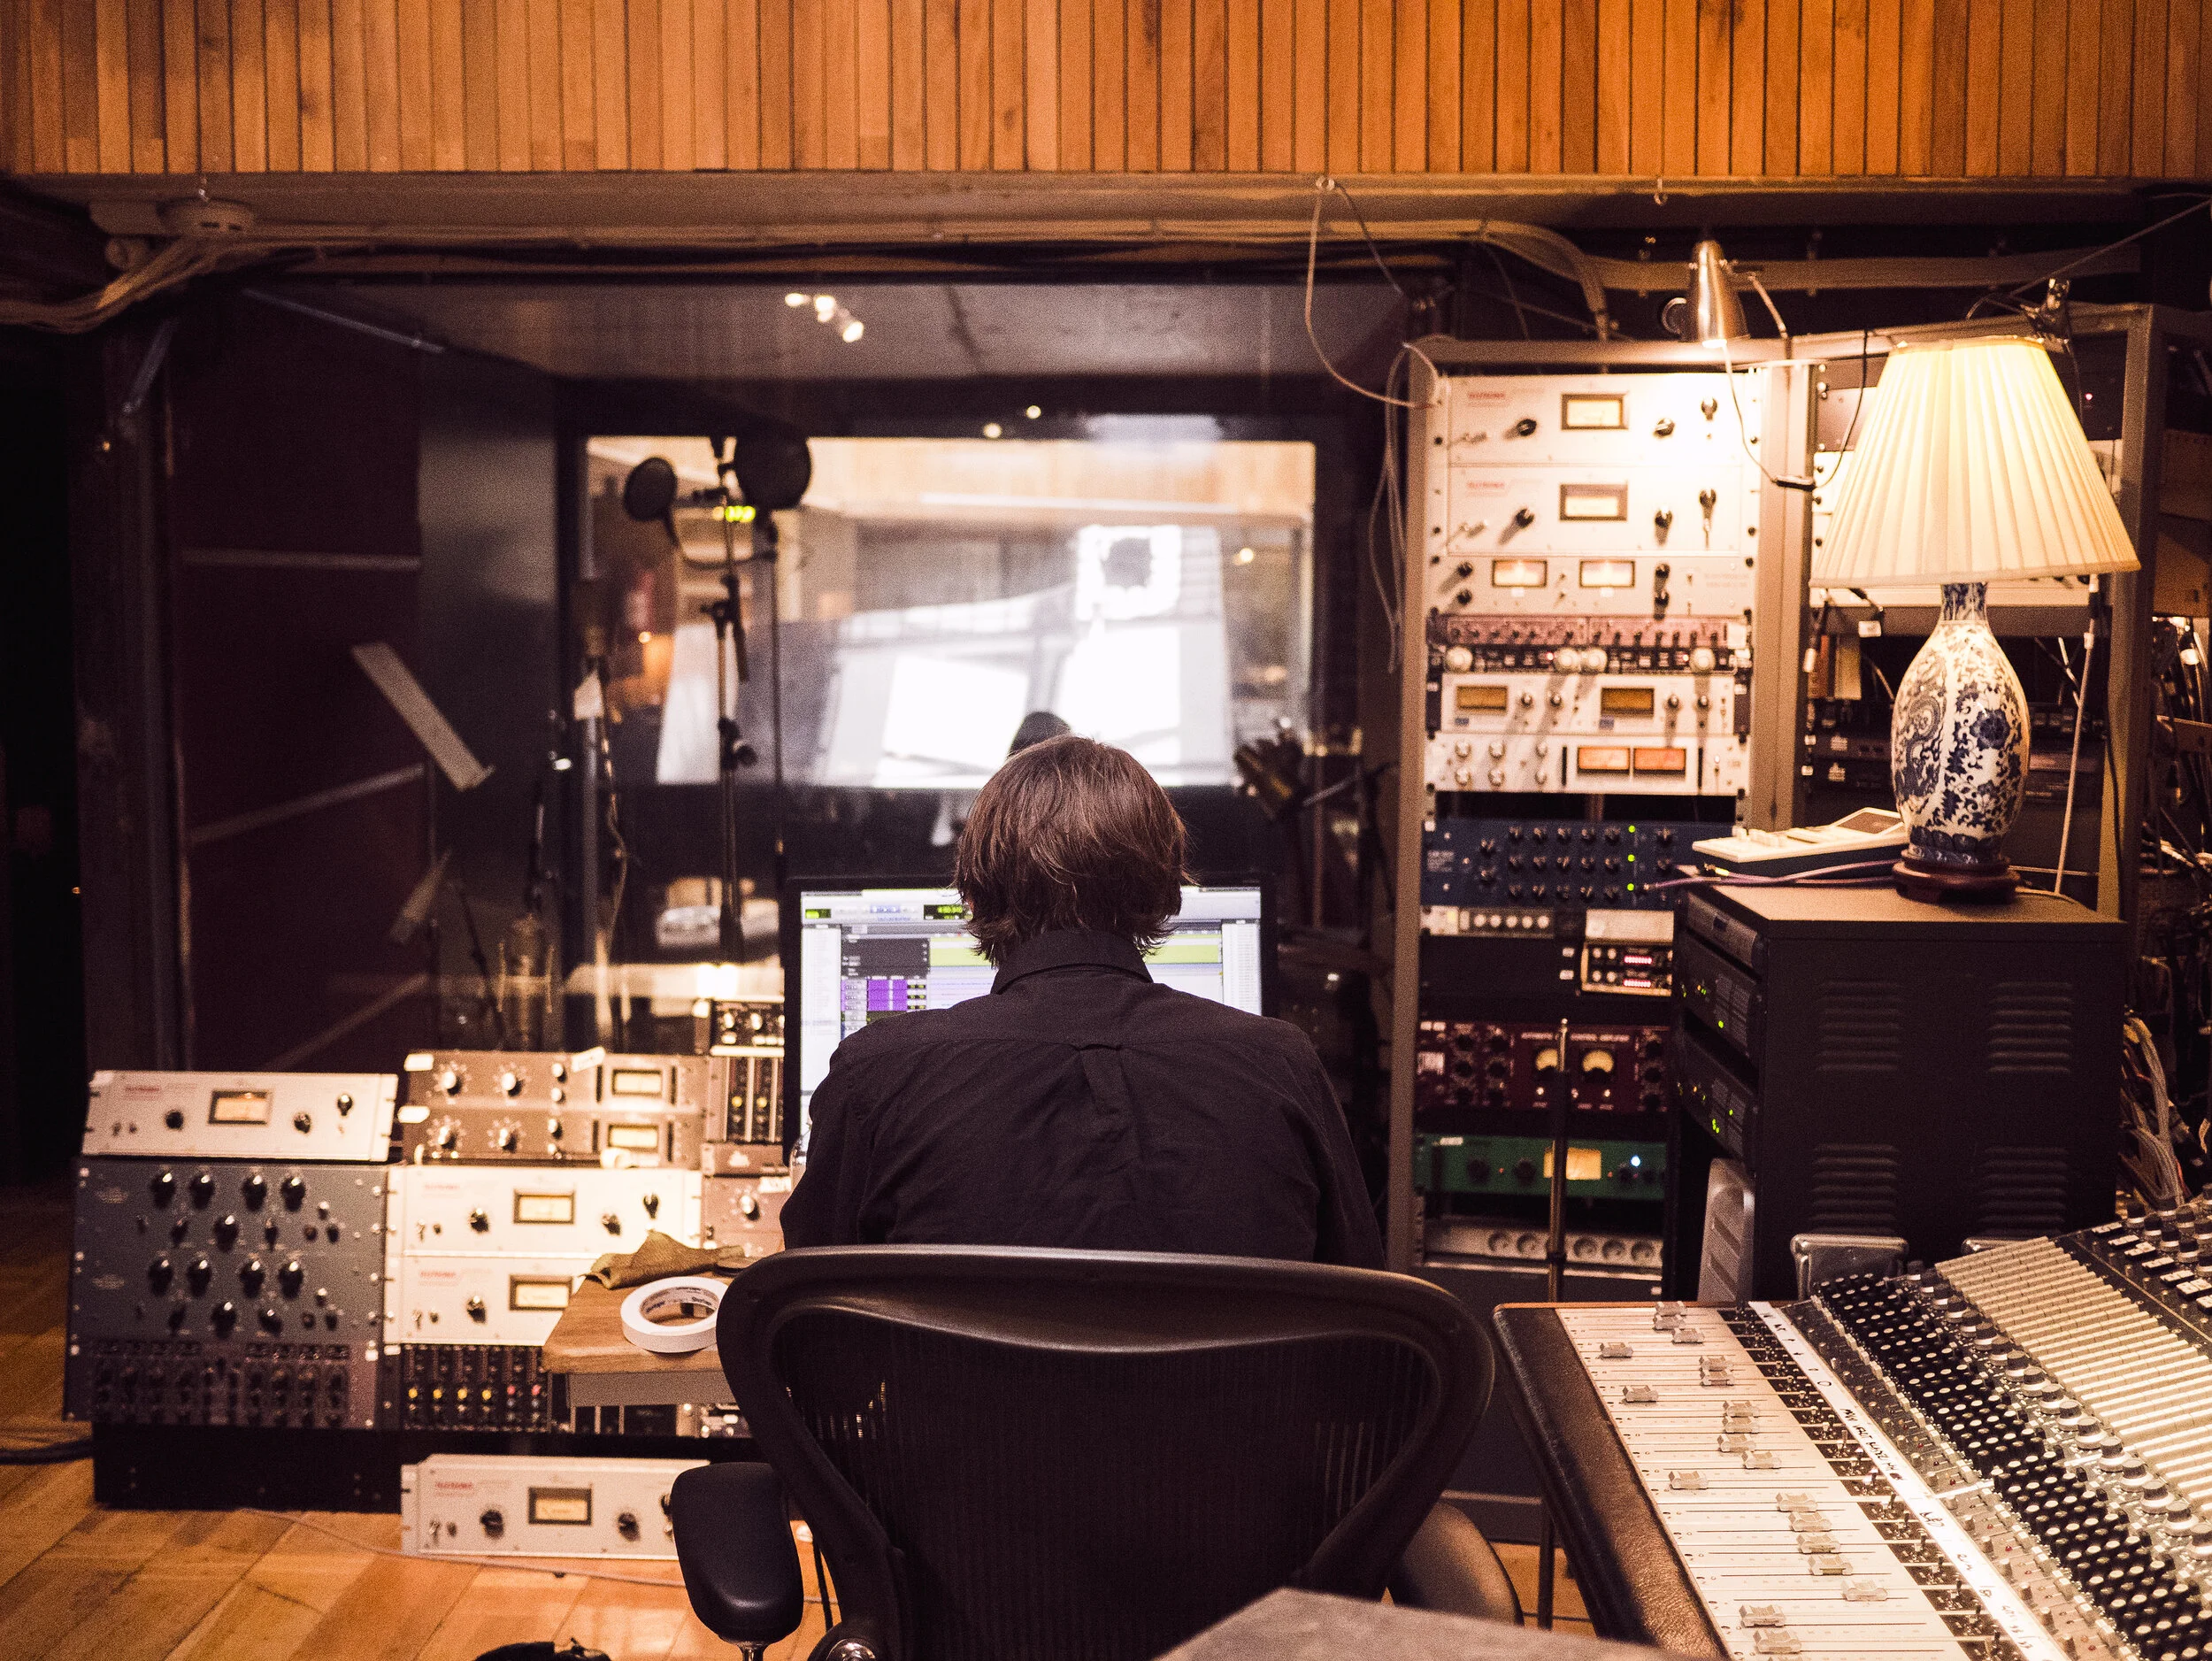
Refrigerator racks with outboard equipment can be fun, but we can do a lot with a couple of decent microphones and an audio interface
I'm not arguing that equipment doesn't matter; it does. It just not going to substitute for bad microphone positioning, an unsuitable room or not refined guitar technique. Contrary, more accurate and detailed microphones will accentuate any of the problems that are present.
Learning how to use what you've got, experiment with various microphone techniques and positions; take steps to adjust your room for a better sound. And why not, maybe spend some time practising and try to be well-rehearsed before you press the record button. These are some basic actions to take that can drastically improve your recordings in a meaningful way.
Closing thoughts
Mistakes are part of the learning process; don't be afraid to make them, and don't hesitate to experiment. After all, recording is a journey, and the process of trying things can be a valuable lesson in becoming a more accomplished recordist.
I hope that this article might encourage you to try out different microphone positions, learn and improve your room. Optimistically, the information provided here will guide you to make better recordings.
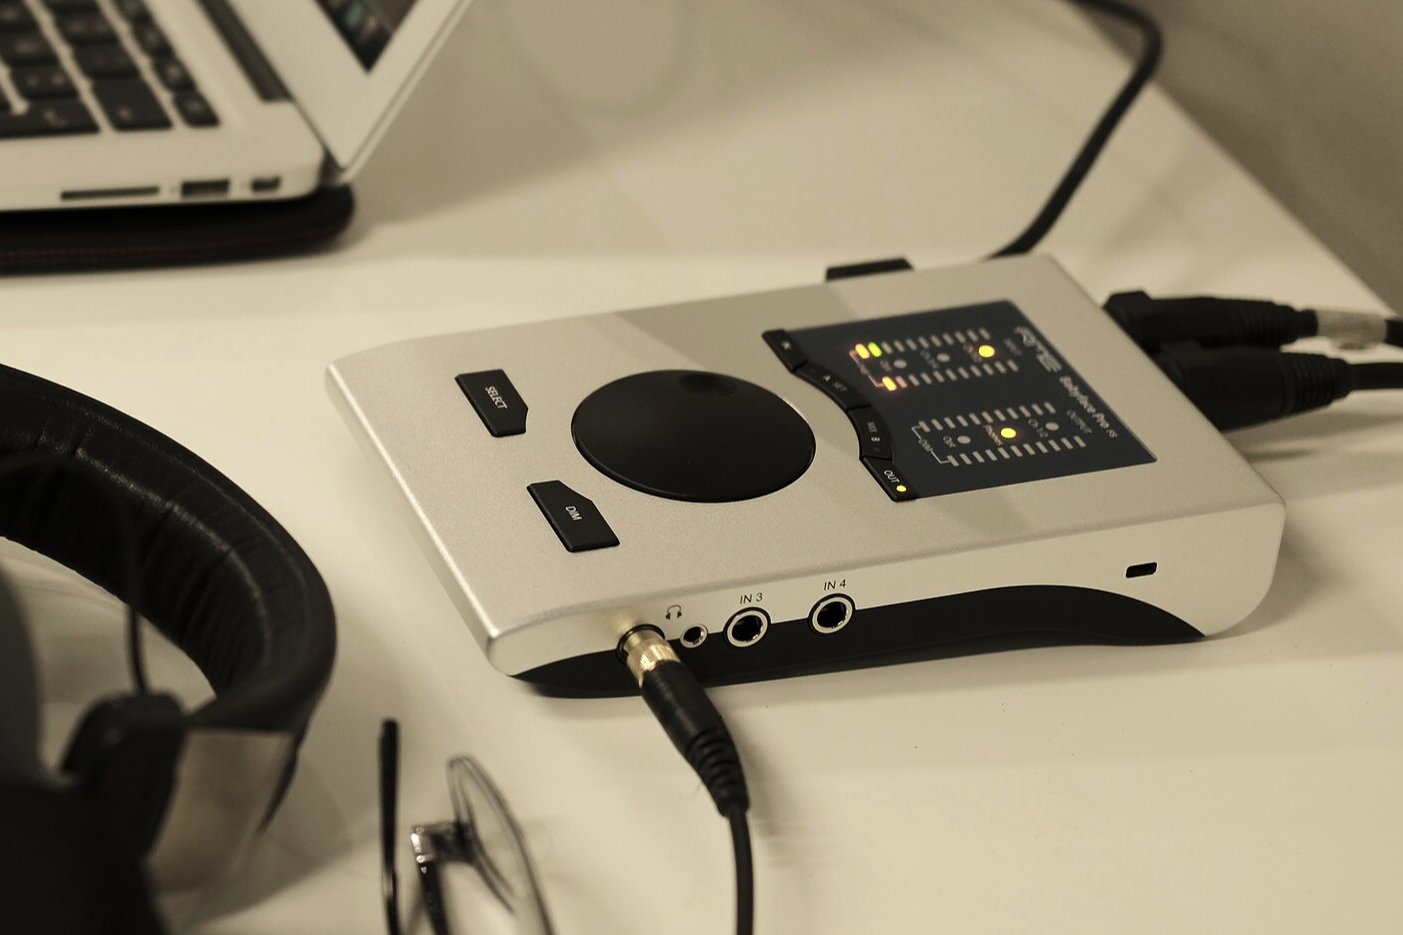
RME Babyface Pro FS Review
The best portable audio interface gets a welcome refresh.
There have been ten years since the introduction of the first Babyface; a portable interface with a unique form and the renown RME build-quality and performance stability. Five years later, the Pro version arrives and brings performance updates in practically every aspect and a new luxurious aluminium chassis. The latest revision updates it clock and now includes a full SteadyClock FS circuit as in the ADI-2 Pro FS for lowest jitter, as well as an improved 3,5 TRS headphones output with 90 mW, from the 70 mW that is found on the older version, and the same output op-amp as on RME's ADI-2 Pro.

The BabyFace takes on a remote location session.
Newly designed analogue and digital circuits improve the SNR and THD figures for the microphone inputs and monitor outputs, while innovative energy-saving technologies allow the Babyface Pro FS to remain bus-powered for portable setups. A small size, high-performance drivers and a fine fidelity designate the new RME as one of the best small audio interfaces for the home studio or the producer on the go.
The Device

A slight slope, tilts the controls towards the user
The Babyface Pro FS is housed in a tough chassis cut from a single block of aluminium. It has a slight slope, that tilts the controls and the metering LEDs towards the user for greater accessibility. It looks quite elegant in real life, much better than any pictures I've seen. The craftsmanship of the unit is exemplary and all the buttons have a satisfying feel to them.
Apart from the two excellent mic-preamps on the back of the unit, there are two additional line-inputs on the right side should you wish to connect it to an external preamp. A lot of small interfaces can only handle two inputs, which are generally enough for classical guitar, but the two extra channels can be proven rather helpful the few times that I might need to record a larger ensemble or experiment with different microphone setups.
Digital I/O with up to 8 channels is also available via ADAT or SPDIF to accommodate bigger setups.
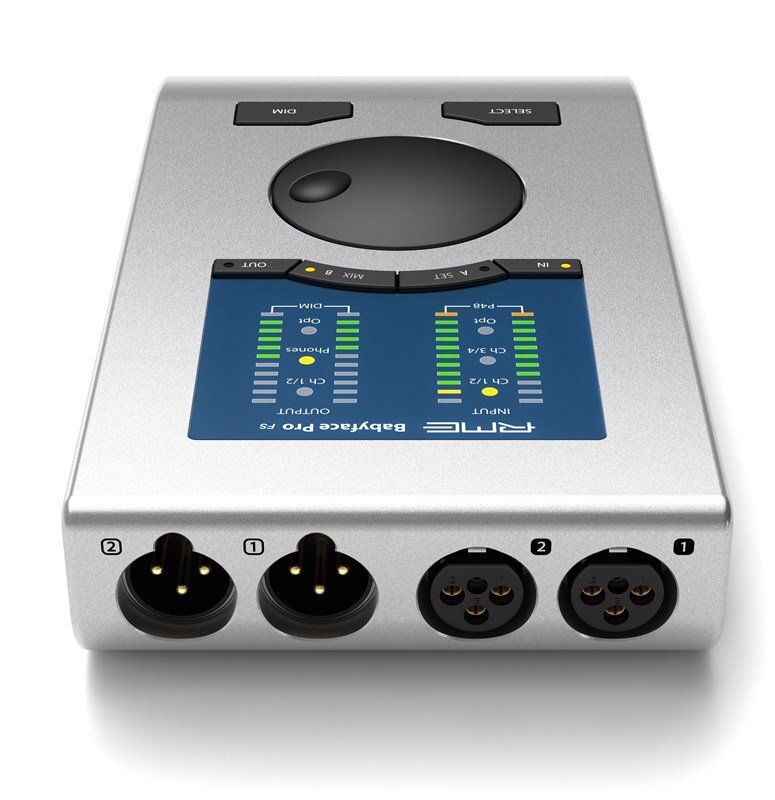
Preamp inputs, monitor outputs and comprehensive metering.
Two balanced XLR outputs feed the monitors is another welcome feature that is rarely seen on interfaces of this size. A surprising inclusion though is a pair of independent headphone busses, one with with a standard jack, the other with a mini-jack socket. Unfortunately, there is no separate control for the two phones, and according to RME, the TRS phone would be 6dB louder. Nevertheless, the next time you will forget the 6,3mm to 3,5mm adaptor on a location recording, you won't be miserable.
Considering the portable nature of the Babyface Pro Fs, I think that RME missed the mark with the provided hardshell case. Don't get me wrong, it is great to have and more than welcome, but it adds a lot of unnecessary bulk. The case itself, although not as premium as the interface, seems durable enough. Opening it up reveals a lot of unused space, with almost one-third of it to be empty. There are slots for the USB and Midi cables, which is handy, and another one for a power supply - that is not included. A case exactly the right size just for the unit would be preferable, I can always throw all the necessary cables in my backpack anyway.
The Babyface has a DC input for standalone applications, but as mentioned the power supply is not provided by RME as the interface is fully bus-powered. I haven't used one to test if there is any additional performance profit.
Unusually for any product in 2020, a two-hundred-page printed manual is included, both in German and English.
Clarity in abundance
True to the reputation of RME, the BabyFace Pro FS delivers a clear and articulate sound. The low-end is full, much better than of most competitive interfaces, while the midrange and high-end remain accurate. The ADDA conversion has only a tad less realism and depth than that of my ADI-2 Pro FS, but I was expecting that.
The preamps are also excellent, I wouldn't hesitate using them for any production. The lack of colouration might make them seem sterile for sources that might benefit from a bit of character. For classical guitar and other acoustic instruments, I find them to be precise and truthful. Might not be as refined or pleasing as expensive outboard preamps, but there is nothing to complain about for interface preamps.
Drivers and TotalMix FX
What separates RME to most other interface manufacturers is the perfect harmony of software and hardware implementation. The in-house developed drivers grant to its interfaces unparalleled stability and performance, and the Babyface Pro FS is no exception. The latency times are the lowest (the lower the better) in its class and working with the interface is seamless. Audio dropouts and other issues that occur in badly written drivers can diminish the user experience or even render a recording useless, however, the Babyface has been flawless in that regard. RME also provides extended support, with driver updates and service for many years after a typical product lifecycle; an OS update wont turn the unit into an expensive doorstop.

The BabyFace Pro FS is equipped with DSP effects for zero-latency monitoring.
Additionally, the TotalMix FX console comes packed with every sensible routing option and zero-latency DSP effects. My needs are pretty straight-forward though, and I have only used a fraction of the possibilities provided. The plethora of options can be a disadvantage, as the GUI seems complicated at first, but it is cleverly designed and with a modern look.
Conclusions
Excellent conversion, small size and the best drivers for audio known to man, place the RME on top of the list of small audio interfaces for the home-studio or location recordings. Although there are plentiful small and portable interfaces, most of them target the consumer or prosumer market. The Babyface Pro FS is one of the few devices that offer professional performance and functionality for the recordists that have fewer demands in terms of channel numbers but don't want to compromise on the audio quality.

DPA 4011A vs Schoeps CMC6 MK22
Other than various Neumann microphones, the most used small-diaphragm condensers in classical concert halls and recordings are made by DPA and Schoeps. The philosophies behind their designs are quite distinctive, as are the usual descriptions of the family sound of each brand. Arguably though, they are more similar than different, as they both belong in the relatively uncoloured realm. But the big question remains; which microphone is better for recording the classical guitar.
To try and answer that question, for my needs and tastes, I had to get demo units of their cardioid microphones.
A Cardioid and an Open-Cardioid
The 4011A is a staple performer for many acoustic/classical instruments when a directional pick-up is required, Schoeps also offers a few different cardioid capsules with their Colette system suitable for a variety of uses. The MK22, which I chose for this shootout, is an open-cardioid. Schoeps describes its characteristics as a combination of the natural low-end of an Omni pattern with the benefit of cardioid directionality. In essence, it is a little wider than their standard cardioid capsule, MK4, and offers a marginally finer bass response.
Comparing the Polar Pattern plots of these microphones, I realised that the MK22 is closer to the characteristics of the 4011A than the MK4, making the decision easier, and this comparison quite logical.

DPA 4011A Frequency Response

DPA 4011A Polar Pattern

Schoeps CMC6 MK22 Frequency Response

Schoeps CMC6 MK22 Polar Pattern
It has nothing to do with sound

The DPA 3511A Stereo Kit
This might be a little unfair to Schoeps, but it's not my fault. DPA arranged for me to have for reviewing the 3511A Stereo Kit; a high-quality aluminium case which except for a matched pair of microphones, includes a lot of premium accessories, like their high-quality microphone mounting clips, shock mounts and a long stereo boom. All made with the highest standards and can be convenient in the field.

Schoeps CMC6 MK22 Set
From Schoeps, all I got was a pair of CMC6 bodies with the MK22 capsules. I know that ultimately the sound is what matters most, and I that can be evaluated without any extra accessories. But getting familiar with the DPA system, elevated my experience.
Another observation that doesn’t have to do with sound is that the NEXTEL finish of the CMC6 preamps and capsules is quite fragile, I thought I could scratch them, just by looking at them. In comparison, the 4011A have a more solid feel and seem more durable.
Setting up
As per my usual recording techniques for the microphone duels, I placed each pair at an AB configuration, with 36cm distance between them, 96cm from the ground and around 70cm from the top of my spruce guitar.
By listening to the samples, it is evident that both microphone pairs provide a solid performance. I would be totally satisfied with either, but there are some differences.
Unambiguous precision
The 4011As have a unique way to draw an utterly accurate and almost holographic image of the classical guitar, without any sign of harshness or hardness that is not a product of the performance. The sustaining notes, ring longer and the complex harmonies are captured clearer, like if they are taken apart.
Without sacrificing detail, the MK22 capsules portray an euphonic result. They are fast and analytic, but yet with a smooth and musical character; as if the performance is treated with a touch of kindness.
Au contraire, the DPA microphones will represent with unambiguous precision all the nuances and subtleties of a world-class instrumentalist and a high-grade luthier guitar; exposing likewise any flaws on a player's technique or the instrument. Their honesty can be brutal and overwhelming in some cases. If the source is good, they are going to reveal it; if not, forget about using them.
The Schoeps's offer a gentle depiction of the performance by applying a veil of wizardry and charming sweetness. However with the DPAs, it is like looking at the recording through a magnifying glass.
Noise concerns
My only gripe with the 4011A is the high self-noise. At 18dB-A the noise is not excessive and in most cases not even noticeable, but it can be bothersome for distant miking with softer instruments, or very dynamic musical styles.
The MK22 with 13dB-A of self-noise is almost as silent as my Neumann TLM 193 which have a remarkable 10dB-A of self-noise performance. In reality, most rooms are noisier than any of these mics.
Back to the original question
Honestly, I cannot say which microphone is better; probably neither is. The Schoeps have a sound, as the DPAs and ideally, I would love to own sets of both. In isolation, both pairs should sound stunning, if not, the problem is certainly not on the chosen pair of microphones.
When I'm not directly comparing and analysing them so closely, I believe that their differences are not as pronounced. Saying that, after hearing to my playing and guitar(s) with the 4011As (and 4006As which DPA also sent me), it is difficult to accept anything less realistic.

Three M/S Setups for Classical Guitar
Capturing the natural room sound of the guitar.
The Mid/Side microphone technique has almost a century of history. Developed by Alan Blumlein in the early 1930s, it became popular in the broadcast studios because of its compatibility with mono. Even in the recording studio, it appears to have many advantages over the most commonly used stereo techniques.
With small instruments like the guitar, it is easy to capture a too wide of an image, resulting in an unrealistic and often a blurry reproduction, especially with ORTF and AB techniques.

Neumann TLM 193 & TLM 170 in M/S Stereo
The "Mid" microphone of M/S provides a solid capture of the instrument, while the "Side" microphone is responsible for picking up the ambience of the room. The right balance of the two microphones allows for a truthful image of the guitar realistically placed in the sound field.
The M/S technique gives you the most control over the stereo spread, but the best part is that you don't have to commit to any balance until the mixdown, as you can always change the balance long time after the recording is finished.
Things to consider
As the "Mid" microphone is responsible for capturing the actual sound of the guitar, it is essential to take the time and make sure that it's placement is optimal. Otherwise, there is not a lot you can do to fix it. Also, if the room ambience is not pleasant there is not a lot you could do to improve it, so you are better off with a close AB technique and using artificial reverb in your DAW during mixing.
Here is one of several M/S setups that I've tried this week. I placed the "Mid" microphone at a distance of 55cm from the top of the guitar, aiming at the midpoint from the bridge and hole. With the capsule being at 96cm high, slightly angled downwards, placing it on-axis with the angle the I hold my classical guitar.
The "Side" microphone with a Figure-8 pattern was simply placed on top of the other at 90 degrees, aligning the capsules as close together as possible, minimizing phase issues. The whole setup was angled slightly to the sidewalls of my room. The room is medium-sized, with a wooden floor, high ceiling and a few interesting angles on the wall, making it relatively live-sounding.

Austrian Audio OC818 M/S Pair
Austrian Audio OC818 in M/S Setup
In this first example, I used an Austrian Audio OC818 pair with the "Mid" microphone was set to cardioid. The response of the Austrian Audio microphones is fairly natural, especially at the low and mid registers. A slight boost is present at the higher frequencies, but it retains the very smooth character of the classic ceramic capsule, making the classical guitar recording to sound polished and vivacious, without any sign of harshness.

Gefell UMT70s M/S Pair
Gefell UMT70s in M/S Setup
The second example utilises a Gefell UMT70s pair, these mics have a unique appearance, an incredibly small grill and an unquestionably satisfying feeling to the touch, the craftsmanship is second to none. The UMT70s shows a distinct bright character with slightly recessed lows in its cardioid pattern. The Gefell microphones offer coloured pickup but maintain a smooth quality. In a way, this combination produces a somewhat more finished recording, with nostalgic charm, it reminded me of some Julian Bream albums. The result is pleasing but differs from the sound that I hear when I play my guitar, in my room.

Neumann TLM 193 and AEA N8 in M/S
Neumann TLM193 and AEA N8 in M/S Setup
An often overlooked aspect of the M/S microphone technique is that it doesn't require a matched pair of microphones. So for the last test, I decided to combine the Neumann TLM 193 with a ribbon microphone for "Side" duties, in this case, an AEA N8.
The TLM 193 has a natural pickup, with good low-end extension, flat mids and unhyped high-end. The most gratifying aspect of the Neumann is that it captures all the nuances of the classical guitar without emphasising any frequency. Additionally, it is dead silent which enhances dynamic playing styles as it allows the notes to fade to complete silence.
The AEA N8 offers an extended high-end in comparison to more traditional ribbons and a very juicy low end. This combination in an M/S setup produces a bigger soundstage and a sound that is reminiscing of the what I hear when I play.
Conclusions
All three setups can produce high-quality recordings, although the perspectives of their designs are different. I'm used to the Neumann sound, and I gravitate towards that, together with the N8 I think they produce the purest and calmest recording, but with the expense of some definition and the higher noise floor of the ribbon. The Austrian Audio microphones are the most versatile and they take EQ well. They are detailed, without sounding overly analytical, and offer an elegant and smooth sounding result. The Gefell combo sounds like an excellent record from perhaps a different era, but if you love that sound, it is impossible to get it with the other microphones.
Coda
The M/S Stereo technique has the potential to create outstanding recordings, captures a full-bodied and defined sound while eliminating phasing issues. Larger halls and resonant spaces are where it excels as it allows us to concentrate on the recording and fine-tune the balance of ambience and close sound during mixing.

Austrian Audio OC818 and the PolarDesigner plugin
What if you could set-up the microphones, record your classical guitar and configure the best polar pattern your room after the recording is finished?

Austrian Audio PolarDesigner Plugin
Polar pattern selection on large-diaphragm condensers is not a new thing, a few microphones intergrade continuously variable selectors that allow in-between pattern selection, or allow the two capsules to be recorded in separate tracks. Austrian Audio expands the possibilities with the PolarDesigner plugin.
The most important feature of the plugin is that it enables us to craft the perfect polar pattern responses across up to five crossover bands, at any time after the recording is finished. To make the plugin even more useful, Austrian Audio has packed a lot more into the PolarDesigner to perfectly fine-tune your sound.
Usual suspects

Austrian Audio OC818 M/S Pair
I decided to try it first on an M/S setup, I used the two output method only on the Mid microphone, I positioned it at 96cm high and around 60cm from the top of my classical guitar with a slight downward angle so that it is on-axis with the spruce top. I placed the second OC818 on top of the first in Figure-8 pattern.
Basic sounds
With the Side mic muted, I concentrated on the Mid mic for a while.
The unprocessed track, with each capsule recorded at a different track, is unusable without the PolarDesigner plugin, but that was expected.
First, I wanted to see how the basic patterns would behave. So, I enable the plugin, as well as some lean low-cut and high-cut filters.


Tweaking the patterns
After playing around with the controls for some time, I found that the Omni pattern assigned to the lower frequencies gives a beautiful body sound to my guitar. Cardioid and Wide-Cardioid patterns were chosen for the mids, to bring tones of the guitar in focus. And for the highs, I used more of a Wide-Cardioid pattern to add some room ambience.

I also used the free-field equalization preset, which I'm not exactly sure what the underneath processing is, but gave more depth and definition to the overall sound. I boosted the lows a little with the proximity control bar.

And finally, I added the Mid channels to the mix and balanced all three to get a natural room sound.
Conclusions
As you can see, the possibilities are endless, and you only have to position the microphones once, record a couple of takes and then figure out the perfect polar response during mixing.
Additionally, on remote location recording, lugging up monitors to accurately check that the microphones are placed in the most desirable position can be quite unattractive. Headphones, on the other hand, are never the best option to judge stereo spread and overall tonal balance. The PolarDesigner plugin allows for fine-tuning to take place with the speakers and room you know and trust at your mixing room.
Click here for the full review of both the Austrian Audio OC818.
PolarPilot App

Austrian Audio PolarPilot App
Austrian Audio designed an App that allows for real-time wireless control over the analogue bias voltages of the OC818, allocating 255 discrete polar patterns for us to choose. Plus access to high-pass, and pad in realtime via Bluetooth. Unfortunately, they didn't send me the OCR8 Bluetooth dongle that is required for this to work, so I couldn't test it out.
The judgement day

PolarDesigner Terminator Control
The plugin allows uses some sort of AI that determines what is important and not and provides a spill terminator or maximize target algorithm which should in principle reduce unwanted spill from other instruments But, I didn't get to use.

DPA 4011A vs Line Audio CM3
Line Audio is a relatively unknown Sweedish company, or rather a one-man shop, dedicated to manufacturing high-quality, unhyped microphones and linear pre-amplifiers. They have been in this business for more than 30 years, and by cutting the middle man, no advertising and minimizing cost on all the not essential elements, they offer their products at the most affordable prices.

DPA’s premium case.
DPA, on the other hand, is one of the leading names in the classical recording world. Many recording engineers, producers and musicians sing praises for their clarity and honest presentation. The microphones, as well as the accessories that accompany them, are as premium as it gets. But, performance comes at a cost.
In this duel, I wanted to see if the CM3 cardioid condenser stands any chance against the 4011A at a less than a tenth of its price. In other words, could someone with a limited budget still manage to get a decent recording?
Setting Up
I positioned the microphones at a small AB setup with 36cm between each microphone, at 96cm high and 55cm distance from the top of the guitar. At this distance, the microphones can capture the true sound of the guitar, and with their cardioid pattern, reject most of the room acoustics.
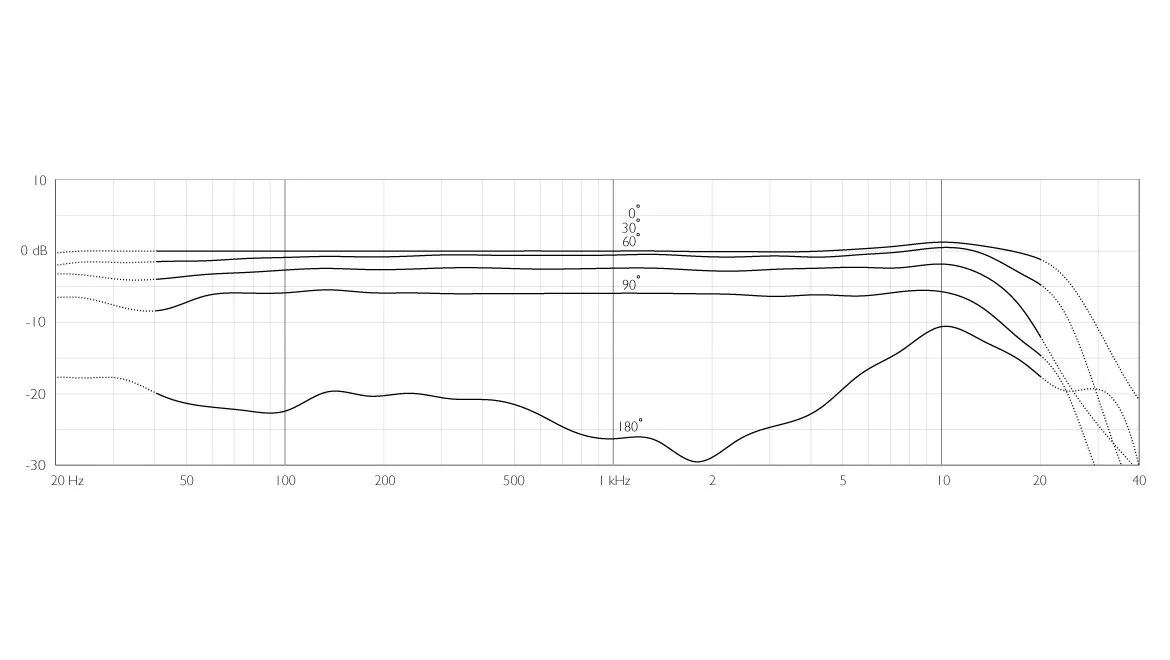
DPA 4011A Frequency Response and Polar Pattern
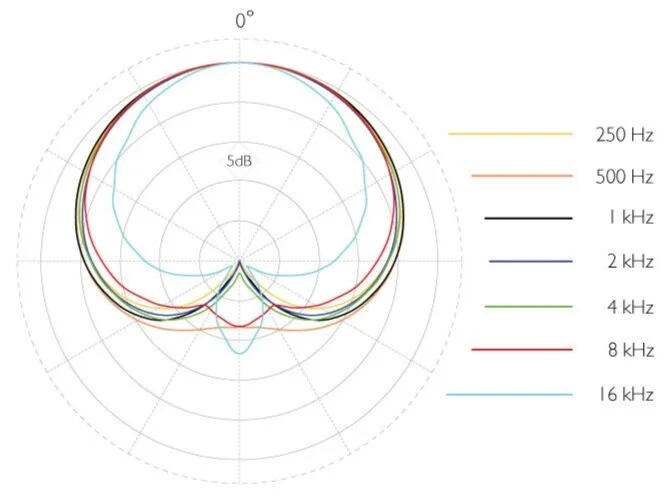

Line Audio CM3 Frequency Response and Polar Pattern
The details matter
Listening to the recordings, the DPA microphones have breathtaking clarity and detail at every frequency. They demonstrate a better resolution and capture a holographic image of the classical guitar, with more realism and depth. The 4011A are brutally honest microphones, but if you are recording a luthier grade guitar and a great guitar player in a beautiful sounding room, you want it all on tape.
The CM3s surprisingly (or not, if like me you have used them for a while) sound very close to the DPA. They are a little more plain sounding, with less resolution and depth, in comparison it feels feel like something is missing from the image. They are also less sensitive and can benefit a lot from a good preamp, but peculiarly they were only slightly noisier than the 4011A in these recordings.

Line Audio’s basic but very portable case.
A distinct approach
The Line Audio CM3s come at a very minimal package, shipped in a simple plastic box, with a basic plastic microphone holder and a decent windscreen. They are so inexpensive, so there is nothing to complain there really. They are also light and small enough, almost as small as an XLR adaptor, that I'm not hesitant to carry a pair even my jacket's pockets.
DPA sent me for test their premium stereo set, that comes with a luxury case and all the accessories you might ever need. The craftsmanship is impressive, everything feels finely processed with all the pieces machined out of solid aluminium. The full assembly looks stunning. Their stereo bar, while relatively expensive, is the best I've ever used.

DPA 4011A Stereo Set, all the accessories you’ll ever need.
Single 4011A or a more basic stereo set up is available, they come with only the essential accessories in a hardshell nylon case. This case is also of premium quality and judging by my experience with the d:vote 4099g (you can read my review here), I prefer this kind of case to wooden cases that come with most higher-priced microphones. As you cannot carry them easily for location recording because of weight and size. This is true especially for small-diaphragm condensers, which might see more commute than larger studio microphones.
For different use cases
In conclusion, the 4011A is the better microphone of the two in every aspect. Taking us a step closer to capturing the classical guitar in all it's nuance. Also, if you charge for your recording services, showing up with the DPA set will reassure your clients for the extent of quality you are committed to.
If you are on a limited budget, or just want to record yourself for non-commercial uses, the Line Audio microphones are the best-kept secret of the recording world. The CM3s can capture classical guitar with realism and honesty and are so inexpensive, you can buy a few.
In conclusion, the 4011A is the better microphone of the two in every aspect. The engineering and the accessories are unparalleled in quality, not to mention the sheer detail and sound quality that they capture. Taking us a step closer to capturing the classical guitar in all it's nuance. Also, if you charge for your recording services, showing up with the DPA set will reassure your clients for the extent of quality you are committed to.
But, if you are on a limited budget, or just want to record yourself for non-commercial uses, don't shy away from the Line Audio microphones, as in my experience it is hard to find any other small-diaphragm condenser microphone with such natural characteristics at this price range or even many times more expensive. The CM3s can capture classical guitar with realism and honesty and are so inexpensive, you can buy a few.
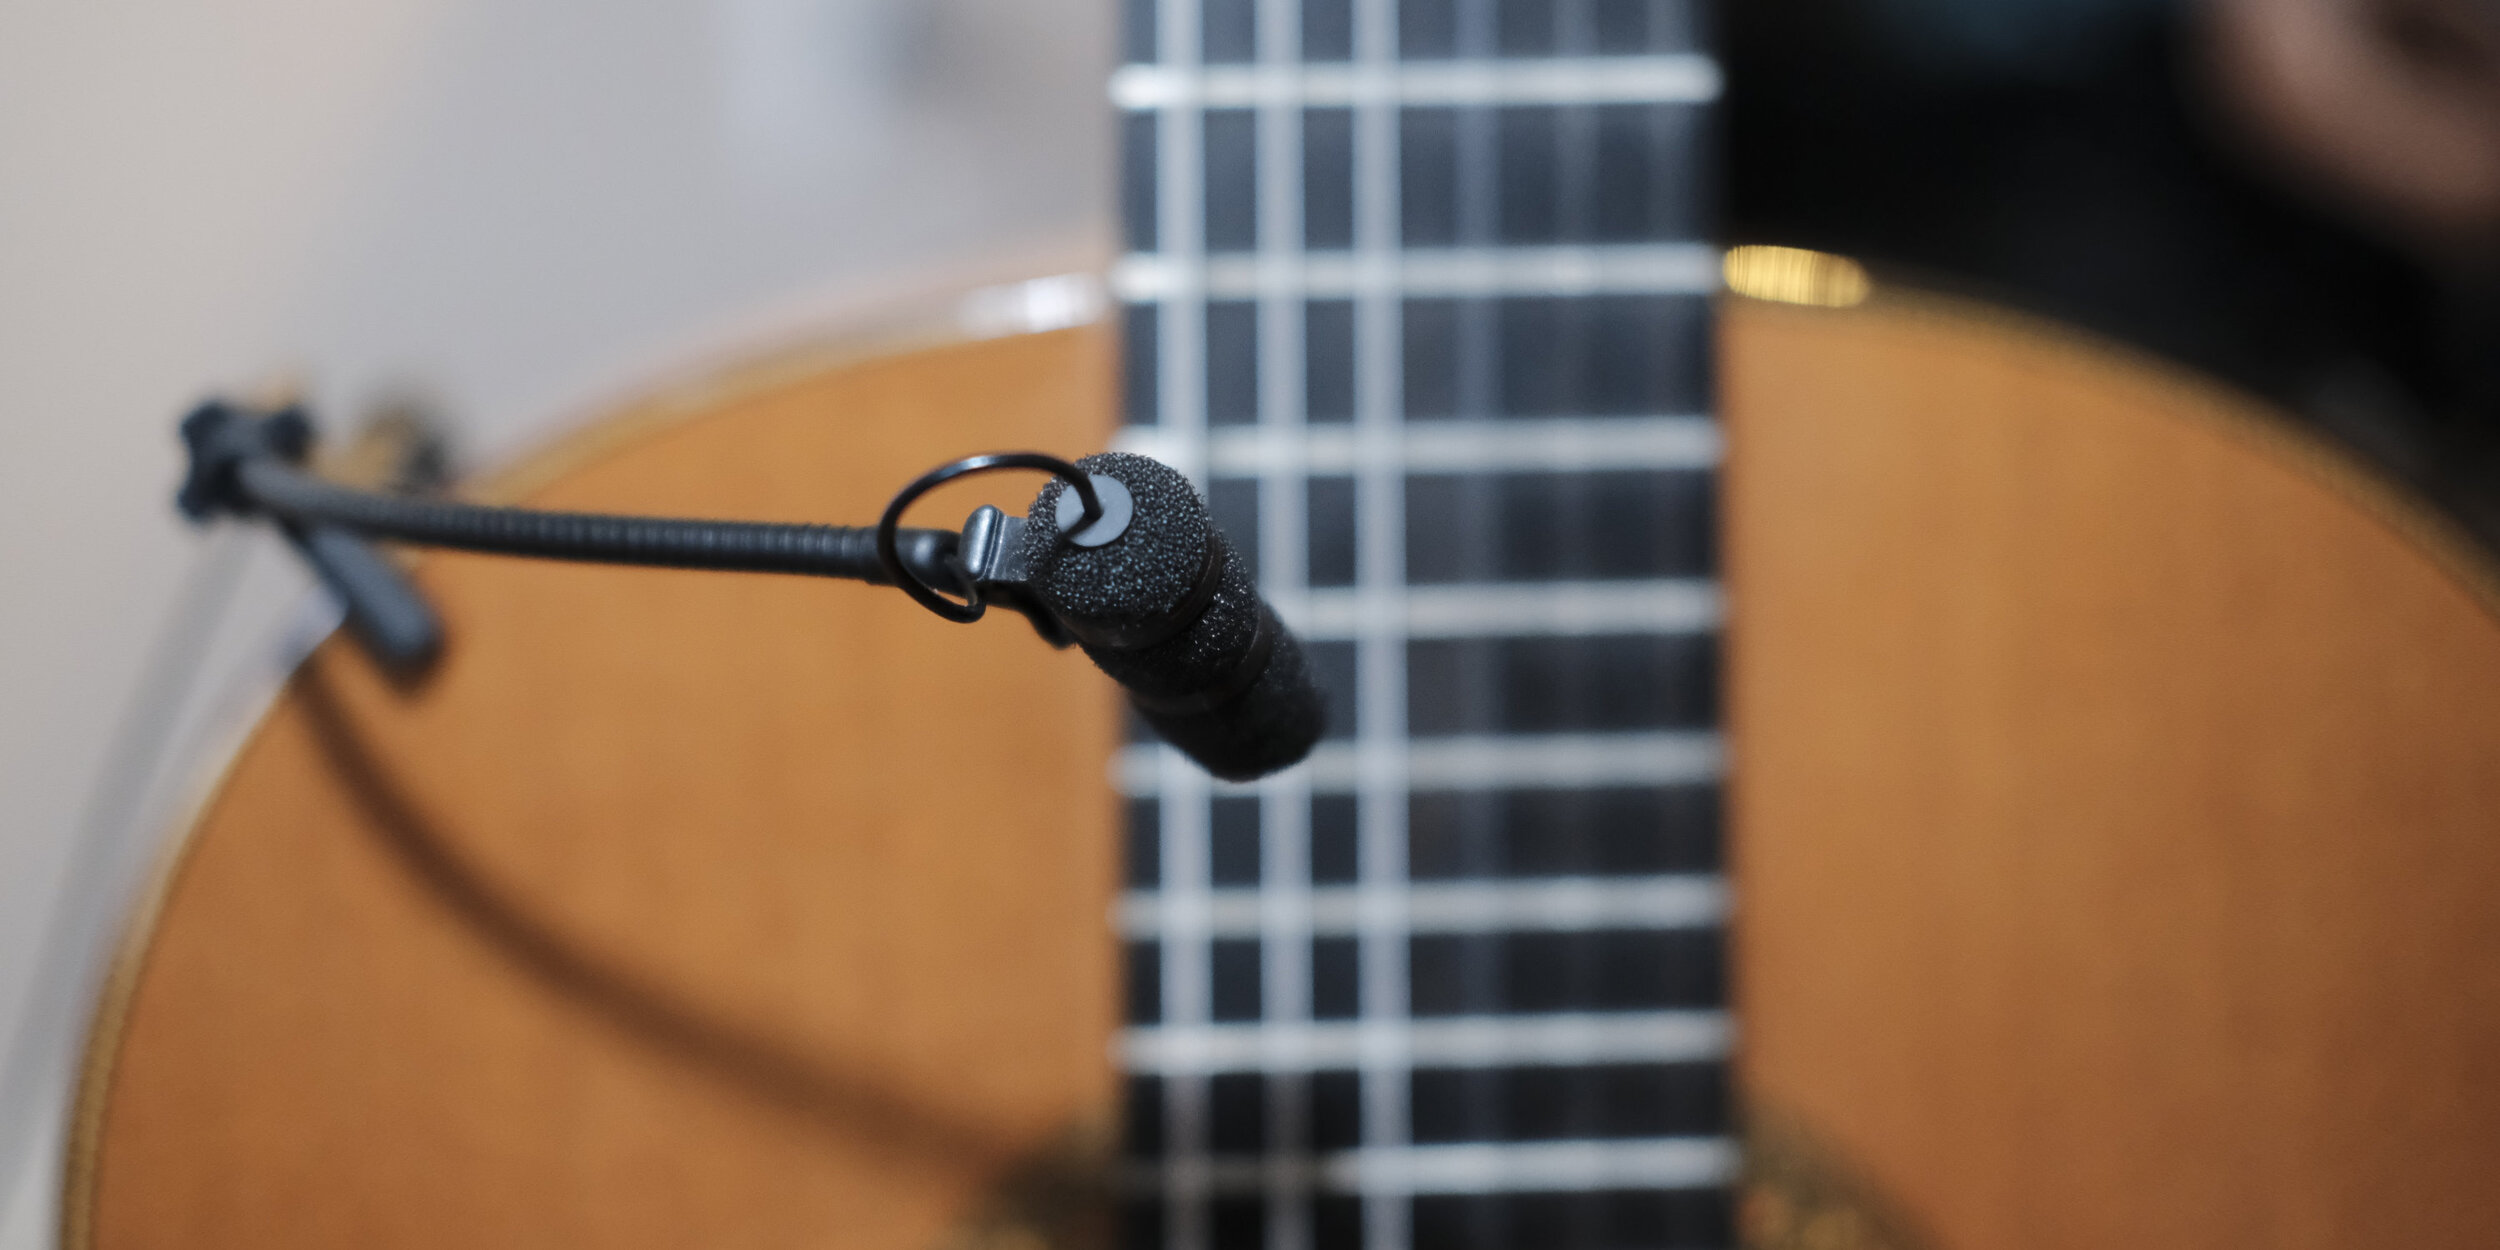
DPA d:vote 4099g Microphone Review
Studio sound for the stage

Danish Pro Audio is acclaimed for manufacturing high-end condenser microphones for acoustic and classical music. The DPA d:vote 4099 is a super-cardioid condenser microphone aimed to bring a high-quality capture on the stage.
Good things come in small packages
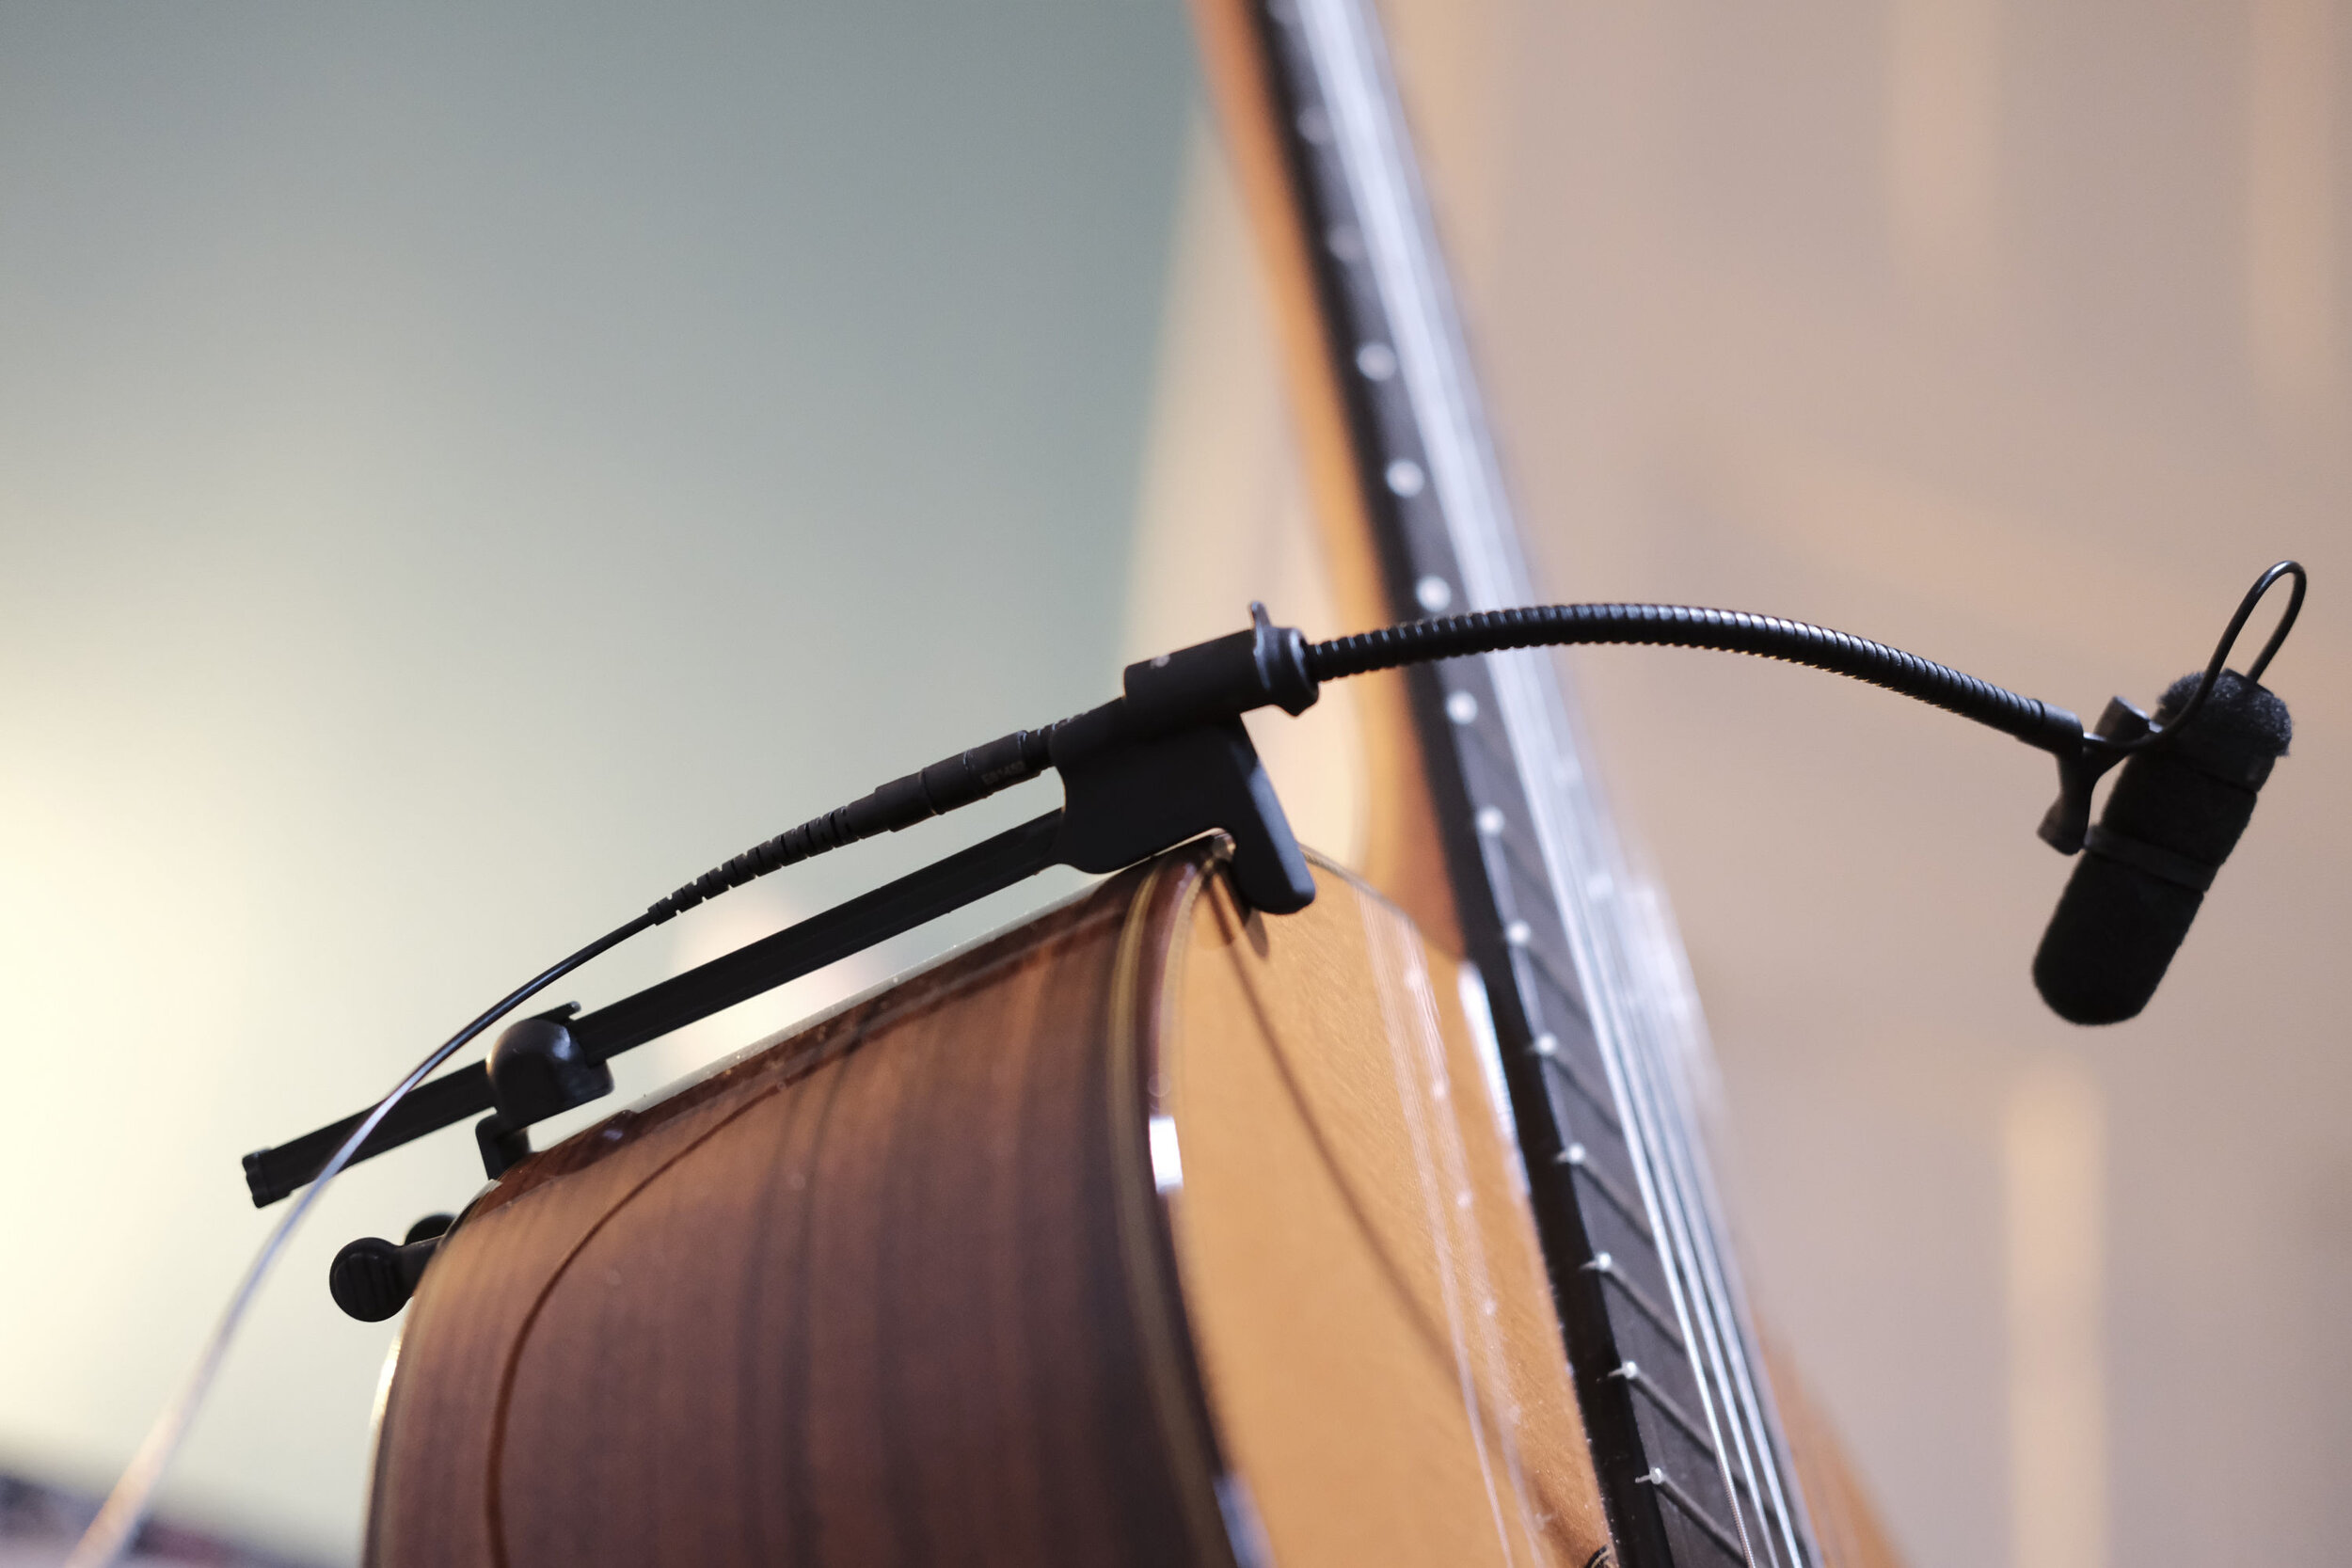
The microphone with its accessories is packed in a neat hard-shell canvas case that is pretty light but offers enough protection, making it excellent for the life on the road. Included is a 1,8m MicroDot cable, an XLR adapter and an instrument mount. I have the 4099g which comes with the guitar mount, DPA offers a plethora of options to suit any instrument.
A 140mm gooseneck holds the miniature 4099 capsule and allows for satisfactory positioning. DPA offers a 180mm extension gooseneck, for even more precise placement and the ability to move the microphone further away from the instrument. A brilliant add-on for the studio or a relatively quiet stage, as the extra distance allows the microphone to capture more of the instrument's surface.
The condenser element is covered by a foam windscreen. Although its very light and compact, it seems super-rugged; except for the detachable cable which gives the impression that is very delicate. Maybe it is my paranoia, but I tend to be extra careful with it when I'm on stage, and you will never catch me out without a backup. Saying that I never had a problem so far.
Hearing the tones

Very easy to mount.
I have used extensively the 4099g on my classical guitar for chamber concerts, usually placing the microphone over the 15th fret and aiming slightly toward the soundhole. Depending on the room, I will adjust further to find the sweet spot. The sound is always balanced and detailed, the DPA delivers a natural and full-bodied representation of my instrument.
With a careful speaker/monitor placement, the DPA can take quite some gain before it starts to feedback. Definitely, enough to compete with a grand piano, string/wind instruments and percussion. The super-cardioid pattern helps in rejecting other instruments and noise, but it's not immune to feedback issues.
A positive aspect of having a microphone mounted on the instrument is that even if I move a bit, the sound always stays the same. Additionally, it unclutters the stage from the various stands.
In the studio, the DPA is not the most qualified performer, the miniature capsule exhibits more self-noise than what is satisfactory. I wouldn't hesitate to use it if I had no other option, but I would choose another mount though for more options in placement.

Flat frequency response on-axis, with a slight presence boost for added clarity.
Essential for all instrumentalists
Liliputian proportions, exceptional sonic quality and excellent craftsmanship, establish the DPA 4099 as a great investment for any instrumentalist. It frees us from the stand prison while rejecting unwanted sounds and still manages to deliver accurate and refined sound.

Soundcheck in Berlin - DPA4099g
Cons
Slightly noisy
The cable is too thin (maybe)
Pros
Balanced and detailed sound
Rejection of unwanted instruments/sounds
Easy to attach-remove
Keeps a constant distance from the instrument on stage

Sony PCM D100 Review - A Portable High-Resolution Audio Recorder
Experiences and adventures of a classical guitarist
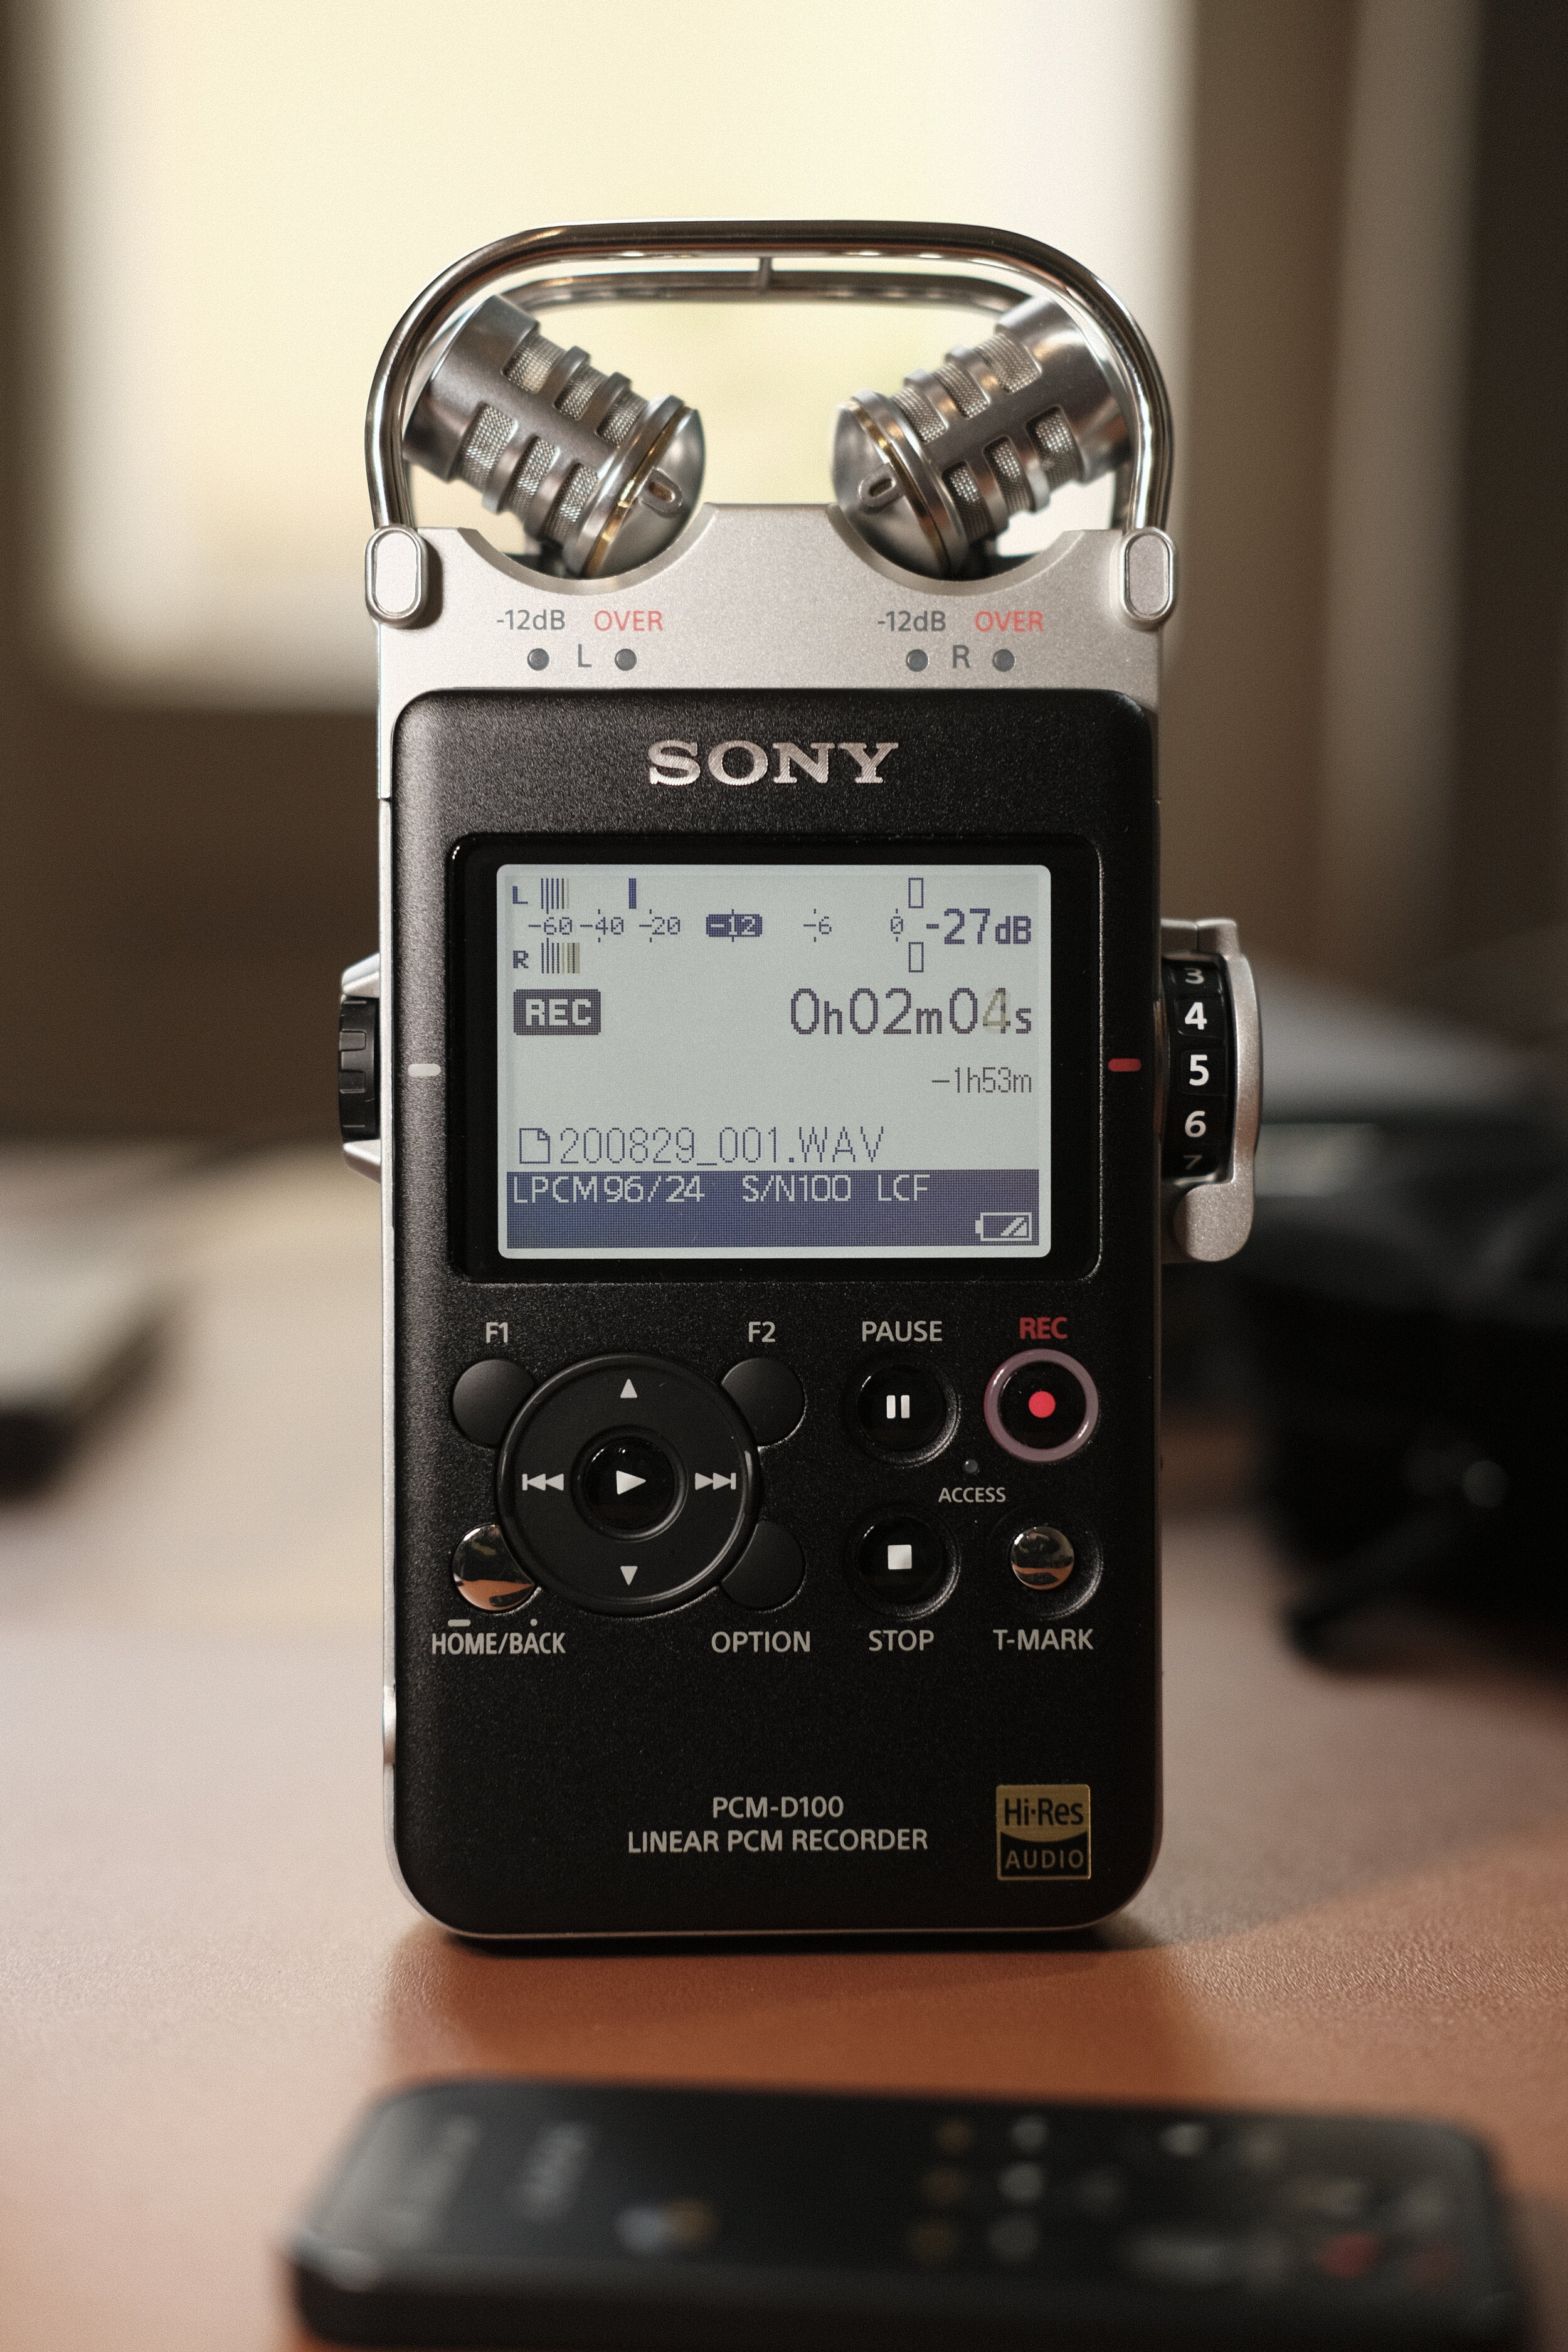
The Sony PCM D100 with the “wide” arrangement.
The weather is great now, and I want to spend more time outside, to explore different locations. While I have a lot of recording equipment for different situations and purposes; as a one-person band, location recording can be tricky. Lugging microphones, cameras, cables, stands, etc. make sure that everything runs smoothly, by the time we start to play, we are already somewhat exhausted.
A portable recorder makes things infinitely less complicated, but most devices that I have tried over the years come with many shortcomings. A lot of people are raving about how great the Sony PCM D100 is, but there seem to exist very few acoustic music recordings on the internet made with it (there are many recordings of trains, cars, cats and other ambiences, but I cannot draw conclusions from such examples).
So, the rarity of any real music examples and the hefty price kept me away from it, but now I decided to get on my hands and find out if the D100 is as good as many people claim.
Recording on a 700-meter altitude monument in Greece

A view from the path to Zalongo, Preveza.
First I went up to the Monument of Zalongo, 700 meters altitude mount, near my beautiful hometown Preveza, Greece.
It was a windy day, and unfortunately, the provided windjammer from Sony was not enough to protect the ultra-sensitive mics. Therefore I had to be very creative with positioning the recorder; which resulted in an unorthodox, from the sound, perspective; but less exposed to the air.
Still, most of the takes got ruined by the clipping of the microphones, but I was lucky and just before the sunset, the wind recede just enough and I was able to have two full takes without any clipping.
(Note to self: next time I will have an idea to climb up a mountain to make a recording, I should bring more means of wind protection.)
The Humid Environment of a Small Port

Twilight at Mitikas, Preveza.
A few days later I decided to visit the beautiful port of Mitikas at Preveza, equipped with and my guitar, the D100 and my camera; I recorded "Αυτή η νύχτα μένει".
If you listen with headphones, you will hear the sound of the gentle waves as they wobble against the rocks behind me. And similarly, this soft breeze was enough to cause problems with Sony's sensitive capsules, even with the windjammer on. Therefore, I had to position the recorder lower than I would have prefered.
In both of these cases, bringing with me any other setup would be hugely unpractical. I wouldn't want to carry a laptop, interface, preamps, and expensive Neumann or Schoeps microphones on a mountain. Neither I would allow them to suffer in the humid environment of the port - considering also the additional setup time that is required for that.
In this manner, the Sony PCM D100 delivers on what is promising; high-resolution, clear and detailed recordings, in a portable short-scaled unit.
A few more notes
In closing, I want to add a couple of points that are usually not talked about much.

Practical nylon case and remote control.
Firstly, I don't really how Sony does that, but since July when I bought the recorder I used it extensively. I did several tests at my home studio, recorded a couple of my concerts and a few long rehearsals, a piano recital for a friend, some scratch ideas for new compositions and the two videos on the mountain and the port. And all that with the first pack of AA batteries that Sony provides with the recorder. It is unbelievable and not at all similar to my experience with Zoom and Tascam recorders that I've used in the past.
Secondly, the accessories provided with the D100 are extremely practical. Namely, the remote control is a god-send for a one-man band as I don't have to stand up all the time to press "rec". The carrying bag is very useful, as it protects the recorder from scratches and dirt - just do not drop it! My only complaint is with the windjammer which could have been more effective.
A new project; Urban Miniatures
A new project I took on is to compose 12 miniature pieces inspired by the city; twelve Urban Miniatures. These would be recorded monthly during the following year in 12 unique locations in Berlin. I plan to use my trusty Sony PCM D100 for all of them. Here is the first.