A Comprehensive Guide to Gain Staging, Recording, Mixing, and Mastering Levels for Classical Guitarists
Part I - Gain Staging & Recording Recording
As we, classical guitarists, have ventured into the world of recording, we've faced the intriguing challenge of capturing our instrument's perfect sound. After meticulously learning about different microphones, mastering the art of microphone arrays, and optimizing our room for the ideal recording tone, we often feel ready to immortalize our masterpiece. Yet, beneath this readiness lies a vast universe of elements that we need to fine-tune to achieve an optimal recording. Among these, understanding gain staging, recording levels, mixing, and mastering levels is crucial.
While there's a plethora of information available on the internet, it can often feel like trying to find our way through an intricate maze, riddled with confusing technical jargon and conflicting advice. In light of this, I've decided to consolidate my personal insights, specific tips, and favorite tools into this comprehensive guide. My aim is to shed some light on these crucial aspects and assist you in capturing and polishing your classical guitar recordings to perfection.
dB Trivia
But first, we have to familiarize ourselves with decibels or dB. These logarithmic units are used to measure the intensity of audio signals. The world of digital audio can be treacherous if you're not careful - one misstep could lead to clipping or distortion, which occurs when the audio signal exceeds 0 dBFS (decibels relative to full scale). Attention to detail is pivotal.
Recording Levels & Gain Staging: Laying the Foundation for a Great Recording
The journey to a great recording begins with understanding gain staging. Gain staging is a process that ensures a clean, distortion-free recording while leaving enough breathing room for further processing during post-production. This involves setting optimal levels of audio signals at each stage of your recording chain. In the context of home studios, this often involves just your instrument, an audio interface, and perhaps some ITB (In The Box) processing.
However, even in this simplified chain, ensuring good gain staging remains crucial. This starts with the sound of your instrument in the room. You'll need to ensure your guitar's sound is clear, resonant, and free from any unwanted noise or interference. Careful placement of the microphones is also key.
Each microphone and each placement will give a different color and character to your recording. When setting up my microphones, I experiment with different placements and distances. Finding the sweet spot is an art - it should capture the guitar's natural tone while minimizing room noise. Adjusting the distance and angle of your microphones can help control not only the tone but also the levels: too close and the sound might be overly loud or boomy; too far and the signal could be weak, leading to a noise-prone recording when amplified. Have a look at my Stereo Microphone Techniques for the Classical Guitar guide..
The next step in the chain is the audio interface. This is where the acoustic energy, the sound waves your guitar produces and your microphones capture, are converted into digital signals your computer can understand.
Your audio interface typically has preamps which amplify the microphone's signal to a level suitable for the Analog to Digital Converter (ADC). The gain knob on your interface controls this amplification. It's crucial to find the right balance here: a signal that's too weak may introduce noise when you try to increase the volume later, while a signal that's too strong risks clipping, distorting your guitar's natural sound.
Once gain staging is properly set, the next crucial part of the process is managing your recording levels. Recording levels refer to the strength or amplitude of the audio signals being recorded in your DAW. In other words, it’s about how loud the recorded audio will be.
For classical guitar, I aim for an average level (or RMS level) around -18 dBFS to -12 dBFS, with peaks not exceeding -6 dBFS. This ensures a healthy signal level without risking distortion or clipping. These values might not mean much if you're just starting out, but understanding them and using a metering tool to monitor your levels will make a big difference in the quality of your recordings.
For those of you who, like me, prefer to use an external preamp along with a separate ADC, the gain staging process involves an additional step but the principle remains the same. Using an external preamp like the AEA TRP2 or SPL Crescendo duo, allows for even more control over the tonal characteristics and the level of the signal coming from your microphones.
Once the signal is conditioned by the preamp, it then goes into a separate ADC, such as the RME ADI-2 Pro FS in my case, which converts the analog signal into digital. Adjusting the input level on the ADC is equally crucial as on the audio interface's preamp for those who use an integrated solution. The goal is the same - ensuring a healthy signal level without risking distortion or clipping, which for me is around -18 dBFS to -12 dBFS RMS, with peaks not exceeding -6 dBFS.
This might seem like an extra layer of complexity, but in my experience, the flexibility and control provided by separate high-quality preamps and ADCs can lead to even better results, and it's worth considering if you're serious about recording.
To sum up, good gain staging for a classical guitar recording involves capturing a clean signal from your guitar, through the air, into your microphones, then into your audio interface, and finally into your DAW. Each step requires careful attention, but with practice and patience, the results can be immensely rewarding.
Additional Tips for Optimal Gain Staging:
I mainly use Vovox Sonorous and Sommer Epilogue cables for a peace of mind
Starting with a Clean Signal: The quest for the perfect recording begins long before hitting the record button. I ensure that my guitar is properly set up and my strings are in good condition to minimize extraneous noise and to allow for effecient dynamics.
High-Quality Cables: Cables can often be overlooked, but they are a critical part of the signal chain. Investing in high-quality cables can prevent unwanted noise and interference in the signal.
Room Acoustics: The room's acoustics can impact the recording significantly. A quiet and sonically balanced room can help ensure a clean, high-quality recording.
Monitoring the Signal Chain: Vigilance is key throughout the recording process. By continuously monitoring the levels throughout my recording chain, I can prevent unexpected overloads or distortions and ensure the best quality recording.
Using Metering Tools for Precision
Youlean Loudness Meter is an essential tool
For those of us who want to be precise with our levels, I highly recommend using metering tools. One of my favorite tools is the Youlean Loudness Meter. This handy software allows me to monitor not only the loudness of my recording but also the dynamic range. The free version is good enough for most cases, and you can support the developers by purchasing the pro version which provides some additional features.
Maintaining Dynamic Control
Classical guitar's essence lies in its subtleties and nuances. Dynamics - the interplay between the quietest and loudest notes, crescendos, decrescendos - bring the music to life, allowing your listeners to connect more deeply.
When setting my recording levels, I always leave ample headroom for these dynamics, striking a balance so that the louder sections don't cause distortion or clipping and the quieter parts remain clear and noise-free. Remember, amplifying a quiet, clean recording is always preferable to fixing a loud, distorted one.
Additionally, transient details - quick, high-energy moments - require careful attention to avoid distortion or getting lost in the mix. Proper recording levels ensure these moments are accurately captured, adding to the richness of the final recording.
Striking the Right Tone
In conclusion, understanding and managing recording levels, along with proper gain staging, can make a significant difference in capturing a perfect performance. It can be the difference between a recording that sounds amateur and one that stands up to professional scrutiny. With careful attention to detail, patience, and practice, you'll be on your way to making recordings that you can be proud of.
Stay tuned for Part II of this series, where we'll dive deeper into the realm of audio recording as we explore the importance of levels in the post-production stages - mixing and mastering. This is where your carefully recorded tracks are polished into a cohesive, balanced, and compelling final product. Until then, happy recording!
Nail Care Secrets from a Classical Guitarist
As classical guitarists, nails are an essential part of our craft. The tone, texture, and volume of our music are deeply influenced by the condition of our nails, thus nail care is a widely discussed topic among guitarists. In the quest for healthier nails, many guitarists search for products and supplements to strengthen and maintain their nails, but I've found that the key to resilient nails lies in a balanced lifestyle, proper nutrition, and sufficient sleep.
Disclaimer: Although I share my experience and observations, I am not a doctor, and the information provided in this blog post is not medical advice. It is always wise to consult with a healthcare professional before making changes to your diet, sleep habits, or lifestyle.
The Berlin Nail Saga: An Anecdote
Nine years ago, my life took an exciting turn when I moved to Berlin. However, my nails began to weaken and tear during my first year here, thanks to my less-than-ideal diet. Alarmed, I sought the help of a dermatologist who, initially attributed my nail issues to age, suggesting that I accept my nails' inevitable decline.. I was only 30 at the time! After explaining my profession and my nails' critical role in my performance, she reluctantly handed me some brochures and a list of costly vitamin pills to buy. Diet, however, was never mentioned.
On my way home, I had an epiphany: my poor diet was sabotaging my nails, not my age. Nails were just the first casualty, and a transformation was crucial. Instead of pouring money into pricey pills, I embarked on a research journey and made sweeping changes to my diet and sleep schedule. A year later, my nails had made a remarkable comeback, and after years of continued dietary improvements, my nails and energy levels are now stronger than ever.
Nutrition Guidelines for Nail Health
Biotin-rich foods: Indulge in eggs, almonds, and sweet potatoes, which are rich in biotin—a B vitamin that promotes nail strength and growth.
Protein: Since nails are primarily composed of keratin, consuming lean meats, fish, and beans can help provide the necessary building blocks.
Omega-3 fatty acids: Fish, walnuts, and flaxseeds can help moisturize and strengthen nails, thanks to their omega-3 content.
Iron: To prevent brittle nails, incorporate iron-rich foods like spinach, lentils, and red meat into your diet.
Zinc: Whole grains, oysters, and legumes contain zinc, which supports nail growth and strength.
Vitamin C: Consuming vitamin C-rich foods, such as citrus fruits, strawberries, and bell peppers, can help promote collagen production, essential for nail health.
Incorporating Healthy Foods into Daily Nutrition
To harness the full potential of these essential nutrients, I try to incorporate them into my daily meals. I practice intermittent fasting, so I eat three meals within an 8-hour window. Here's an example of my typical day:
Breakfast: Quinoa seeds, flaxseed, raw cocoa in Greek yogurt, topped with various berries, nuts, and cinnamon, plus a piece of 95% dark chocolate with my coffee.
Lunch: Grilled salmon or meat with a side of colorful veggies, ensuring I get enough protein, iron, and omega-3 fatty acids to keep my nails strong and healthy.
Dinner: A delicious omelet with mixed greens, providing a blend of biotin, iron, and vitamins.
The Power of Sleep and Balanced Lifestyle
In addition to a balanced diet, getting enough sleep is crucial for overall well-being and nail health. I aim for about 8 hours of sleep per night, ensuring I go to bed and wake up at approximately the same time each day. This consistent sleep schedule supports my body's natural circadian rhythm, contributing to better overall health, including the strength and resilience of my nails.
Furthermore, leading a balanced lifestyle, where stress is managed, physical activity is regular, and mental well-being is nurtured, plays an integral role in maintaining not just nail health but overall body health. Of course, life happens, and unexpected events can throw our schedules off balance. As a musician and father of two kids, I embrace the challenges of spending long hours practicing, traveling for concerts, and juggling family responsibilities, which can sometimes make it difficult to adhere to a perfectly balanced routine. However, I always strive for a healthy lifestyle, acknowledging that it's an ongoing process and that every effort counts towards maintaining the well-being of my nails and overall health.
Lasting Tones
The secret to strong, healthy nails doesn't lie in quick fixes or expensive supplements. It's about embracing a lifestyle that focuses on balanced nutrition, overall well-being, and sufficient sleep. In my experience, weak nails are often one of the first signs our bodies give when we're not providing them with enough nutrients and rest. By recognizing this early warning and taking action, we can ensure our nails remain strong and healthy, allowing us to continue producing beautiful tones. Keep in mind that it's always best to consult with a medical professional before making any major changes to your diet or lifestyle.
Bang & Olufsen Beoplay H9 (3rd Generation) Review
They do sound good, but it's not all fine.
Wireless headphones that don't sound like a bloated mess are hard to come by. Professional audio brands don't seem interested in this market segment, while consumer products are often tuned so weirdly that it gives me nausea even when I think about it; clarity and definition sit very low in the design goals list.
Admittingly, I avoided some of the more expensive ones. I already have high-end wired headphones, and I couldn't justify spending too much on wireless headphones just for casual use. Besides, budget wired headphones that sound excellent are not scarce, while good sounding, comfortable headphones of the wireless sort seem to be an elusive combination.
However, a couple of months ago, I found a great deal on the Bang & Olufsen Beoplay H9 3rd generation and decided to purchase them.
Bang & Olufsen
Bang & Olufsen is a Danish premium headphone and speaker manufacturer with an almost century-old history. With a pretty much consumer-oriented marketing and a glamorous design aesthetic, it gives the impression of a lifestyle brand rather than a high-end audio manufacturer. Although it is undeniable that part of its success is attributed to the market that lusts for premium, higher-status products, reports about the superior sound quality are always favourable.
Bang & Olufsen H9 3rd Generation
First impressions
Unboxing the Beoplay H9 3rd gen. is everything you expect from such a brand. The box has a snug fit and feels much like an Apple product; opening the lid has an ultra-smooth action. The headphones sit comfortably on a soft-feeling moulded cell to keep them safe during transportation. There is also a carrying pouch and a basic assortment of cables. I like the attention to detail, but honestly, I would gladly trade the "high-end" experience for a decent carrying case since the included cloth is a mere dustcover. It is noteworthy that both the anniversary edition H95 and the HX, the succeeder of the H9, come with a hardshell case.
The headphones feel good on the hand and are well made; metal yokes, leather earpads, metal sliders, cushioned fabric headband and quality plastic earcups. A unique feature of the Beoplay is the mechanism that extends the chokes as it moves fluidly instead of having the more usual clicky steps. The action is buttery smooth, and the resistance is ideal as it's not difficult to adjust but holds its place strongly enough.
The pouch is nice, but mainly for the dust or light scratches.
Sound and tweakability
Pairing the H9 3rd gen. with my Google Pixel and MacBook was effortless, and after listening to some classical music, I was pleasantly surprised by the sound quality. The B&O sound is smooth and easy to listen to without sacrificing clarity much. The stock response is a bit recessed on the highs, resulting in a warmer overall presentation, but the drivers are flexible enough, so I could easily fine-tune to my liking with the free Beoplay app.
Low notes are deep and well behaved; they don't overwhelm the overall image. The H9 3rd gen. midrange is pretty competent; well-captured recordings sound fairly realistic. Instruments sound like themselves, with their individual tonal qualities distinguished.
The high-end response matches the overall sound signature of Beoplay. It doesn't demand your attention but is not too restrained either. It supports the natural reproduction of instruments and voices and grants a less analytic and more fun listening experience. The room ambience in solo recordings is more laid-back than on typical studio headphones.
I would not use the H9 3rd gen. for mixing or other critical listening purposes, so they won't replace my Focal Clear MG or even my trusted Beyerdynamic DT880. However, for casual listening and the convenience that the wireless connectivity offers, I am happy finally have a Bluetooth headphone that sounds good enough for the intended uses. With the noise-cancelling turned off, the presentation is more akin to open headphones rather than closed, which is an impressive feat.
Controls and connections.
Active noise-cancelling
Engaging the active noise-cancelling alters the sound to some extent. There is less depth and meat to the sound, and the highs become somewhat more fake-sounding as if filters are applied on both ends of the spectrum. There is also a noticeable increase in self-noise. So, it's not an option I would leave "on" all the time, but, I accept the lessening of the overall sound quality for the times when outside noise could render listening without noise-cancelling unbearable.
The effect of noise cancelling is quite decent, but compared to other headphones, it is not nearly as powerful.
Transparency mode
The implementation of the transparency mode of the Beoplay doesn't make much sense to me. The responsiveness of the touch interface is pretty sluggish, so if someone talks to me when I'm wearing them, it is way faster to remove the headphones and talk to them than to engage in funny gestures with my fingers on the right earcup until I find the correct spot to get to the transparency mode. Besides, the resulting sound is rather repulsive.
I could see the benefits of the transparency mode if it wouldn't pause whatever you were listening to before or even more so if it could work during a call to hear my voice more naturally. But, that's not how it functions.
Touch me if you can
I like the idea of a futuristic world where everything will be effortless and efficient, but the touch interface on the H9 3rd gen. is neither. Au contraire, there is a throughout unresponsiveness that becomes annoying pretty fast. I prefer the more typical set of buttons for controlling the headphones anytime. Saying that, the circular gesture for controlling the volume is works smoothly.
(Dis)comfort
The sound quality and feel of the H9 3rd gen. could make me overlook these minor complaints, which in the grand scheme might appear superficial. Unfortunately, my biggest gripe is about the second most crucial aspect of any headphone. The Beoplay H9 3rd gen. is one of the most uncomfortable headphones I have ever worn. The earcups are somewhat small for an around-ear headphone and press the ears, but the worst part is the headband. I cannot understand how a manufacturer with such a long history in the industry could not get the headband right. I can only wear the B&O for about 45 minutes before they become unbearable. Regrettably, I didn't do any extended listening sessions during the return period, so I had to keep them.
Wireless range and battery
The range is exceptional. I could move from room to room without any issue. Although the Bluetooth protocol is older, I haven't experienced any drop-offs or other ill effects. Battery life is adequate for normal use.
They lay nicely flat.
Getting passive
The B&O H9 3rd generation sports a 3,5 input that bypasses the on-board DAC and offers a passive experience, which was a decisive factor for me when I purchased them as I could still use them when they are out of juice. In addition, this ensures that the headphone won't become an expensive paperweight when, in a few years, the battery will not be able to hold a charge. Unluckily, following the trend of our times, the battery is not user-replaceable.
When the H9 3rd gen. is connected passively to my MacBook the sound is pretty decent. When I plug the B&O into any high-end DAC, like my RME ADI-2 Pro FS, the limitations of the drivers become apparent as a slightly harsher character is being exposed. This perhaps means that part of the balance and elegance of the Beoplay become possible through digital manipulation. This is not a critique but rather just an observation.
Final thoughts
Annual design revisions, upgraded Bluetooth protocol and futuristic touch interfaces are not enough to ignore that the Bang & Olufsen H9 3rd gen. are uncomfortable to wear for a prolonged time. Maybe it's just me, so I could only recommend them if you can find them at a fair price and a vendor with a good return policy. If you don't have any hot spots, the sound is reasonably satisfying for wireless headphones.
Best Type of Microphone for Recording the Classical Guitar
One of the most usual questions I get asked is which microphone is the best for capturing the classical guitar, but as with all deep questions in life, I'm afraid there is no simple answer. Our guitars, nails as well as playing techniques differ vastly. Besides, our rooms have unique properties, and of course, our tastes vary. Another decisive factor is our listening environments, but that's a subject for another day.
I've written on Classical Guitar Tones extensively about the different microphones, brands and models. If you have been here for a while, you've seen me test all sorts of microphones, entry-level to high-end. In this article, I take a step back and present my thoughts on the different types of microphones, their strengths and weaknesses. Plus some words on the different polar patterns.
On being passive
Ribbon microphones have a relatively simple design with no active circuitry and use a thin metal ribbon suspended in a magnetic field. Most ribbon designs hear sound bi-directionally and produce natural and complex recordings. They have the reputation of being fragile and need careful handling and storage.
Dynamic microphones are similar to ribbons as both capture sound by magnetic induction. In contrast, they are very robust, resistant to moisture, and have low sensitivity. In practice, they offer no real asset in classical guitar recordings as their advantages benefit mainly on-stage use and capturing of loud sources.
For the most part, I don't get along well with ribbon or dynamic microphones, mainly because of their sensitivity or lack of. I often play soft passages or employ silence in my music, and with passive microphones, one has to crank the gain on the preamps to get sufficient levels, resulting in unwanted noise. After all, the classical guitar is a soft and delicate instrument, and no matter which preamps you use, it is impossible to get noiseless classical guitar recordings with passive microphones.
Ribbon microphones are also quite forgiving to the various mechanical "non-musical" noises, such as nail and fretting sounds. And this is why some people love them, especially on harsher and louder instruments and a less subtle repertoire. But, I find the response of most but the finest ribbon microphones, principally with the thinnest ribbons (some Royer, AEA, and Samar makes come to mind), quite sluggish.
Phantom power required
Nowadays, there are a plethora of active ribbon microphones, purposed for capturing softer sources and being less dependent on the preamp choice. These tend to work better with classical guitar. Yet, even high-end active ribbon microphones are far from being noiseless. I understand that for some people noise is a nonissue, but for me, it is a distracting element. I like deep blacks and hate when the softer parts or rests are being washed away by preamp hiss.
Also, the figure-eight polar pattern found in most ribbons makes them less than ideal for many recording situations. They do work nicely as a side microphone in an M/S stereo array.
Capacitors move the (recording) world
Condenser microphones require a power source to function and generally produce a high-quality audio signal mainly due to the small mass of the capsule. They can capture on tape utmost detail, sometimes even too much of it, and are the most used transducers in recording sessions and concert halls.
Most of the classic designs have been either tube or transformer equipped condensers, but with the dominance of digital recording, transformerless solid-state condensers have increasingly gained popularity in classical recordings for their additional clarity and lower self-noise.
Size matters
Condenser microphones are categorized by the size of their diaphragm and come in two main types: small-diaphragm, like most Schoeps' and the Neumann KM184, and large-diaphragm, like the Neumann U87 and AKG C414.
So, which one is better for the classical guitar, you may ask? Not so fast. Again, the answer is not straightforward.
Let's talk first about their differences.
Small diaphragm condensers are usually more accurate, with a faster transient response and superior off-axis response. They are also smaller and lighter, so they are easier to carry, besides being visually unobtrusive. The latter is a decisive factor in why SDCs dominate the concert world.
Paying audiences generally don't enjoy seeing a stage the musicians surrounded by several dozens of microphones and bulky heavy-duty stands to support them. Neumann, Schoeps and DPA provide small-diaphragm condenser systems with every possible polar response and mounting option a classical sound engineer might on location.
Polar patterns say more than you think
The downsides of using SDC's on a classical guitar, especially at home, are only a few but nontrivial. Small-diaphragm condensers are tuned for specific roles. Directional microphones are either purposed for close spots on soloists, used in combination with a stereo array at some distance, or for the main pickup and thus are tuned to compensate for the high-end frequency loss that occurs. The result, when used inappropriately, is either a poor low-end response or hyperrealistic recordings with exaggerated high-end. In other words, they can easily sound thin and harsh.
On the other hand, SDCs with an omnidirectional response (the real microphones), especially those that have been tuned for the free field, offer an optimal response at both ends of the spectrum. Additionally, they provide greater flexibility in positioning owing to the absence of proximity side-effects but become a challenge to use in non-treated rooms that universally suffer from early reflections and standing waves.
Microphones with wide- or sub-cardioid polar characteristics come to close the gap, with a better low-end response than their cardioid cousins, some room rejection, and sometimes less pronounced high-end. Unfortunately, small-diaphragm cardioids with such polar patterns are rare, and except for the bargain Line Audio CM3 / CM4, they are always on the expensive side.
So, where does the good old large-diaphragm condenser fit?
Generally speaking, LDC's suffer from a pronounced proximity effect, transient smoothing and suboptimal off-axis colouration. In addition, they require sturdier stands, are more difficult to position due to their size and weight, and can be quite visually intrusive in videos.
All these intricacies cannot be good, right? Moreover, excellent sounding large-diaphragm condensers suitable for the classical guitar are quite rare and expensive, as most LDC's are targeted for vocal pickup.
Any advantages?
As I wrote above, noise on a recording can be distracting. The smaller the size of the capsule, the greater the self-noise of condensers. Tube and transformer-based microphones are also subject to higher noise levels. Therefore, transformerless large-diaphragm condensers have lower noise to signal ratios, with several Gefell, Austrian Audio, and Neumann models reaching nonexistent self-noise figures.
Likewise, many universal studio LDC's grant additional flexibility, as they bring multiple polar patterns, removing the need to own or carry multiple microphones or capsules on a session. With a modern microphone, like the excellent and most versatile Austrian Audio OC818, you can not only choose on the fly between any possible polar pattern, but you can also do it long after the recording has been completed.
Here is my recording of Debussy’s Prelude VIII. Recorded on location with a pair of Austrian Audio OC818s.
Let's proceed to checkout.
One can make a good recording with any decent microphone, some experimentation and post-production skills to boot. There are no excuses for bad recordings in 2022.
On a budget, neither ribbon nor large-diaphragm condenser microphones of decent quality can be found as cheaper offerings are made either for a vintage vibe or vocalists in mind. Line Audio's small-diaphragm condensers are the undenied kings of the entry-level recording setup.
When searching for a high-end classical guitar recording setup to capture a world-class guitarist with a magnificent guitar in an excellent sounding room, a pair of exceptional and well-positioned omnidirectional or somewhat directional condenser microphones is hard to beat. DPA, Gefell, Austrian Audio and several high-end Neumann condensers come to mind. In such a scenario, the size of the diaphragm is incidental. With less ideal conditions, even high-end SDC's on a solo classical guitar, be it directional or not, can expose flaws and produce unattractive recordings.
To conclude, in most situations I favour large-diaphragm condenser microphones for their inherent sound qualities and noiseless behaviour. First-class LDCs can produce a luxurious recording and provide a pleasant listening experience. I also like how they look on videos; unapologetic, proud and predominant, almost commanding. With that said, the realism that some of the best SDCs treat the listener when every element is exemplary can be breathtaking.
Perhaps it is more advantageous to bring together small- and large-diaphragm condensers in an elaborate three- or four-microphone array.
Essential Accessories for Classical Guitarists
One of the things that I always loved about the classical guitar is its simple nature. We can practically make music anywhere; all we need is somewhere to sit, good nails, and a decent guitar. Oh boy, was I wrong?
It turns out that a fresh strings and a bunch of scores are not enough. Here are some essential accessories for the classical guitarist.
Take your guitar and play anywhere you want.
Humidity Control
Fine guitars are very delicate instruments, drastic changes in the temperature and humidity can damage them, and even subtle non-ideal climate conditions in prolonged exposure can negatively affect your guitar.
You don’t have to live in a desert for your guitar to get dried out.
I guess that you already have a nice hardshell case to keep your guitar inside when you are not practising, this would keep it safe to some extent but is not enough. Unless you live in a perfectly stable environment, average in every possible way, you need to make sure that your guitar feels comfortable. That means around 45%-50% relative humidity level in room temperature.
If you have a humidifier/dehumidifier in your room, and never travel with your guitar, then you are fine. With no small kids or pets, you can also keep your guitar on a stand. For the rest of us who travel for concerts, lessons, or holidays, the constant and sometimes harsh humidity changes can harm the instruments.
The D'Addario Humidipak keeps my guitars in a perfect condition.
After trying a few different options, I've been using the D'Addario Humidipak Maintain System for a couple of years; it gives me peace of mind even when I travel to Greece. It comes with two cloth pouches for the case and inside the instrument, and three humidifying packs; one for the headstock and two for the soundhole.
They should last around four months, but depending on where you live, it can take up to a year for them to dry out. If you live in a dry environment, the first pack will get stiff quicker than that.
Tip - When you play keep them in your case, and remember to close it tightly. This habit will make sure of maintaining the ideal conditions inside your case and will keep the humidifying packs healthier for longer.
You can also combine it with the D’Addario Humiditrack to monitor any humidity and temperature changes of your instruments for additional mental calmness.
Tip - This summer, I brought a few dried out humidifying packs to Greece, and after being exposed for a couple of weeks in the high humidity levels of a seashore town, they recharged and became as good as new.
Keep it clean.
Keeping it Clean
The D’Addario Micro-Fiber cloth takes care of polishing my guitars.
Dust, sweat, and finger oils are some of the worst enemies of a beautifully applied finish on a guitar. I prefer not to apply chemicals to my guitars myself; I leave it to my luthier to take care of things like that. But for regular cleaning, I use two D’Addario Micro-Fiber polishing cloths; one for wiping down the strings and neck after playing and one for cleaning the top, back and sides every few days.
Be gentle, and always apply circular wiping motion. If you live in a hot environment and sweat a lot or wear short sleeve t-shirts, you should wipe down the guitar every day.
My Lens Dust Blower takes care of everything.
Tip - Before wiping down your guitar with the micro-fiber cloth, you may want to remove some larger dust particles first that may scratch the top, I use a camera lens dust blower for that. Actually, I use it to blow dust out of almost every piece of equipment.
In case there is a dirty spot that doesn't go away with a simple wiping, wet the cloth slightly with water, apply the wet cloth on the area that needs to be cleaned, then buff away moisture with the dry part of the cloth (or another cloth).
Tip - These cloths are very sturdy and should last many years. If dirt accumulates, you can wash them in warm water, just don't use any detergent or softener.
Changing Strings
A fresh set of strings can bring life and joy to our faces. But, changing strings is the necessary evil; nobody likes to do it.
Tuning machines heads.
Depending on the string type, I usually change strings on my guitar(s) every three to four weeks. Sometimes a little more than that if I don't have any serious session coming up, sometimes less than that If I have concerts and recordings. So, if you have a few guitars, changing strings can take up a lot of time, mostly winding and unwinding tuning pegs.
Tip - When you change strings, replace them one by one to keep the tension on the fretboard.
I still remember the revelation of using a string winder for the first time, some fifteen years ago. This invention matches that of the wheel, so simple, yet it transforms the life of a guitarist. Hyperboles aside, changing string with one can make the process a breeze.
D'Addario String Winder is a godsend tool.
Tip - Unwind the string, then cut it in the middle when it is somewhat loose. This habit will speed up things even more.
I use the D'Addario String Winder because as on top of the winding abilities, it is also a string cutter, and a bridge pin puller for all you that double as steel stringers.
Tip - Cut that excess stings that fly all over the headstock, not only they look ugly, but they can produce buzzing and other unwanted vibrations.
Small things can make a difference in keeping our instruments as healthy as possible. And although at first, some might seem inconvenient, they can easily become habits and you won't have to think about them ever again.
I hope that this article is helpful for you, let me know in the comments if there is something I forgot to mention.
Disclaimer - This article might seem to be sponsored by D'addario, but I assure you it is not. I purchased these products myself with my own money, and have been using them for many years.
5+1 Things That Will Improve Your Classical Guitar Practising
In the first part of Things That Will Improve Your Classical Guitar Practising, I touched upon adopting new habits that can boost your efficiency. The second part elaborates on the importance of being mindful in your routine.
Time is of the essence.
Music is organised sound in time. As audiences, we experience a musical performance as it unfolds linearly; one moment leads to the next. We give meaning to the notes not only by what surrounds them and is heard concurrently but also what precedes and follows.
Listening to music is a highly complicated process. Although we are intuitively tuned to understand shifting emotional states conveyed by pitches and rhythms, a well-defined sense of beat is necessary as it seems to be conformity between musicians and listeners amongst all different cultures.
In other words, no matter how diligent was the composer when choosing the right notes and rhythms if the performer doesn't support them boldly; in that case, the music suffers.
When it comes to keeping time, the metronome is the best friend you ever had; it will never lie to you and will make sure that you respect time.
Use the metronome in your daily practice. Make sure that you understand the rhythms that the score presents to you. The key word here is understanding; solo performances don't always need to be metronomically precise. Perfect executions, metronomically speaking, depending on the style, can be uninteresting. But, if you don't learn to perceive rhythms accurately your audience will be left confused.
So, remember to keep a balance of practising with and without the metronome. Eventually, you'll need to learn how to let the phrases breath as well.
Stand on the shoulders of giants.
Sir Isaac Newton famously wrote in 1676 "If I have seen further it is by standing on the shoulders of Giants". Music might not be astronomy or mathematics, but the tradition is a well established one.
Through the aeons, teachers play the role of passing wisdom from generation to generation. And, in the age of information, books, forums, videos and blogs can give us additional insights into the music we pursue to master.
While we can take advantage of all those options simultaneously, with the danger of being overwhelmed, I would argue that nothing has more value than claiming the information ourselves. A century of recorded music gives us access the judgement, observations and vision of the great masters.
It is imperative to listen to music carefully, lots of it, various performers and interpretations. Analyse and criticise it; ask questions. Try to understand why they make the choices they do; what works, what doesn't and why. Make notes, then try to apply some of your findings to your playing.
Know thyself. Or at least try.
Psychological research suggests that we are not very good at evaluating ourselves accurately; we frequently overestimate our abilities. This is known as the Dunning-Kruger effect. The less we know, the more we think we understand; and musicians are no exception.
No matter how many times your teacher points out that your rhythm is way off, it's extremely hard to evaluate yourself objectively in real-time. Additionally, it is impossible to fix performance issues before you understand what these issues are. It is a process.
Thankfully, in our technological world, it is possible to shorten the gap between how well we think we play and how we do sound. To stare directly in the mirror and observe all our faults. We achieve that by recording our performances regularly and then listening critically. The emotional distance that is granted by becoming the audience allows us to review our playing slightly more objectively. And as we keep exercising this muscle of critical listening, we eventually learn to do it in real-time, at least to some extend.
And no, you don't need to set up a home studio, even a simple audio and video capture with your phone can have a similar effect. Admittingly, investing in some recording gear won't hurt; a pair of decent microphones and a good headphone.
A chat with the composer.
Most of the classical guitar repertoire was composed long before we were born, by composers that are not around anymore. But even for our contemporaries, we rarely have the chance to have a one on one chat about their works and intentions. In either case, they have grand us with something almost as good; the music score.
When you study a new piece of music, don't just read the notes. Study the harmonic implications, the motives, the rhythms. Break down the composition to its elements, see how they connect, ask what their purpose is. Try to understand what is their function in the micro and macro context.
Additionally, read the biography of the composer, learn about major influences, life and period. Be interested and get personal. This in-depth research is utterly inspiring and may lead to musical revelations.
Understand the notes.
"Music is a language", how many times you have heard or repeat that phrase? Well, I believe that most people don't truly understand what it means.
The most common reading of that phrase is that music can affect our feelings universally across all cultures, meaning that we can detect happiness and sadness even in unfamiliar music idioms. While that is not wrong, it doesn't even touch the surface of what makes music a fully grown language.
Pitch, tempo, rhythm, and dynamics convey shifting emotional states. In Western music, harmony gives us information about the hierarchy of pitches, their tendencies and their meanings. Even if we don't formally study music, we learn to intuitively understand these nuances by an early age with nursery rhymes, cartoon music, songs in family gatherings, etc. But, every culture has its music, and each has a language.
Study common practice harmony, study contemporary composition techniques, learn the peculiarities of different periods, learn the specifics of the culture that you come from, be interested in other traditions, and diverse musical genres. After you learn the basics, dive deep into things that got your attention, then study wide and repeat.
Be interested in the tradition; in consequence, your playing will become more engaging and individual.
Destination.
Guitar playing is one of those things that you cannot stay still; if you stop pushing forward, you roll backwards. It takes a lot of hard work and discipline only to keep one's technique, let alone advance. Although you can set goals for yourself, there is no real destination. The journey is the reward; Music is a lifetime pursuit after all. So, don't be anxious, don't rush, enjoy every step of the way.
Three Most Essential Plugins for the Classical Guitar
With the seemingly unlimited processing power of modern computers and affordability of recording equipment, it is not hard to make amazing recordings on location or even at our living rooms; and there is no need to wear a white coat to be able to use a microphone anymore.
Abbey Road recording engineers in white coats
This democratisation of music production brought an abundance of plugins; plugins that we can use to shape our music in any shape or form we can imagine. We don't need to buy expensive and bulky hardware equalizers and reverb units anymore.
Albeit the plethora of plugins, I adopt a minimal approach. There are just a few of them that I use every day and consider to be crucial for my workflow. Here are the three most essential plugins for the classical guitar:
Phase Metering with the 2CAudio Vector
The classical guitar is a rich and complex-sounding instrument, and as one, it can only be fully appreciated when recorded in stereo. Most of the stereo microphone techniques require the microphones to be placed at some distance with each other, and the more microphones you use, the easier it gets to face phasing problems.
Phasing occurs when the wave shapes of two or more microphones are not perfectly aligned in the time domain. This attribute is not entirely undesirable; as the sound begins its journey from the plucked strings and the vibrations of the top of the guitar, our notes travel as sound waves towards the microphones and reach them at slightly different times. Combined with additional waves that reflect on the walls and other objects around us, all with small but not insignificant delays, these slight differences help to create the stereo effect that we experience. Not dissimilar to how our ears and brains perceive and interpret the world around us.
When these differences are augmented to a greater degree, phasing occurs and has a noticeable influence on the sound quality of our recordings. Cancellations and comb filtering can potentially strip fundamental frequencies from our recording, leaving the recorded guitar sound thin and weak. Phase problems can be fixed during mixing by aligning the offending tracks, but it's always preferable to take the extra time and correct this when setting up the microphones.
2CAudio Vector
Here is my process. After finding the desired positions of the guitar(ist) and microphones, I make the first test recordings, then I immediately load the 2CAudio Vector plugin to check for any phase issues. If needed, I move one of the microphones a centimetre or two, closer or further away. Possibly, I need to adjust the angle of the microphone(s). I make small changes and repeat as many times as necessary.
Any result higher with than +70 is acceptable, I strive though for an average of +80 or higher.
Additionally to the phase-meter, the 2CAudio Vector displays a visual spatial meter, a long-term average level, and panning meters. It is a very important tool, and, it is free.
Alternatives - for those who are on a Mac and use Logic Pro X, Apple provides a bare essential but usable alternative; the Correlation Meter, found under the Metering group. If free options are not for you, iZotope offers the Insight 2 metering plugin at a substantial price, which offers a lot of additional metering tools that can be handy.
Filtering, Tone Shaping and Surgical Corrections with the FabFilter Pro-Q 3
Learning how to use an equalizer correctly can transform a good recording to a world-class one. Not to say that it can save your wallet from the need of better guitars, microphones and other gear.
A gentle roll-off of the low (below 50Hz) and high frequencies (above 18000Hz) is my starting point. There is not much if any classical guitar information at these ranges and most speakers (for home, or even pro-audio) will attenuate these frequencies. I don't want my recordings to have much information that I cannot hear, anyway.
FabFilter Pro-Q 3 in Action
Tip: I've created a preset with these filters so that I don't have to set them up every time. Better yet, I have created a logic template with my plugins and panning presets that I load any time I start a new session. Small things can make our lives easier and save a lot of time.
Next, I'll try to see if there is any unwanted frequency or resonance that needs to be tamed or even eliminated. I use a wide Q band when boosting frequencies for the smoothest response, and a narrow Q band when cutting to eliminate the offending frequency without affecting nearby elements.
And finally, I might apply a mild high shelf, boost or cut of a couple of dBs, if I find the need to get a crisper or darker sound. If there is too much body or not enough fullness, I apply a mild low shelf cut or boost. A little goes a long way.
To be honest, most of my solo recordings nowadays have a very limited amount of EQ (needless to point out that all the microphone comparisons on this site have no EQ or other processing). I try to get it right before the signal converts to digital, taking a great deal of consideration on the room and microphone technique, and my fingers on the guitar. Yet sometimes this is not possible for various reasons, and learning how to sculpt your sound with an equalizer can be invaluable.
For example, last year I decided to record my classical guitar at a historic monument in Greece, Zalongo. I took my trusty Sony PCM D100 portable recorder with me... on top of the mountain. The high altitude proved to be very challenging, the wind didn't allow for any normal position of the recorder, so it ended up being too low and on the side. When I returned home, I thought that the recording was ruined, but careful equalization saved the day.
My recent series of articles exclusively focuses on how I utilize EQ. If you are interested in gaining more knowledge about it, these articles are a great resource to refer to: Crafting Your Sound: How to shape your classical guitar recordings with EQ
The FabFilter Pro-Q 3 is one of the finest equalizers on the market. The sound is clean and precise, yet with some extra dimensionality and sweetness. The GUI is as intuitive as is breathing, the possibilities offered are virtually endless. Besides, a convenient real-time spectrum analyser to better judge what your EQ choices are affecting is available, as well as other useful tools. It is not cheap, but it is the best!
Alternatives - any modern DAW would have a decent equalizer built-in, basic filtering will be effortless, but more complicated sculpturing will be somewhat limited. Waves Q10 is an affordable equalizer with somewhat similar functionality and interface.
Telling sweet lies with the 2CAudio Aether
Considering that the performance is excellent, the general tone and attributes of the guitar well captured; anything we add at this point is a lie. Adding reverb to a recording is a necessary lie, as nothing will affect the listener more than the physical space that the music takes place.
Contrarily, nothing is more repulsive than a terrible recording trying to hide behind a wash of cheap "church" ambience.
Tip: As reverb tends to smear the sound to a considerable degree, I make most judgments regarding EQ, microphone positioning, etc. without the plugin engaged. I want to have the best possible result, before applying any enhancing effects. I fine-tune my levels, panning and equalizer choices with the reverb later.
2CAudio Aether Algorithmic Reverb
Applying reverb needs to be a mindful process. To some extend it is a stylistic choice; what is appropriate for the music, what expressive and dramatic elements we want to convey. According to these questions, I choose an algorithm or preset, a starting point, but the settings need tweaking to fit the overall character of the music.
Room reverb has the power to make a recording feel real and accessible, friendly, like having a guitarist play for you in the same room. A medium or larger hall sound will present the audience with a feeling that they have attended a professional recital; a formal setting. Lastly, larger halls and churches can distance the musician from the audience, maybe even from the instrument itself, granting an elusive and ethereal mystique.
Some audiences might prefer the intimate warmth of the Segovia's recordings, while others find pleasure in the spaciousness of Julian Bream's recordings, yet others might seek a middle ground; not too dry, not too wet. For me, it primarily depends on the actual music.
When fine-tuning the settings, the tempo and rhythms of the piece must be considered; how much space exists between notes, how quick do they change, how dense is the harmony, etc. Faster pieces need shorter reverb tails or they will sound blurry, slower pieces might benefit by longer ambience tails. I fine-tune these parameters on a song to song basis, a few times I might even add automation to the adjustments.
All rooms have a sound, they accentuate and attenuate different frequencies, like employing a catholic EQ. Any decent reverb plugin will offer some adjustability for regulating the response of its algorithms. Most of the time, I tend to tune my reverbs a little darker so that they are not as obvious. Taming the low end can also be desirable to help the recording be a little clearer. At rare cases, I will use two instances of the plugin with different settings on high and low responses.
Tip: The place of the reverb on the signal chain matters, I sometimes like to put the Reverb before the EQ. Hence the general equalization applies to the recorded sound as a whole, almost like shaping a classical guitar tone recorded in a larger room. I avoid any drastic boosts or cuts in that case though.
2CAudio Aether’s intensive list of presets
The 2CAudio Aether is the most expressive and expensive-sounding reverb plugin I have ever witnessed. It is an algorithmic reverb and can sound quite realistic but always musical and impressive. It has excellent room and hall emulations, suitable for classical and acoustic music, still, it can create any ambience sound you can imagine. 2CAudio provides an enormous preset library for the Aether to get you started, and the adjustability is intense. Right now it is on sale.
Alternatives - I started with the 2CAudio Breeze, before migrating to its bigger brother. Breeze offers a similarly excellent sound, at a bare essential and affordable package. It offers less tweakability, but that might be a good thing as the Aether can sometimes overwhelm the inexperienced. Breeze 2 should be even better than the first version I was using. I have also heard good things about the Exponential Audio PhoenixVerb, but have yet to try it.
I’ve recently tested about a dozen different reverb plugins, to find the Best Reverb Plugin for Classical Guitar.
Closing thoughts
I have and sometimes use other plugins as well, but I try to keep an as-small-as-possible armoury. By limiting my plugin choices, I can concentrate on the music. I want to have to take as few unimportant decisions as I need.
If you are on the market for a new EQ or reverb plugin, this article can give you some fine options. But I also hope that this text might inspire you to learn and use what you already have, use your ears to make mindful adjustments, and finally present your music as you intend.
6 Common Mistakes When Recording the Classical Guitar at Home
Part I - The room and the microphones
You just bought a couple of microphones and want to start recording your classical guitar at home; share your recordings with your friends, archive your performances, or start your career as a professional guitarist or recordist. Additionally, recording yourself will force you to look straight into your flaws, thus improving you as a player.
These past few months, I have received quite a few emails and taught several Skype sessions with the focus on recording classical guitars. There are a few mistakes that seem to be common, mistakes that we all do when we first start recording.
In this article, I discuss some of the flubs of the beginner recordist that have to do mainly with the microphones and the room.
You can also read the 6 Common Mistakes When Recording Classical Guitar at Home, Part II article, where I discuss about utilizing a proper signal chain and achieving satisfactory results in post-processing.
Mistake no.1 - Not spending enough time to study the room
Julian Bream - A Life on the Road (Book, 1982)
Every room is different, and If I had to take something out of the brilliant Julian Bream’s book "A Life on the Road" is how essential is to take the extra time to find the spot of where the guitar sounds the best in the room you are; the position in the room and the angle towards the sides are some of the things to consider.
Of course, Julian Bream mainly talks about performances, but the same logic applies to the recording aspect as well. The best sounding spot in the room will allow you to play more comfortably, thus you might sculpture a nicer sound of your guitar; and depending on the microphone technique you use, added ambience or the elimination of unwanted reflections will have an enormous impact on the final recording.
Usually, most of us sit where it is convenient and don't think much about positioning the microphones, as long as they are not in the way. Some others, they like symmetry and will position themselves or the microphones in the middle of a square or rectangular room; the worst sounding spot in a room like this, introducing a plethora of problems that are impossible to remove.
So, try a few different positions, angle the guitar towards one of the sidewalls, maybe sit a little closer to the back wall, to give some space and allow the guitar to project properly. Better yet, ask someone else to play the guitar, ask them to try a few different positions and observe how it affects the sound. Use your ears as if they were the microphones.
Mistake no.2 - Placing the microphones too far away from the guitar
Norbert' Kraft’s distant miking with a spaced pair of Neumann microphones
If you have ever watched any Naxos videos, you must have noticed Norbert Kraft's distant and wide miking. Similar techniques can be seen any many famous recordings. Getting influenced by professional recordists can be inspiring, but also equally misleading as the source material is very different. Techniques that can be excellent in a church, large halls, or even a well-treated studio never apply to the smaller room reality of the home recordist.
By following such techniques you might end up placing the microphone(s) closer to the front wall than the guitar. Even when the microphone(s) are close to equal in distance, it is possible to end up with an overly diffused and roomy sound; as a result, the sound of the small room will be forever embedded in your recording. Getting too wide will also be a problem if the room is not wide enough. Also, the guitar is a small instrument and rarely benefits from a very wide pick up. Therefore, try moving the microphones closer to the guitar but not too close.
Mistake no.3 - Placing the microphones too close to the guitar
Pat Metheny - nylon string recording; don’t try this at home!
After failing with the "church-technique", many of us want to get rid of the small room sound altogether, we have amazing reverb plugins anyway, and start positioning the microphone(s) very close to the guitar, I mean really close. To a similar erroneously path can arrive those with an acoustic guitar background or those who have witnessed some terrible close-miking examples in even famous recordings.
The problem is actually... threefold:
Firstly, by placing the microphones too close, finger and other mechanical noises will creep in, resulting in an annoying and unattractive recording. You may start cutting high frequencies to remove some of those artefacts but sooner or later you'll end up with an immensely dull recording.
Then, most of us usually start with directional microphones, those exhibit a pronounced low-end frequency response due to the proximity effect. One can balance the unwanted boost with careful EQ-ing, but beginner recordists won't have the skills for that. The low-frequency boost combined with the need to cut high-end information will produce an unbalanced imitation of a classical guitar.
Furthermore, the classical guitar is a complex instrument; every part of the top projects different frequencies that they all combine at some point to create a cohesive and rich sound. Normally this point is around the length of the soundboard, about 50cm, that should be the limit of how close you can get with the microphone(s): Greater distance is preferable if the room allows, but, never record classical guitar closer than 50cm.
Remember, classical guitar needs space!
Mistake no.4 - Not experimenting with microphone height, angle and techniques
Placing the microphone(s) at the height of the guitar is a decent place to start, but as microphone height and angle influences so much the overall character of the recording, ignoring other possibilities will frustrate you as you will have to fight with post-processing to get the desired result. It is preferable to spend the extra time and set up the microphone(s) correctly.
Normally, as classical guitarists learn to project their sound slightly upwards, the further away you place the microphone(s), the higher they should be positioned. And, by allowing the microphone(s) to face a bit downwards, so to be on-axis with the guitar, you can achieve a realistic and full-range recording with great definition. This technique will capture what is usually called the "audience perspective".
If you notice that the guitar, guitarist or microphones to sound a little sharp, you can angle the microphones slightly off-axis to reach a smoother treble response.
In the case of spaced pairs, it is not uncommon to point the microphones somewhat outwards so that they are not parallel to each other. But in a small room, and at greater distances, additional room reflections will soak into the recording. Thus, I've found that is more desirable to point the microphones slightly inwards or a little higher to achieve a mildly off-axis response but with less "room" in the recording.
For those who pursue an intimate and fuller sound, with a tame high-end and less room, what is called the "player's perspective"; miking the guitar a little closer and with the microphone(s) lower is a good place to start. Avoid placing any microphone opposite of the soundhole, otherwise, the recording will become boomy. For an even fuller sound, place the microphone(s) lower yet, and point them upwards.
The discussion about miking techniques is a complicated one and deserves its own article(s), but until I write it, these ideas should get you a bit more involved.
Mistake no.5 - Not checking for phase problems in stereo recordings
The 2CAudio Vector plugin includes a phase meter and its free!
The classical guitar should be recorded in stereo. Either a pair of spaced condensers or one of the several other stereo setups will do. Except for the coincident microphone techniques, like M/S Stereo and X/Y, any technique that involves two or more spaced microphones, can potentially become a phase nightmare.
Phasing has a noticeable influence on the sound quality of your recording, as due to cancellations and comb filtering it can potentially leave your recorded guitar sound thin and weak. Be sure to check for phasing problems with a proper plugin (I use the 2CAudio Vector, it has a phase meter, plus some other welcome features and its free), adjust the microphones until you minimize phase - everything higher than 80% on the meter is acceptable. You can still compensate for phasing during mixing, but it’s always better to take care of it beforehand.
Mistake no.6 - Thinking that more expensive microphones or preamps will fix all problems
Shopping for new microphones, interfaces and other toys... I mean tools... is fun; a big chunk of writings on this site is about reviewing and comparing recording equipment. But, at this age, pretty decent recordings can be made with a reasonable budget. So blaming the gear is only an excuse for not willing to go the hard way.
Refrigerator racks with outboard equipment can be fun, but we can do a lot with a couple of decent microphones and an audio interface
I'm not arguing that equipment doesn't matter; it does. It just not going to substitute for bad microphone positioning, an unsuitable room or not refined guitar technique. Contrary, more accurate and detailed microphones will accentuate any of the problems that are present.
Learning how to use what you've got, experiment with various microphone techniques and positions; take steps to adjust your room for a better sound. And why not, maybe spend some time practising and try to be well-rehearsed before you press the record button. These are some basic actions to take that can drastically improve your recordings in a meaningful way.
Closing thoughts
Mistakes are part of the learning process; don't be afraid to make them, and don't hesitate to experiment. After all, recording is a journey, and the process of trying things can be a valuable lesson in becoming a more accomplished recordist.
I hope that this article might encourage you to try out different microphone positions, learn and improve your room. Optimistically, the information provided here will guide you to make better recordings.
6+1 Things That Will Improve Your Classical Guitar Practising
Playing the classical guitar can be utterly gratifying for professionals and amateurs alike; moulding unique sounds with our fingers and expressing our inner selves. Even more so, playing an instrument is a way to escape some of our everyday problems.
On the other hand, practising the classical guitar can often be frustrating; progress sometimes feels impossibly slow, and there are way too many things that need our full attention.
Adopting a new habit, or slightly shifting our mental state, can transform our practice sessions and boost our efficiency. Besides, a more enjoyable time with our instruments could only make us want to play more.
Here are a few of the things you can do to get the most out of your practice session.
Schedule your Practice Sessions
If you often postpone practising, finding yourself not having enough time for a full session. Try to organise your day better, instead of picking up your guitar every time you feel like it. Just like many other activities, set a specific time for practising, and make sure to show up on time. No excuses.
Don't Skip Days
If you can dedicate a couple of hours every day for your passion, it's excellent. But, don't skip practising for a day because you only have half an hour, thinking that it won't be enough. Decide on one thing, be it a difficult phrase or technique, you wish to conquer; gather all your concentration and dedicate your limited time on taming it.
Practice What you Can't Do - but Don't Reach Out for the Stars, yet.
I often see people with very little experience try to tackle a difficult concert piece. Usually, they try on their own for a couple of years, then frustration kicks in because they don't see any improvement, and they either quit or (hopefully) search for a teacher.
You should always practice material that is on the edge of what you can do, but not totally out of reach. Not too hard, not too easy. By building a well-balanced repertoire when the time is right, even difficult pieces will seem effortless.
Keep an Organised Space
There is no better way to lose time and kill concentration than having to search for that Bach score you wanted to work on, a metronome, a file for your nails, etc. Keep a tight and organised practice space with everything you need for the routine available at hands reach.
Do Not Disturb!
Speaking of concentration, put your phone in silent mode! You can achieve more in 30 minutes of full concentration, than in three hours full of distractions. Unless you are a surgeon, or your wife is pregnant, you can manage to stay off-line for an hour.
Don't Practice Through the Mistakes!
A common mistake that beginner guitarists do is to keep practising the same things, and usually by repeating the same mistakes, over and over again hoping that they might eventually improve.
What happens is that mistakes are being reinforced through repetition. Our muscles don't care if it sounds correct or not; if you repeat a movement a hundred times, that's what they'll learn. So, every time you make a mistake, stop right there and start again from the top.
If the mistake persists, work out the specific measures that need attention. Find out why your fingers want to play something different, practice slowly and correctly until you have it all down.
Slow. Down.
Playing classical guitar requires fine finger movements and coordination. Guess what, you cannot control those if you play at a relatively fast tempo. Work on your technique at a very slow tempo, one at which you can control all these fine movements to a great degree. Once you have the correct movement down, it's easy to increase speed.
Repeat - repeat - repeat
You managed to play that difficult Villa-Lobos part correct... once. You should celebrate!? Well, not so fast! If you cannot play it correct at least five times in a row, you probably haven't nailed that part yet, and chances are the when you'll have to perform the full score, the "wrong" version will creep into your performance. So, don't be satisfied with one correct repetition, and move on to the next part. Repeat as many times necessary until you can play it correctly every time!
Don't neglect to enjoy your sessions
I hope that some of these ideas will help you play this difficult piece you have been trying for some months, and hopefully make your practice a touch more satisfying.
Don't forget, no matter your level or your goals, be thankful for what you have achieved so far. Being able to play the classical guitar is a reward in itself.
Connecting Harmonies with Melodic Lines
An Intensive Journey to Demystifying the Fretboard - Part 6
If you haven’t read yet, make sure to check the previous segment of the series:
Part 5 - Voice Leading for Classical Guitar
Three-note voicings, like the triads, are a good starting point to work on polyphonic concepts for guitar as they are more comfortable to play and allow more freedom of movement than four-note voicings without losing any essential elements.
Hearing the Voices
The first step towards understanding polyphony is to be able to hear the voices individually and be able to create melodic lines on each one of them.
Singing is the most direct way that we experience sound as it involves the least amount of translation. Therefore it is the most efficient way to internalise sounds and understand all the different elements that create a musical experience. Even if you don't consider yourself a singer - I certainly don't think myself as one - try to sing as much as you can. Top melodies, inner voices, low voices, rhythms, everything!
Formulae
Start with a simple progression and add melodic lines independetly to the top, middle, and low voices.
Make sure that the melodies don't overlap with the other voices because:
Voices may lose their individuality.
Due to the nature of the guitar, it will probably mean that you will have to interrupt one of the other voices.
Writing Melodies
For this example, I will use the example from the lesson on voice leading. The combination of open and close voicings allows for greater flexibility of the melodic notes.
Adding a melodic line to the soprano is the obvious choice, as we are used and expect to hear music with the melody on the top voice.
To keep things simple, I only used diatonic notes with a constant eight-note value to connect the target tones. Target tones are all the important notes that are part of the harmonies at each instant, the rest of the notes are scale tones in the Key of G Major.
In a similar fashion, I created a melody for the bass.
The low part is almost as intuitive to play and hear as the top one.
Finaly, let’s hear a melody on the tenor/alto.
The middle voice is a little trickier, both in writing and in playing, as sometimes there is not enough space for an interesting melody and can easily disturb one of the outer voices. Nevertheless, adding a melody to the middle voice is equally satisfying and even more so rewarding.
Paying Attention
A couple of technical aspects that you need to be consious of when you are practising melodic lines on three voices:
Make sure that you let all the tones ring their actual values. As much as you can.
Make sure that you play the two harmonic voices a little softer to let the one with the melody stand out.
Playing all the voices and melodies individually a few times will assist you in understanding them better before you put the whole arrangement together.
Relishing Polyphony
If this is not enough for you, after practising all melodies individually, an extra step to stimulate the progression and elicit polyphony is to tweak the rhythms and combine melodic lines in all voices.
An Intensive Journey to Demystifying the Fretboard - Quick Access
Part 1 - Practising Scales with Creativity
Part 2 - Understanding Double Stops
Part 3 - Practising Triads & Inversions
Part 4 - Learning the Open Triads
Part 5 - Voice Leading for Classical Guitar
Part 6 - Connecting Harmonies with Melodic Lines
Voice Leading for Classical Guitar
An Intensive Journey to Demystifying the Fretboard - Part 5
If you haven’t read yet, make sure to check the previous segment of the series:
Part 4 - Learning the Open Triads
Voice leading is the linear movement of individual melodic lines or parts, their interaction leads to expressed harmonies. In other words, voice leading allows us to understand where voices want to go, by considering where they come from and what everybody else around is concurrently doing.
Smoothness and Indepenence
The primary interest in voice leading is to maximise smoothness and promote the independence of voices. These virtues of part-writing are satisfied when the voices move as little as possible and in different directions.
Considering these goals, we derive the following straight forward rules:
Common Note Principle; If two chords have a note in common, try to keep it in the same voice.
Contrary Motion; If not or for some reason you don’t want to keep it there, make sure that some of the voices move in different directions.
Make sure that you don’t cross voices - avoiding large jumps helps.
Three Baisc Voice Leading Rules
Agustin Barrios' Preludio Saudade from La Catedral is a perfect example of voice leading, by studying just a couple of measures, it completely demonstrates the application of these rules.
La Catedral - Preludio Saudade; Measures 10-11 and 19-20.
Diatonic Progressions
Let's examine the possible diatonic root progressions and their voice-leading options:
Chords that their roots are a fourth or a fifth apart have one common tone. Try to keep it in the same voice but if you don’t want, make sure that some of the voices move in different directions.
Chords that their roots are a third or a sixth apart have two tones in common. You can keep one or both at the same voices, or make voices move in opposite directions.
Chords with roots a second or seventh apart don’t have any notes in common, so your only option is to move all voices in different directions.
Voice Leading in Diatonic Progressions
These rules are mere guidelines and should never obstruct musical expression. Most great composers historically operate on the frontier of what is considered acceptable at any given time. It is the responsibility of the thoughtful composer though to understand, internalise and analyse the voice leading principles in part-writing in addition to important musical works.
Play and listen carefuly the following voice leading example, analyse the linear movement of the voices. Finaly, apply these simple rules to other progressions.
Voice Leading Example in a Diatonic Progression
Parallel Movement in Instrumental Writing
Parallel movement is generally avoided as it takes away the individuality of the voices, but in instrumental writing, it can be an effective device for underlining a melody with a greater sense of cohesiveness and density. Claude Debussy and Maurice Ravel, architects of the contemporary music, used parallel melodic harmonies extensively; but there are examples of parallel movement even in Bach.
In a contrapuntal context, parallel harmonies may provide contrast but should be only used sparingly.
An example of paraller movement can be found again in Agustin Barrios' La Catedral, in the second movement this time.
La Catedral - Andante religioso; Measures 3-4.
An Intensive Journey to Demystifying the Fretboard - Quick Access
Part 1 - Practising Scales with Creativity
Part 2 - Understanding Double Stops
Part 3 - Practising Triads & Inversions
Part 4 - Learning the Open Triads
Part 5 - Voice Leading for Classical Guitar
Part 6 - Connecting Harmonies with Melodic Lines
Learning the Open Triads
An Intensive Journey to Demystifying the Fretboard - Part 4
If you haven’t read yet, make sure to check the previous segment of the series:
Part 3 - Practising Triads & Inversions
Even a slight change in the arrangement of the notes can have a drastic impact on how we perceive their sound.
Creating Open Voicings
Open position triads are voicings of triads with an intervallic span greater than an octave; the most common way to achieve that is by raising or lowering the inner voice of a close triad by an octave. This allows for the evenest arrangement of the three voices.
G Triad in Root Positon - Close and Open Voicing
Open triads and open voicings, in general, are execllent devices because they let the individual voices sound more balanced and clearer.
G Triad in First and Second Inversion - Close and Open Voicings
Diatonic Open Triads
Similarly to how we practised close position triads, we can arrange all open position triads in a diagonal array, covering a three-octave range.
G Major - Diatonic Open Triads in Three Octaves
Practising Open Triads in Pairs
Music carries in a forward motion, nothing stays still; this linear fashion informs our apprciation of a musical composition.
Remember, practising open triads in pairs is a useful exercise to undestand how harmonies connect as well as a way to force ourselves to practice more than one things at the same time.
For now, practice diatonic triads that their roots are:
A fourth/fifth apart - these have one note in common
A third/sixth apart - these have two notes in common
A second/seventh apart - these don’t have any notes in common
Practising Open Triads in Pairs
Practice the Open Triads and in the next lesson, we are going to put them to use.
An Intensive Journey to Demystifying the Fretboard - Quick Access
Part 1 - Practising Scales with Creativity
Part 2 - Understanding Double Stops
Part 3 - Practising Triads & Inversions
Part 4 - Learning the Open Triads
Part 5 - Voice Leading for Classical Guitar
Part 6 - Connecting Harmonies with Melodic Lines
30-minute Classical Guitar Warm-up Routine
The main reason for setting up and following a regular warming-up routine before each practice session is to you avoid muscle and tendon related injuries. A successful one will also assist in your technique development and allow you to increase your playing consistency.
Be careful not to overdo it though, you don't want to wear down your fingers before your session even begins. A common mistake among guitar students is to spend most of the practice time with technical exercises, neglecting polishing up repertoire.
By focusing on each exercise for only about 3-4 minutes, alternating hands and focus area, you can manage to tire your fingers just a little, while maintaining physical and mental stamina for the basic work-out.
Additionally, you want to work your fingers on a variety of techniques and movements, to ensure a balanced outcome, with the additional benefit of having worked and polished the basic - and most important - techniques that the classical guitar repertoire requires.
Before you begin, keep in your mind that, accuracy is extremely important. Therefore, practice at a slow and comfortable tempo, stay focused and pay attention to your tone production quality, and efficiency of movement.
ABS: Always Begin Slowly
Start with some of the basic Right-Hand attack techniques on a single string.
Although "im" is mostly used for scales and melodies, a fit “a” (RH) finger, as well as an agile “4” finger (LH), gives overall balance and control to the hand - therefore don’t skip on practising the “ma” variations.
Also, try different strings.
After a few minutes, it is time to let the RH hand rest and concentrate on the LH, slur exercises are very helpful. Pick a scale practice hammer-ons.
Keep all the fingers as close together to the fretboard as possible, and aim for a quick and accurate attack. Slurs are all about accuracy, strength is over-rated.
More RH picking exercises on a single string, this time triplets will guide us to practice sequential attacks with three fingers.
Triplet accenting slurs for the left hand. Make sure that the tone of all three notes is similar - pay attention especially to the pinky as it usually the weakest one.
Its time to introduce string crossings for the right hand, these will prepare your RH fingers for more realistic - real repertoire - requirements.
Practice descending slurs with pull-offs. I like to keep working on the same scale throughout the warm-up routine.
Tremolo is an elusive technique for many guitarists, perform these sequences, and emphasise the first finger to gain more control. Remember, repetition is the key to success.
Left-hand triplet descending slurs. Focus on the pull-offs, each note should have the same volume and tone.
We are all Drummers: when practising right-hand Patterns, like these arpeggio sequences, I usually mute the strings with my left hand, to better judge the accuracy of the individual hits.
Mixed slurs can be very rewarding, these are some examples but try to experiment with different one or two strings mixed-slur sequences.
Remember, none of these exercises is fully comprehensive, I could (and do) easily spend more than 30 mins just on each topic individually, but that's not the purpose here. So, if you have trouble with a specific technique/exercise or want to elaborate more, find a place to fit it into your regular practice routine.
The Rasgueado exercises are useful even if you don't plan to play any flamenco, they give strength to your finger and flex them to the opposite direction for better balance.
Work on short bursts of speedy ascending lines, so that you can synchronise both hands and practice scale lines that might come up in your repertoire.
Four finger Rasgueados for more fun.
And lastly, short bursts of speedy descending lines. Push your tempo limits but don't forget that accuracy is the King.
Parting thoughts
As pointed earlier, tone production quality should always be a concern, as well the accuracy and efficiency of the movements. Try to stay focused throughout the warm-up and the rest of your session. Never practice without concentration, it leads to uninspiring performances. And don't practice without intention, because it leads to incoherent playing.
This routine might seem somewhat excessive, but the length of each repetition can be adjusted to realistically match your time. Some of the variations can be skipped, but try to cycle through all of them at decent intervals.
It is most essential to follow and repeat all the exercises a few days before a recording session or a concert, doing so, you will get to be at the top of your game.
DPA 4011A vs Line Audio CM3
Line Audio is a relatively unknown Sweedish company, or rather a one-man shop, dedicated to manufacturing high-quality, unhyped microphones and linear pre-amplifiers. They have been in this business for more than 30 years, and by cutting the middle man, no advertising and minimizing cost on all the not essential elements, they offer their products at the most affordable prices.
DPA’s premium case.
DPA, on the other hand, is one of the leading names in the classical recording world. Many recording engineers, producers and musicians sing praises for their clarity and honest presentation. The microphones, as well as the accessories that accompany them, are as premium as it gets. But, performance comes at a cost.
In this duel, I wanted to see if the CM3 cardioid condenser stands any chance against the 4011A at a less than a tenth of its price. In other words, could someone with a limited budget still manage to get a decent recording?
Setting Up
I positioned the microphones at a small AB setup with 36cm between each microphone, at 96cm high and 55cm distance from the top of the guitar. At this distance, the microphones can capture the true sound of the guitar, and with their cardioid pattern, reject most of the room acoustics.
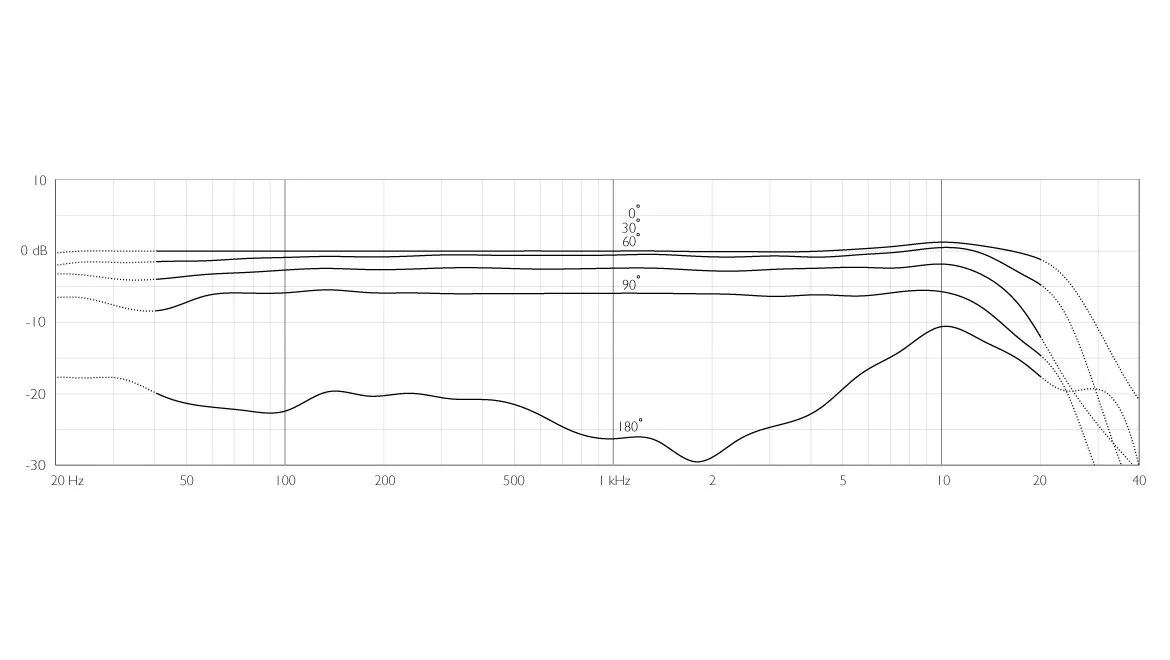
DPA 4011A Frequency Response and Polar Pattern
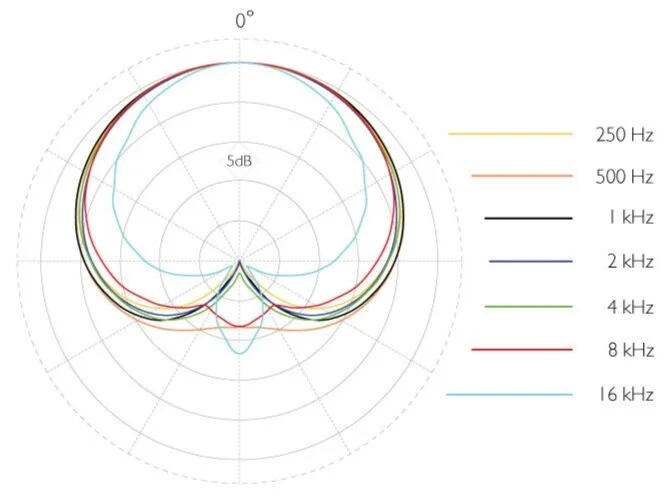
Line Audio CM3 Frequency Response and Polar Pattern
The details matter
Listening to the recordings, the DPA microphones have breathtaking clarity and detail at every frequency. They demonstrate a better resolution and capture a holographic image of the classical guitar, with more realism and depth. The 4011A are brutally honest microphones, but if you are recording a luthier grade guitar and a great guitar player in a beautiful sounding room, you want it all on tape.
The CM3s surprisingly (or not, if like me you have used them for a while) sound very close to the DPA. They are a little more plain sounding, with less resolution and depth, in comparison it feels feel like something is missing from the image. They are also less sensitive and can benefit a lot from a good preamp, but peculiarly they were only slightly noisier than the 4011A in these recordings.
Line Audio’s basic but very portable case.
A distinct approach
The Line Audio CM3s come at a very minimal package, shipped in a simple plastic box, with a basic plastic microphone holder and a decent windscreen. They are so inexpensive, so there is nothing to complain there really. They are also light and small enough, almost as small as an XLR adaptor, that I'm not hesitant to carry a pair even my jacket's pockets.
DPA sent me for test their premium stereo set, that comes with a luxury case and all the accessories you might ever need. The craftsmanship is impressive, everything feels finely processed with all the pieces machined out of solid aluminium. The full assembly looks stunning. Their stereo bar, while relatively expensive, is the best I've ever used.
DPA 4011A Stereo Set, all the accessories you’ll ever need.
Single 4011A or a more basic stereo set up is available, they come with only the essential accessories in a hardshell nylon case. This case is also of premium quality and judging by my experience with the d:vote 4099g (you can read my review here), I prefer this kind of case to wooden cases that come with most higher-priced microphones. As you cannot carry them easily for location recording because of weight and size. This is true especially for small-diaphragm condensers, which might see more commute than larger studio microphones.
For different use cases
In conclusion, the 4011A is the better microphone of the two in every aspect. Taking us a step closer to capturing the classical guitar in all it's nuance. Also, if you charge for your recording services, showing up with the DPA set will reassure your clients for the extent of quality you are committed to.
If you are on a limited budget, or just want to record yourself for non-commercial uses, the Line Audio microphones are the best-kept secret of the recording world. The CM3s can capture classical guitar with realism and honesty and are so inexpensive, you can buy a few.
In conclusion, the 4011A is the better microphone of the two in every aspect. The engineering and the accessories are unparalleled in quality, not to mention the sheer detail and sound quality that they capture. Taking us a step closer to capturing the classical guitar in all it's nuance. Also, if you charge for your recording services, showing up with the DPA set will reassure your clients for the extent of quality you are committed to.
But, if you are on a limited budget, or just want to record yourself for non-commercial uses, don't shy away from the Line Audio microphones, as in my experience it is hard to find any other small-diaphragm condenser microphone with such natural characteristics at this price range or even many times more expensive. The CM3s can capture classical guitar with realism and honesty and are so inexpensive, you can buy a few.
Purposeful Practising
A Personal View on the Art of Practising the Classical Guitar
One of the most common issues that I encounter among intermediate and sometimes even advanced guitar students is that they don't know how to achieve the most with their practising. They usually try to memorise a piece, then play it from the top a few times, and move on to the next.
This approach is not what I consider purposeful practising, as it doesn't lead to the mastery of any of the aspects of performance. This epidermal handling of repertoire hinders the chances to unlock hidden details. In other words, you ought to become an expert!
Here are the steps I take when I'm learning a new piece.
The First Read
I usually read the whole piece once or twice, not only this helps to improve and maintain my sight-reading skills in the long run, it allows me to have a broader idea of what the piece is.
Finding Fingerings
After the first read, I make fixed and deliberate string and fingering choices, measure by measure and phrase by phrase. I evaluate the different options based on the character of each voice, the ability to connect with the previous and next phrases, and by ensuring finger independence at its maximum.
I take notice on published fingering suggestions, but I don't rely on them as I almost always have to change them.
Notes, Rhythms, and the Choreography of the Fingers
I go through every measure with a metronome to verify that all my notes and rhythms are correct, and make sure on the deliberate and purposeful movement of my fingers on the fretboard. I repeat the part I'm working on as many times as it is needed, establishing an exact finger choreography.
Confidence
Slow, deliberate practising and repetition are the devices that build performance confidence. What you want to avoid is to use the same tools to reinforce a faulty technique.
I practice at a comfortable tempo; from a couple of measures to a full section, and finally the whole piece. My objectives are clear tone and perfect delivery. When I make a mistake, I start over!
Building Speed
Practising with a metronome keeps us in time, and creates a reflection in our brains of what the piece is like, and how our fingers should be moving to achieve that. Therefore when it is time to start working on speed, I start at a very comfortable tempo and with small increments (around 4 to 6 BPM) I practice until the point that the piece starts to fall apart. I always push a little further than that, but at the last playthrough, I return to a comfortable tempo.
Interpretation
When notes and tempo are in place, it is time to work on phrasing and dynamics. An awfully important nuance of performance as it expands our capability for individual development, and the capacity to communicate deeper emotions with our music. Yet, it is probably the aspect of music that is the most difficult to teach, and often teachers and players don't contemplate.
Writing about phrasing and dynamics in music is like talking about a painting or a picture, but I can give you some of the processes that guide me to improve my interpretation skills.
First, I read about a specific epoch and learn as much as I can about the individual composer that I'm studying. It doesn't mean that I have to restrict myself to a clichéd way of performance; on the contrary, with a greater insight into what a piece is about, we become freer to make deliberate choices and shape or phrases.
An equally important step is that I try to listen to as many performances of this piece as I can find. I try to listen to all the small details that we generally don't pay so much attention and make notes. I ask questions, make notes. For music adapted from other instruments, I like to listen to performances on the original instrument.
The key-words here are to become informed, purposeful and conscious of all the choices you have to make to shape your interpretation.
Practising Performance
Practising and performing are two different concepts with distinct purposes. While I practice to learn how to move my fingers more accurately in an almost mechanical and unconscious motion, to minimise mistakes, and determine the minutiae, hoping eventually to become a master of a work. The focus in performance is to carry out in a focused manner the essence of a piece, have a concise and nuanced meaning, and not to allow small mistakes to destruct the cohesiveness of the piece.
After breaking up all the individual elements for better control of phrasing and dynamics, it is time a put it all together. In consequence, I conclude every practice session with an actual performance of the piece I'm learning.
I treat this final segment as a legitimate performance, one that takes place in front of an audience. If a mistake occurs, I attempt to minimise its significance. I don't stop, but I carry on until I play the whole piece - sometimes the whole programme that I decided to play. I record my practice performance for critique!
Revision
On my next practice session, I start working on the parts that were not executed well, try to understand the technical difficulties or problems that might cause that. I attack the parts in question and attempt to find solutions.
The Informal Recital
Even if you are not yet a performing guitarist, or might not even aspire to be one, I recommend that you give short informal recitals to your friends and family. Not only it is a fun way to spend a Sunday afternoon, but also nothing builds confidence in your skills more than the sound of warm applause.
Be mindful, play only the pieces that you can execute adequately; nobody wants to see you struggle with a difficult piece that is way out of your level (yet). Even if that means that your recital should only be 5 minutes long, eventually you will build on that. Lastly, don't forget to offer them a glass of wine or two before your recital.
Closing Thoughts
Practising any instrument requires a lot of time and effort, and the guitar is no exception. If you take action to make your practising more focused, purposeful and efficient; your playing with developing in a similar deliberate manner. One that leads to the immensely rewarding experience of masterfully playing the guitar.
Practising Triads & Inversions
An Intensive Journey to Demystifying the Fretboard - Part 3
If you haven’t read yet, make sure to check the previous segment of the series:
Part 2 - Understanding Double Stops
Triadic harmony is so profoundly embedded into the western culture that, even when played out of context, their sound is so powerful that our souls, minds and bodies still revert to their meanings.
Therefore, our next stop in the journey to the further demystification of the fretboard could not be anything but the Triads; regardless of how well you think you know them.
The Triad
A triad is a set of three notes that can be stacked vertically in thirds.
G Triads in Root Position.
Triad Inversions
When any note other than the root is in the lowest voice, the triad appears to be in inversion. Inversions of triads have distinct qualities and attributes.
G Triad Inversions
All Inversions
The first step is to learn the Triads and their Inversions in all positions across the different string-sets.
G Triad Inversions - All String Sets
The Diagonal Guitar
After getting comfortable with these, the next step is to practice the Triads in a diagonal array - starting on the lowest note available which is not always the root. This approach provides the most effective way to have the whole fretboard at your disposal at any time.
G Triad Inversions in a diagonal array.
Diagonal Diatonic Triads
Once you start feeling comfortable with the G major Triad, apply the same approach to all diatonic triads in the key of G major.
Practising Triads in Pairs
Triads are almost never found alone, they usually act in cooperation with other sonorities that precede and follow them. Much like all music anyway; we experience sound in time and we give meaning to it by appreciating how it unfolds.
Practising triads in pairs is a useful exercise to realise how harmonies connect as well as a way to force ourselves to practice more than one things at the same time.
For now, practice diatonic triads that their roots are:
A fourth/fifth apart - these have one note in common
A third/sixth apart - these have two notes in common
A second/seventh apart - these don’t have any notes in common
An Intensive Journey to Demystifying the Fretboard - Quick Access
Part 1 - Practising Scales with Creativity
Part 2 - Understanding Double Stops
Part 3 - Practising Triads & Inversions
Part 4 - Learning the Open Triads
Part 5 - Voice Leading for Classical Guitar
Part 6 - Connecting Harmonies with Melodic Lines
Understanding Double Stops
An Intensive Journey to Demystifying the Fretboard - Part 2
If you haven’t read yet, make sure to check the previous segment of the series:
Part 1 - Practising Scales with Creativity
I always find it fascinating how much colour we can squeeze out of combining just two notes together.
Traditionally, the most common use of the double stop is to add more weight and support to melodic lines. Therefore it’s our obligation to study them exhaustively since not only they can assist us with the further demystification of the fretboard but they are also quite useful compositional elements.
Within one octave can be found the intervals of the second, third and fourth as well as their inversions fifth, sixth and the seventh. It is very useful to think of these pairs of intervals as reflections on a mirror since their effects are similar and we deal mostly with how much space you leave between the voices.
The following happens when we invert the intervals:
Seconds become Sevenths and vice versa
Thirds become Sixths and vice versa
Fourths become Fifths and vice versa
Also:
Major intervals become Minor and vice versa
Diminished intervals become Augmented and vice versa
Perfect intervals remain Perfect
Bonus Info:
When Major or Perfect intervals become a half step larger are called Augmented
When Minor or Perfect intervals become a half step smaller is called Diminished
The diverse pool of emotions and colours that different intervals convey can be by a not so subtle margin subjective and therefore their uses differ across various cultures, centuries and genres of music.
It is generally accepted though that:
Thirds and a Sixths are consonant and colourful
Perfect Fourths and Fifths are tonally ambiguous
Seconds and Sevenths are dissonant and provide plentiful tension
Music with excessive use of dissonance can sometimes be alienating but contrarily music without tension and dissonance can quickly become boring and too convenient. A way to use dissonances in a more companionable tone is to hide dissonant intervals within a consonant texture so that they become less animating and dominant features of the overall music.
Things to do:
Explore all intervals in the same diagonal manner similar to the scales practising
Pause and try to think what each interval brings out to youCreate miniature works or improvise only with the use of double stops, why not restrict yourself to only one type of double stop
Find uses of double stops in the works of the composers you like and analyse them.
When practising intervals and double stop, my goal is to be able to recall any sound without much thinking and to be able to play anything, anytime and everywhere on the guitar!
After all, double stops are 66,6% triads.
An Intensive Journey to Demystifying the Fretboard - Quick Access
Part 1 - Practising Scales with Creativity
Part 2 - Understanding Double Stops
Part 3 - Practising Triads & Inversions
Part 4 - Learning the Open Triads
Part 5 - Voice Leading for Classical Guitar
Part 6 - Connecting Harmonies with Melodic Lines
Practising Scales with Creativity on a Classical Guitar
An Intensive Journey to Demystifying the Fretboard - Part 1
First Notes
Learning and practising all twelve (or twenty-four) scales is essential for any guitarist, as it is an efficient way of building technique and developing awareness. But, practising doesn't have to be a purely mechanical exercise.
My main objectives in the way that I approach the instrument are:
to be able to see all notes across the whole fretboard and how they relate,
to stop relying on fingerings as much as possible as they can easily become a prison the more one relies on them,
be able to sing or hear a melody and play it without much fuzz.
Practicing with Games
What I found useful was to treat practising as distinct small games that have different rules.
Some examples of different games:
Starting on the lowest note of the scale, play four notes per string up to the highest
Do the same with starting on the next note - that will create a different path to follow, so that will make it impossible to start memorising fingerings
Do the same by using only one finger on the left hand - again it works against memorising patterns
Start on a different but higher position and play two notes per string - that will lead to a different kind of diagonal path
Play only specific intervals - like only 3rds or specific up-down combinations
Exploring the fretboard
Additionally, a different type of game is what I would call Explorative Improvisation, where I thoughtfully improvise with a specific objective.
Here are some rules:
You are only allowed to use the notes of a specific scale
You can put range restrictions as well
Every time you play anything that is something, stop and analyse it, invert it, play it in different ranges and areas of the fretboard
If you feel that you are stuck in a rut - playing the same things, again and again, restrict yourself to a part of the fretboard that you are not as familiar
Allow yourself to make melodies only with using a specific or combination of intervals - what if you could only play 4ths and 5ths
Bonus game: Take a melody or a song that you know quite well and play it in a different tonality and/or register - play it by ear or by analysing the intervallic structure of the melody - do not just move a familiar fingering pattern in a different position! Depending on your level, folk songs to Bach’s cello suites can provide a very fun game!
Remember, practice as slow or fast as you need to make it sound right!
An Intensive Journey to Demystifying the Fretboard - Quick Access
Part 1 - Practising Scales with Creativity
Part 2 - Understanding Double Stops
Part 3 - Practising Triads & Inversions
Part 4 - Learning the Open Triads
Part 5 - Voice Leading for Classical Guitar
Part 6 - Connecting Harmonies with Melodic Lines