Crafting Your Sound: Shaping Classical Guitar Recordings with EQ
Part I - High-pass, Low-Pass Filtering and Shelving EQ
Many guitarists - and I plead guilty - spend a lot of money on new equipment to improve the sound of their recordings. I'm not suggesting that decent equipment isn't helpful, but the truth is that it's certainly easier to buy new stuff than to learn how to make the most of what you already have. In this article, I'm going to focus on a cheaper and more effective way to improve the sound of your classical guitar recordings: EQ.
Equalization is a powerful tool that allows you to boost or cut specific frequencies in your recording, which can drastically change its overall tone and character. Mastering EQ can help you create recordings that bring out the unique qualities of your guitar and playing technique. Instead of constantly buying new equipment, invest in experiences that enrich your musical journey, such as attending concerts or workshops.
Disclaimer: No two Classical Guitars are the same
One of the beautiful things about classical guitars is that each instrument has a unique voice. No two classical guitars are the same, therefore it's essential to choose an instrument that complements your playing style and taste. Besides, different genres require distinct guitars to sound authentic. Take the time to experiment with a diverse range of guitars and find the one that feels and sounds right for you, as, without doubt, it will have the most significant impact on the final result of your recordings - after the guitarist. Likewise, every recording space is unique. Your room will impose its character on the recording, so before even pressing the record button, make sure that your guitar sounds the way you want in your room.

Disclaimer: No one-size-fits-all
While it's helpful to learn from other guitarists and recordings, it's unlikely that you'll get the same results by blindly copying EQ settings or microphone techniques. Instead, it's crucial to develop the ability to identify what EQ is doing to the sound and use that knowledge to shape the recording to your liking. This means listening closely, experimenting, and learning to trust your ears. As you become more familiar with how different frequencies interact, you'll be better equipped to make informed EQ decisions that complement your music.
Also, take a look at the Best Studio Monitors for Classical Guitar guide, as they are essential to make reliable decisions regarding EQ.
Everything should work in tandem
Having a clear artistic vision is essential when using EQ. For example, if you're aiming for an intimate sound, you'll want to choose a microphone placement and EQ settings that complement each other to create a warm and cosy tone. In this case, you may want to experiment with mic placement options that bring the microphones closer to the guitar and EQ settings that emphasize the low-mid and mid-range frequencies. Microphone choice is also critical, as overly analytical microphones or ones designed for free-field use would capture too much detail.
On the other hand, if you're going for a concert hall experience, you'll want to experiment with microphone placement and EQ that gives the audience perspective and create a sense of space and depth. In this instance, you may want to use a pair of microphones further away or employ multiple microphones to capture different aspects of the guitar's response. Then, use complimentary EQ to shape the sound as though your guitar was captured in a larger space.
To get some inspiration take a look at the Three-Microphone Setup for Recording the Classical Guitar.
Using High- and Low-Pass Filters

High-pass and low-pass filters should be the first things you apply, even before you make any other decision on how you want to EQ your recording. Ideally, if your preamp or microphone has a high-pass filter, you should engage it. A gentle roll-off of low and high frequencies will remove unwanted sounds and give you a cleaner recording. Additionally, you will be able to make more informed EQ decisions. In some occasions, no further equalisation is necessary to achieve a well-balanced recording.
For classical guitar, I always start with a mild high-pass filter at about 60Hz (-6dB/Oct) and a low-pass filter at about 18KHz (-6dB/Oct), and then I work from that. You may need to apply sharper high-pass filter settings if your room isn't as quiet and noises such as street rumble creep into your recording. You could either adjust your settings to a higher frequency, use a -12dB/Oct slope, or try both). Similarly, to eliminate some of the finger-moving sounds or chair squeaks, you might need to set a lower low-pass frequency and a sharper slope.
Make sure to find a balance between removing unwanted frequencies and preserving the natural character of the recording. Overuse of these filters can lead to an unnatural, thin sound.
Shelving EQ

Shelving EQ allows us to adjust the amplitude of all frequencies above or below a certain point and is another extremely effective tool in our EQ toolkit. It can be useful for creating a more balanced sound or giving a subtle shape to the recording.
For example, if you find that the low end of your recording is overpowering, you can use a low-shelf filter to reduce the amplitude of all frequencies below a certain cutoff point (usually around 200-250Hz) a couple of dB. Thus, effectively reducing low-end boominess. Conversely, if your recording sounds somewhat thin, a low-shelf filter boost of a couple of dB at around 125Hz should rectify that.
Furthermore, if your recording sounds too bright or harsh, you can cut frequencies above about 3.5 kHz by a few dB with a high-shelf filter. Or boost all frequencies above 8-10Khz if the recording lucks brilliance and air. Be especially careful when boosting high frequencies, because they can expose the poor sound of your room or your playing.
Tip - And while most guitarists don't really like boosing the high-end as this might emphasize mechanical sounds, I find that a subtle boost of frequencies above 2,5KHz in combination with a bit more potent cut of frequencies below 250Hz, under the right circumstances, result in a very classy sound. Provided the recording isn't too sharp or harsh and the playing is short of non-musical sounds.
My Secret Weapon: The FabFilter Pro-Q3
One of my favourite plugins for classical guitar recordings is the FabFilter Pro-Q3. Admittedly, not much of a secret if you have been here for a while (read the Three Most Essential Plugins for the Classical Guitar) . The Pro-Q3 offers precise control over the frequency spectrum with a range of filter types and is easy to fine-tune via the graphical interface.
To make my life easier, I have created a set of custom presets that I use as a starting point for different recording scenarios. These presets are designed specifically for classical guitar and can save me a lot of time when mixing. My custom presets pack “EQ Essentials” is available in the CGT store, so if you also have the FabFilter Pro-Q3, you could use my presets in your workflow. But it's important to remember that there is no one-size-fits-all solution and that you'll need to adjust them for your recordings.
Final thoughts
In conclusion, EQ is an essential and powerful tool for creating professional-quality classical guitar recordings. However, it's important to remember that EQ is just one part of the recording production. Don't underestimate the quality of your recording space and microphone placement. Keep in your mind, creating great recordings is a journey. With practice and patience, these guidelines can help you enhance the sound of your recordings and capture the beauty and nuance of the classical guitar.
In part II of this series, we will delve deeper into the use of Parametric EQ to further enhance your recordings. Parametric EQ offers even more precise control over frequency adjustments, allowing you to zero in on problematic frequencies and carve out a more refined sound. We'll discuss how to identify and address problem areas in your recordings and provide tips for using the parametric EQ to shape the sound of your guitar. And finally, in part III, we will explore some of the more advanced settings of FabFilter Pro-Q3. Stay tuned!

Best Reverb Plugin for Classical Guitar
Classical guitar performance is meant to be experienced in a natural space; the player, the guitar, the room, and the audience summon an ensemble and create a unique contract. As recordists, we aspire to capture such magical moments, but we don't always have the luxury to operate in fantastic-sounding spaces. As producers, we sometimes record in our homes or bland-sounding studios, in such occasions, the use of artificial reverb is unavoidable.
For a decade or so, I've been a happy user of 2CAudio's reverb plugins, Breeze at first and then Aether, as you can read in my post for the Three Essential Plugins for Classical Guitar. However, I recently got a MacBook Air M2 (review coming soon), and these plugins are not yet compatible with Apple's processors. Thus, although I'm still pretty satisfied with the results I got from both Aether and Breeze, I have to find their replacement.
Note: As I learned after starting this test, Logic can run x86-x64 plugins natively and without having to setup Rosetta. Possibly with a hit on the CPU, but this should only become appartent on more heavy projects that solo classical guitar recordings. This fact make the need to find new plugins a but less imminent.
After an initial market research, I downloaded trial versions of all plugins that caught my eye and are compatible with apple's silicon. Testing software with so many variables can be intensive, therefore I spent enough time with each plugin to understand its interface and try to make it work for my taste and needs.
The reverbs I tested this time:
Neunaber WET Reverberator
Strymon BigSky
Universal Audio Lexicon 224 Digital Reverb (Spark Native)
Universal Audio Pure Plate Reverb (Spark Native)
FLUX IRCAM Verb v3
Apple Chromaverb
RELAB RX480
RELAB RX480 Essentials
FabFilter Pro-R FLUX IRCAM Verb v3
LiquidSonics Seventh Heaven
TC Electronic VSS4 HD Native (Non-compatible with Apple ARM Processors)
2CAudio Aether (Non-compatible with Apple ARM Processors)
2CAudio Breeze2 (Non-compatible with Apple ARM Processors)
My final assessment of the usefulness of these plugins is asserted not only on sound quality, ιntuitiveness and adjustability play a minor but meaningful role.

My least favourite reverb plugins

Neunaber WET Reverberator
No matter how much I tried, I couldn't make the Neunaber WET Reverberator Plugin sound decent enough for my uses. I wanted to like the sound, as the WET pedal, that the algorithm originates, is quite popular among electric and flamenco guitarists. In all settings, there is always some chorusing on the reverb tail that I couldn't remove, and the space doesn't sound realistic, natural or with a desirable sound signature.
The price of the WET Reverberator Plugin is reasonable, but considering that there are a few plugins at a similar price (especially during sales), besides the decent sounding free plugins included with most major DAWs, I cannot recomended it even for those on a tight budget.

Strymon BigSky
Another plugin ported recently from a pedal with an almost cult-like following is the Strymon BigSky Plugin. I was looking forward to testing it, however the experience was underwhelming. Not only the sound quality of the Room, Plate and Hall algorithms was not on par with the other reverbs of my test, but the tweakability was also pretty limited. Perhaps the other algorithms included could justify the high praise and price, but for classical guitar, the sounds were not convincing enough. Thus, another hard pass unless you are looking for shimmer reverbs for your classical guitar.

Apple ChromaVerb
The last of the three not-good-enough reverb plugins is Apple’s ChromaVerb, which is included in Logic's vast plugin collection. The UI is much more intuitive than the "pedal" plugins, and getting a usable sound was not that hard. As expected, the ambience created by the ChromaVerb pales in comparison to the most sophisticated reverbs of the test; it lacks finesse and sounds more like an effect than a realistic space. But given that this is a free option, the results were better than expected.
The good but not-for-me

LiquidSonics Seventh Heaven
Another plugin that seems to be loved by many producers is the LiquidSonics Seventh Heaven. LiquidSonics claims to reproduce the algorithms of the acclaimed Bricasti M7. I have never used the M7 in person, so I cannot confirm or deny this. What I can back up is that the Seventh Heaven has a rich and refined sound, and I can see why it is so popular. The interface is pretty modern and intuitive, I was able to get a sound I liked right away. After comparing it to some of the other plugins though, I concluded that it sounds a bit too polished and generic for my taste. It is worth noting that the Seventh Heaven is the only convolution-based reverb of the test.
Moving on, a reverb plugin that will satisfy those who want extreme control over how the space sounds is the FLUX IRCAM Verb v3. The Verb v3 creates the most realistic-sounding room recreation of the bunch, and could be perfect for film production or other uses that realism and accuracy are desired. In addition, the control the UI provides is pretty phenomenal. I needed some time to get to know how every parameter affects the sound, but after a while, the somewhat uncommon layout made total sense, and I was pleased by how much control the Flux plugin offers. Soundwise, the IRCAM reverb lucks a bit of musicality and elegance for solo classical instruments.

FLUX IRCAM Verb v3
A utility reverb plugin
One of my favourite plugin developers is FabFilter. I really like how powerful their various plugins are, love the clean and pristine sound quality, and appreciate the modern and intuitive UI. I own their Mastering bundle and use it almost every day.
I downloaded the trial version of the Pro-R when it was released a few years ago and did enjoy the user interface and sound, but not enough to change the 2CAudio reverbs I have been using almost forever. This time, I got to play more with the Pro-R and even used it in the production of my latest release: 'Will Have Been'. It is a very intuitive and capable reverb plugin, not my favourite sounding of the bunch but very useful and easy to use. So, I'm debating getting it now or waiting for a sale, but FabFilter's Pro-R will definitely find its place in my collection.

FabFilter Pro-R
Rent or own

Universal Audio Lexicon 224
A reverb plugin I was happy to see released in native format - without requiring the expensive dongle that is called Apollo - is Universal Audio's Lexicon 224 Digital Reverb. Universal Audio has the resources to create some great plugins, but some of the hype comes from the fact that they were only available through their DSP-powered interfaces. That was perhaps necessary a decade ago, but computers today are so powerful that this business model makes little to no sense. With the release of Spark Native, Universal Audio seems to have realised that.

Universal Audio Pure Plate
The Universal Audio Lexicon 224 Digital Reverb sounds musical and manages not to get in a way. Besides, lots of attention has been given on the UI, which looks beautiful but is a bit limited. The Pure Plate reverb sounded perhaps even more musical, albeit less natural for solo classical guitar.
I liked both reverbs from Universal Audio, but if there is one thing I hate more than USB dongles is the subscription model for software - an argument against using Adobe apps as well. Now, $149,99 a year for all the Spark Native plugins is not so bad. But, considering that I don't have any use for any of the other plugins, I decided to cancel my subscription at the end of the trial period and reevaluate later.
Early reflection goodness
When I first got into recording, personal computers were not powerful enough, and native plugin offerings were pretty limited. For that, I used to own a TC Electronic Powercore unit and loved the TC VSS4 algorithm. The Powercore was much of a hustle later on for me to keep using it, and native plugins became capable enough, so I parted ways with it. TC Electronic released the VSS4 HD Native plugin, and although it is not compatible with apple silicon yet, including it in the comparisons can only be constructive.

TC Electronic VSS4 HD
The VSS4 HD sounds pristine and lush, with some of the most realistic early reflections. It makes any recording sound somewhat more three-dimensional. Oher algorithms may sound more pleasing for longer reverbs, but the VSS4 HD is hard to beat for short realistic reverbs.
Vintage vibes

RELAB RX480 v4
One of the best-sounding reverbs of the bunch is the RELAB RX480 Dual-Engine V4. It is supposed to be sample-accurate dual engine recreation of the legendary Lexicon 480L. I cannot confirm or deny the claim as I never had the pleasure to listen one in person. The RX480 is truly stunning with its plush, thick sound. A more modern UI could make the RX480 more straightfoward, as the LARC-type graphic control would make more sense to those with experience with the original Lexicon units, but I could live with that. It is much more impreesive than the UAD 224 Reverb and sounds more pleasing to my ears. The Random Hall algorithm especially is impeccable.
Moreover, RELAB has a lighter version, the RX480 Essentials, which packs the same basic 480L sound with a less overwhelming UI and at a burgain price for what you get.
The familiar

2CAudio Aether
I purchased the 2CAudio Breeze several years ago, then moved on to the Aether. I'm using both plugins it tandem sometimes; the Breeze for a more natural space and Aether for a thicker sound. Both plugins are exceptional, with first-rate sound quality and offer plenty of control. I was so pleased with this combination that I stopped looking for other reverbs. I somehow also missed trying the Breeze2 when it got released.
As it is obvious, I'm used to the sound of these plugins. I downloaded a trial version of Breeze2 to conclude this comparison. Both 2CAudio plugins sound admirable, with the Aether being the most versatile, especially for those who are also into sound design. But I was particularly surprised by the Breeze2. The placement of the solo classical guitar in space is very realistic and offers lots of depth. The Breeze2 sounds lush without sounding as much as an effect or too sterile as some of the other plugins.

2CAudio Breez2
Although it is not yet compatible with the Apple ARM chips, and perhaps there never will be. Given that I already had the first version, the update to the Breeze2 was inexpensive for me, so I didn't give a second though. Unfortunatelly, due a dispute at 2CAudio, the future of the company is currently uncertain. So, I cannot recommend either one, at least for now.
Some thoughts on convolution reverb
I've tried convolution reverbs in the past and had determined that they don't work for me, but I thought that this time might be different perhaps. In addition to Apple's Space Designer, I downloaded the Inspired Acoustics Inspirata Silver and HOFA IQ Reverb v2. As much as I wanted to like them, I never got them to blend well with the dry tone. Admittingly, impulse respneses sound very natural and realistic, but It always sounds like a cross-fade of room ambience and classical guitar layers than an instrument in a room. Furthermore, the IRs tend to get a bit weird whenever I am pushing them. I understand that the results rely on the specific IRs, but I get satisfying results with algorithmic reverbs to investigate convolution reverbs further at this time.
Conclusions
If who don't have a problem with subscriptions and might have uses for the other UAD plugins, the Spark Native is hard to beat. For a versatile reverb with a clean but superb sound, the FabFilter Pro-R ticks all the boxes. Lastly, for vintagey charachter and thicker reverbs, the RELAB plugins are outstanding.
For me, the Breeze2 will replace the original Breeze for realistic but musical sounding spaces, and the LX480 will replace the Aether for characterful reverbs. And, I’ll keep an open spot for the FabFilter Pro-R.

6 Common Mistakes When Recording the Classical Guitar at Home, Part II
Part II - Post Processing
Professional sounding classical guitar at home is not a fantasy anymore or at least achieving a recording quality that is not embarrassing to share. Affordable audio interfaces, preamps and microphones have flooded the market these last decades, with increasing performance and processing power. Rooms, recording techniques and mixing are holding us back.
In the first part on the 6 Common Mistakes When Recording the Classical Guitar at Home, I tried to encourage you to try out different microphone positions and to study your room acoustics.
The second part focuses on some of the common mistakes of beginner classical guitar recordists on utilizing a proper signal chain and achieving satisfactory results in post-processing.
Mistake no.1 - Improper gain staging

AEA TRP2 Gain Knobs
The fear of clipping the converters leads some amateur recordists to use too little gain, resulting in recordings that are low in level. Without adequate signal-to-noise rations, these recordings will become noisy when any attempt is made to bring them at a normal level during mixing or playback. Contrarily, recording too “hot” will possibly clip the converters and can introduce nasty sonic artifacts to the audio. In either case, the recording will suffer from a limited dynamic range and high noise; attributes that we don't usually associate high-quality classical guitar recordings.
My advice is to aim between -6dB to -12dB as a maximum peak level (not average), per channel. Therefore, when you are happy with the placing and distance of your microphones, do a couple of test recordings, play as loud as you would normally do and set the gain levels accordingly. If you set the levels correctly, you will have a healthy and strong signal, but even if you (or another guitarist you are recording) eventually get carried away during the performance, you still have enough headroom to avoid digital clipping.
Mistake no.2 - Unrealistic panning
Classical guitar is a small instrument, radiating sound from a definite point in space. One of the worst choices you can make if you record in stereo (which you should) is to use a too wide panning. Regardless of if the listener is an audiophile type, sitting on his couch perfectly balanced in front of a pair of top-tier speakers, or a regular person listening to music with earbuds. A hard-panned left and right guitar will sound unnaturally wide and cloudy.

Proper panning of Stereo AB channels
A realistic classical guitar recording is one that creates a phantom image of the instrument right in the middle of the speakers, but with some space around it. Such recordings can remove the playback medium and transport the listener in the room with the player.
In typical AB Stereo scenarios, I pan one channel at 3 o'clock and the other at 9 o'clock. I fine-tune the panning according to the polar pattern of the microphones, how apart they are set, and the distance from the guitar.
Mistake no.3 - Limiting dynamics
Classical guitar is not the most dynamic instrument, and if anything, we should strive to capture as much dynamic range as possible (it starts from the player, so we should also prioritise dynamics in performance). Compressors, on the other hand, are designed to do just the opposite; minimize the dynamic information of an audio track by limiting the loudest notes and boosting the softest signal.
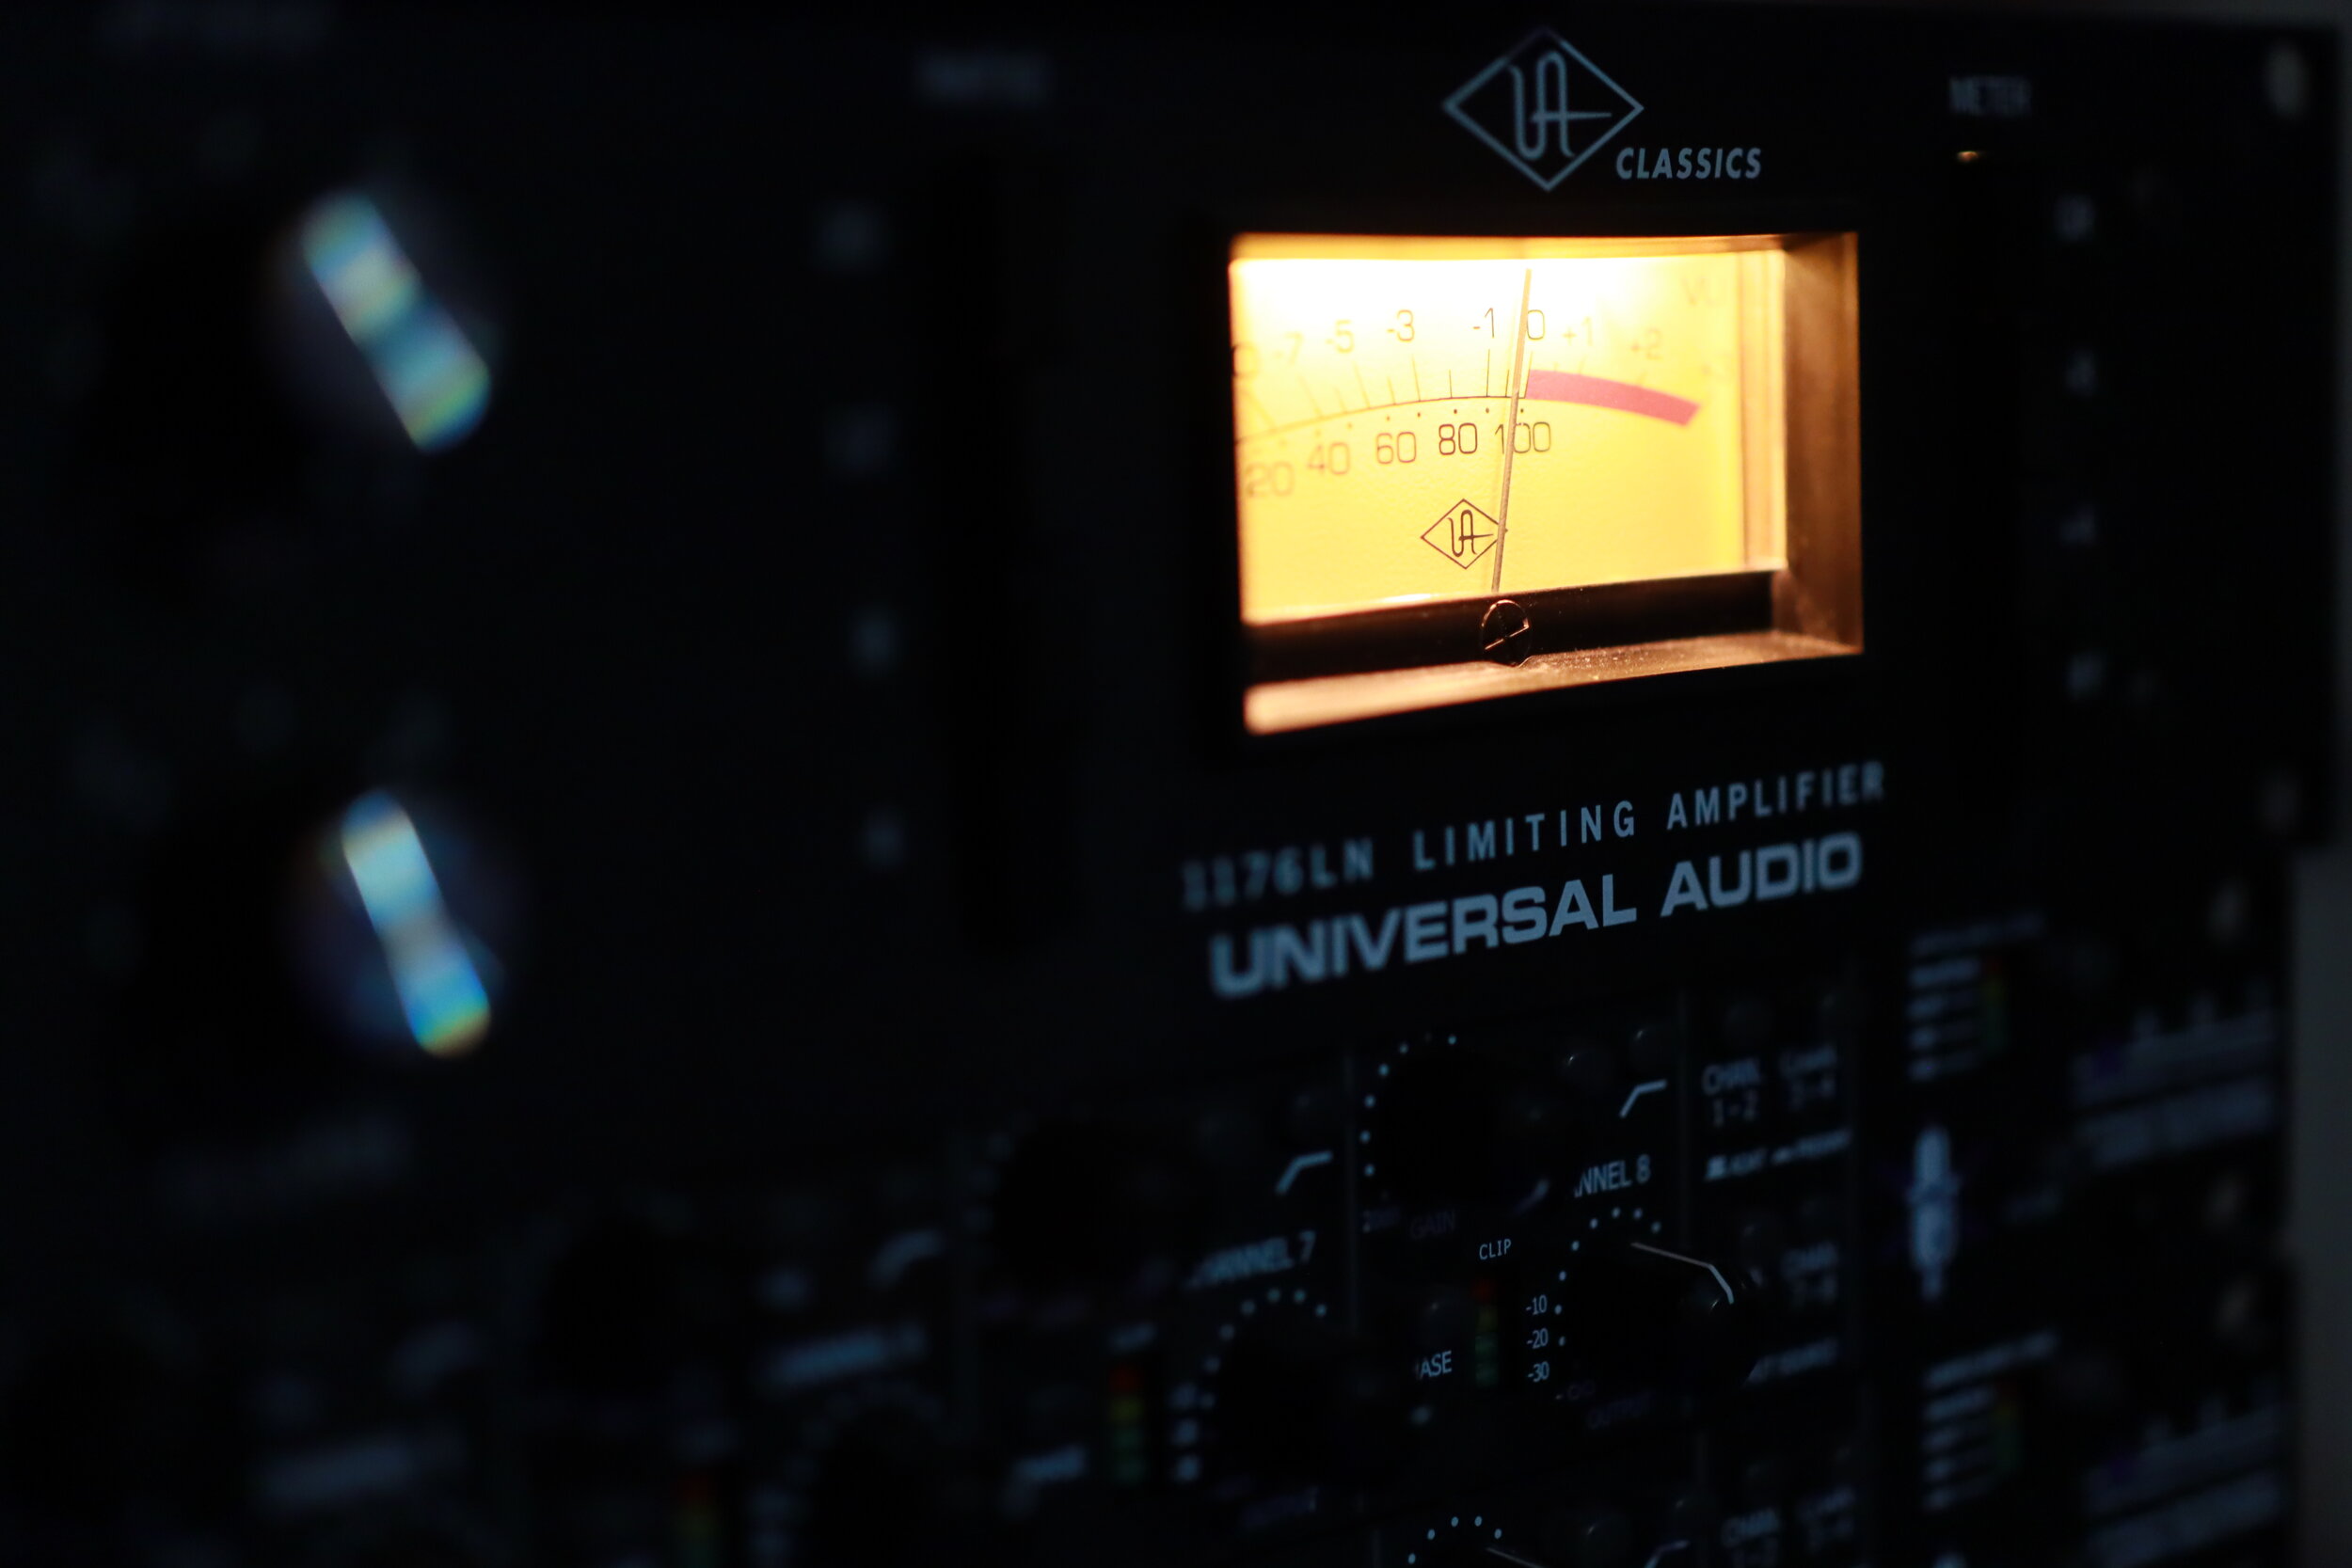
The classic Universal Audio limiting amplifier
Compressors do make the initial playback sound more exciting and powerful… for a few seconds, but in my opinion, it never pays back. Some of the problems that are introduced with the use of compressors in solo classical guitar recordings are squeezed dynamics, increased noise level and altered instrument tone.
Cross-genre guitarists employ compressors more often, as they learn that they can be invaluable in a dense mix. But I haven't found any use for dynamic limiting in a properly captured classical guitar recording.
Therefore, unless you have to deal with issues of the room or improper microphone positioning, don't use compressors on classical guitar recordings.
Mistake no. 4 - Being afraid of using filters

High-pass filter’s switch on an Austrian Audio OC18
Many microphones feature high-pass filters, the most common are 40Hz, 80Hz and 120Hz; the same is true for some dedicated outboard preamps. But many beginner recordists are afraid to take advantage of them. The truth is that in the context of the classical guitar, not much musical information is presented at the low-end frequencies. Most of what is below around 80Hz is unwanted room rumble and weird resonances; therefore by attenuating them, we end up with a cleaner recording. Capturing what is essential and leaving out the rest.
As low frequencies can have a lot of energy, it is preferable to cut undesirable low-end before the signal hits the converters, if possible. This tactic allows us to set the gain and levels appropriately and leads to better signal-to-noise ratios. But even if your microphones or preamps don't have any filters, you can still apply a high-pass filter in your DAW to remove non-essential information.
I also like to use a low-pass filter to remove high-end information that is inaudible, so that my audio consists of only the frequencies I can hear. A gentle roll-off of the low (below 50Hz) and high frequencies (above 18000Hz) is a good starting point. An EQ plugin with these basic filters is the first plugin I load on every track. You can read more on the article Three Most Essential Plugins for the Classical Guitar.
Mistake no.5 - Not learning how to use an equalizer
Other than the low- and high-end unwanted information that we can simply remove with the appropriate filters, undesirable resonances can occur in the audible range as well. These can be caused by the imperfect rooms that we are recording in, our instruments or our technique. Obnoxious resonances can and will distract the listener.
Learning how to use an equalizer to detect and attenuate or eliminate such issues will make the listening experience much more pleasurable.
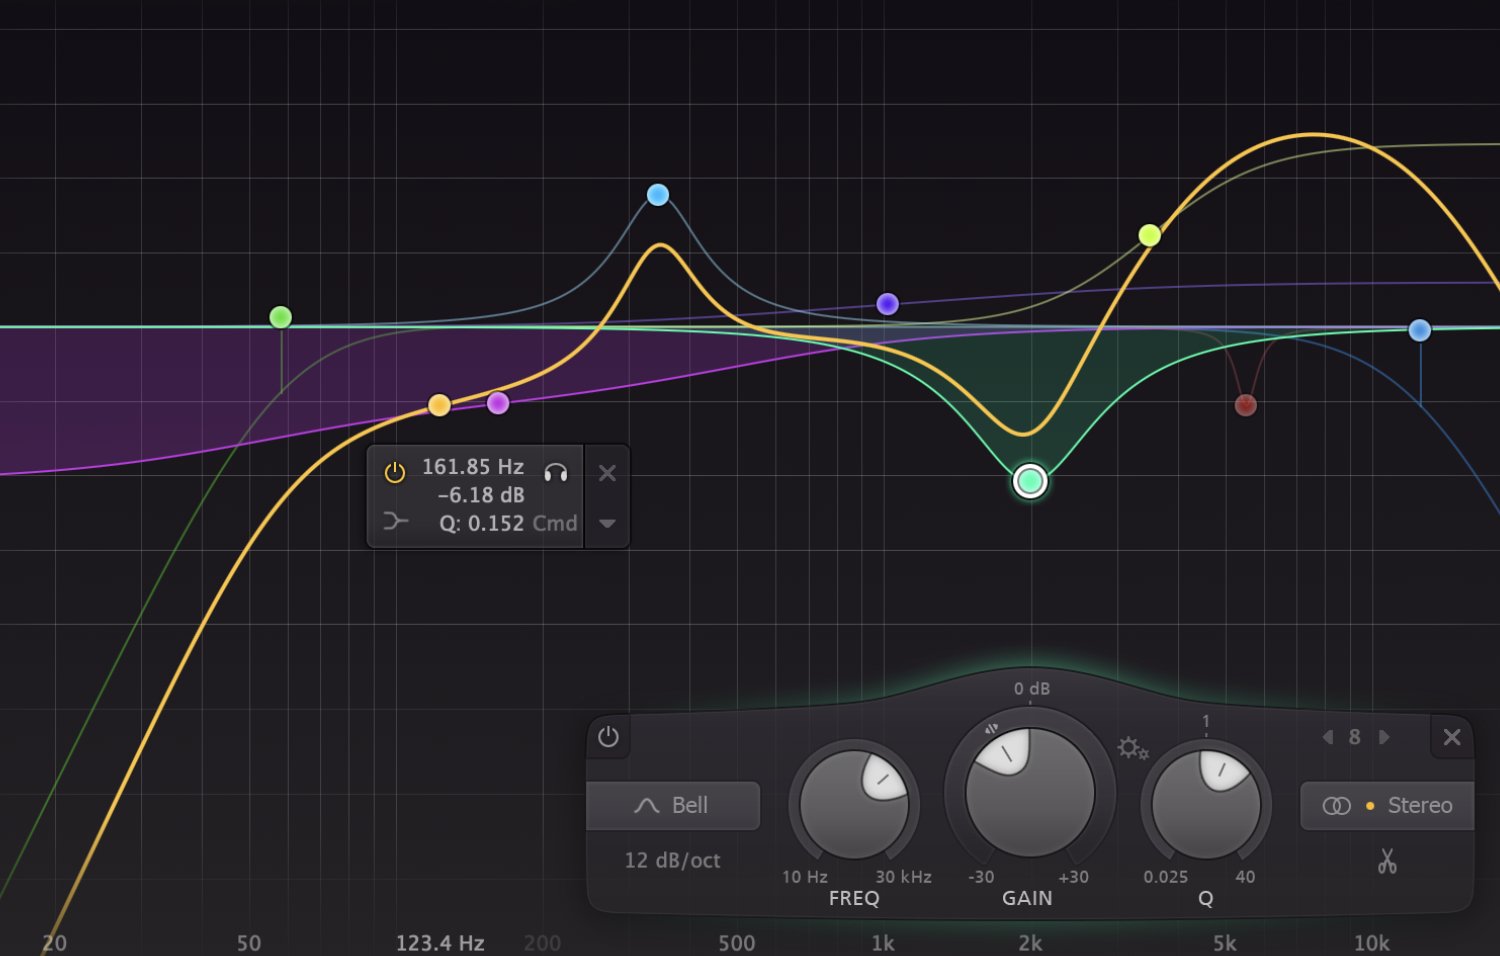
The best way to identify an offending frequency is by using your ears. I know that this doesn't sound like great advice, but keep reading. When you detect something that you don't like, add a bell-shaped point on your EQ with an extreme boost and search through the suspected range, like dialling in an analogue radio.
Once you find the irritating frequency, the sound should be quite disturbing at that point, apply a notch or a generous cut with a narrow Q. Toy around with the Q value to find the sweet spot; a setting that makes the problematic sound disappear but lets the rest of the audio unaffected.
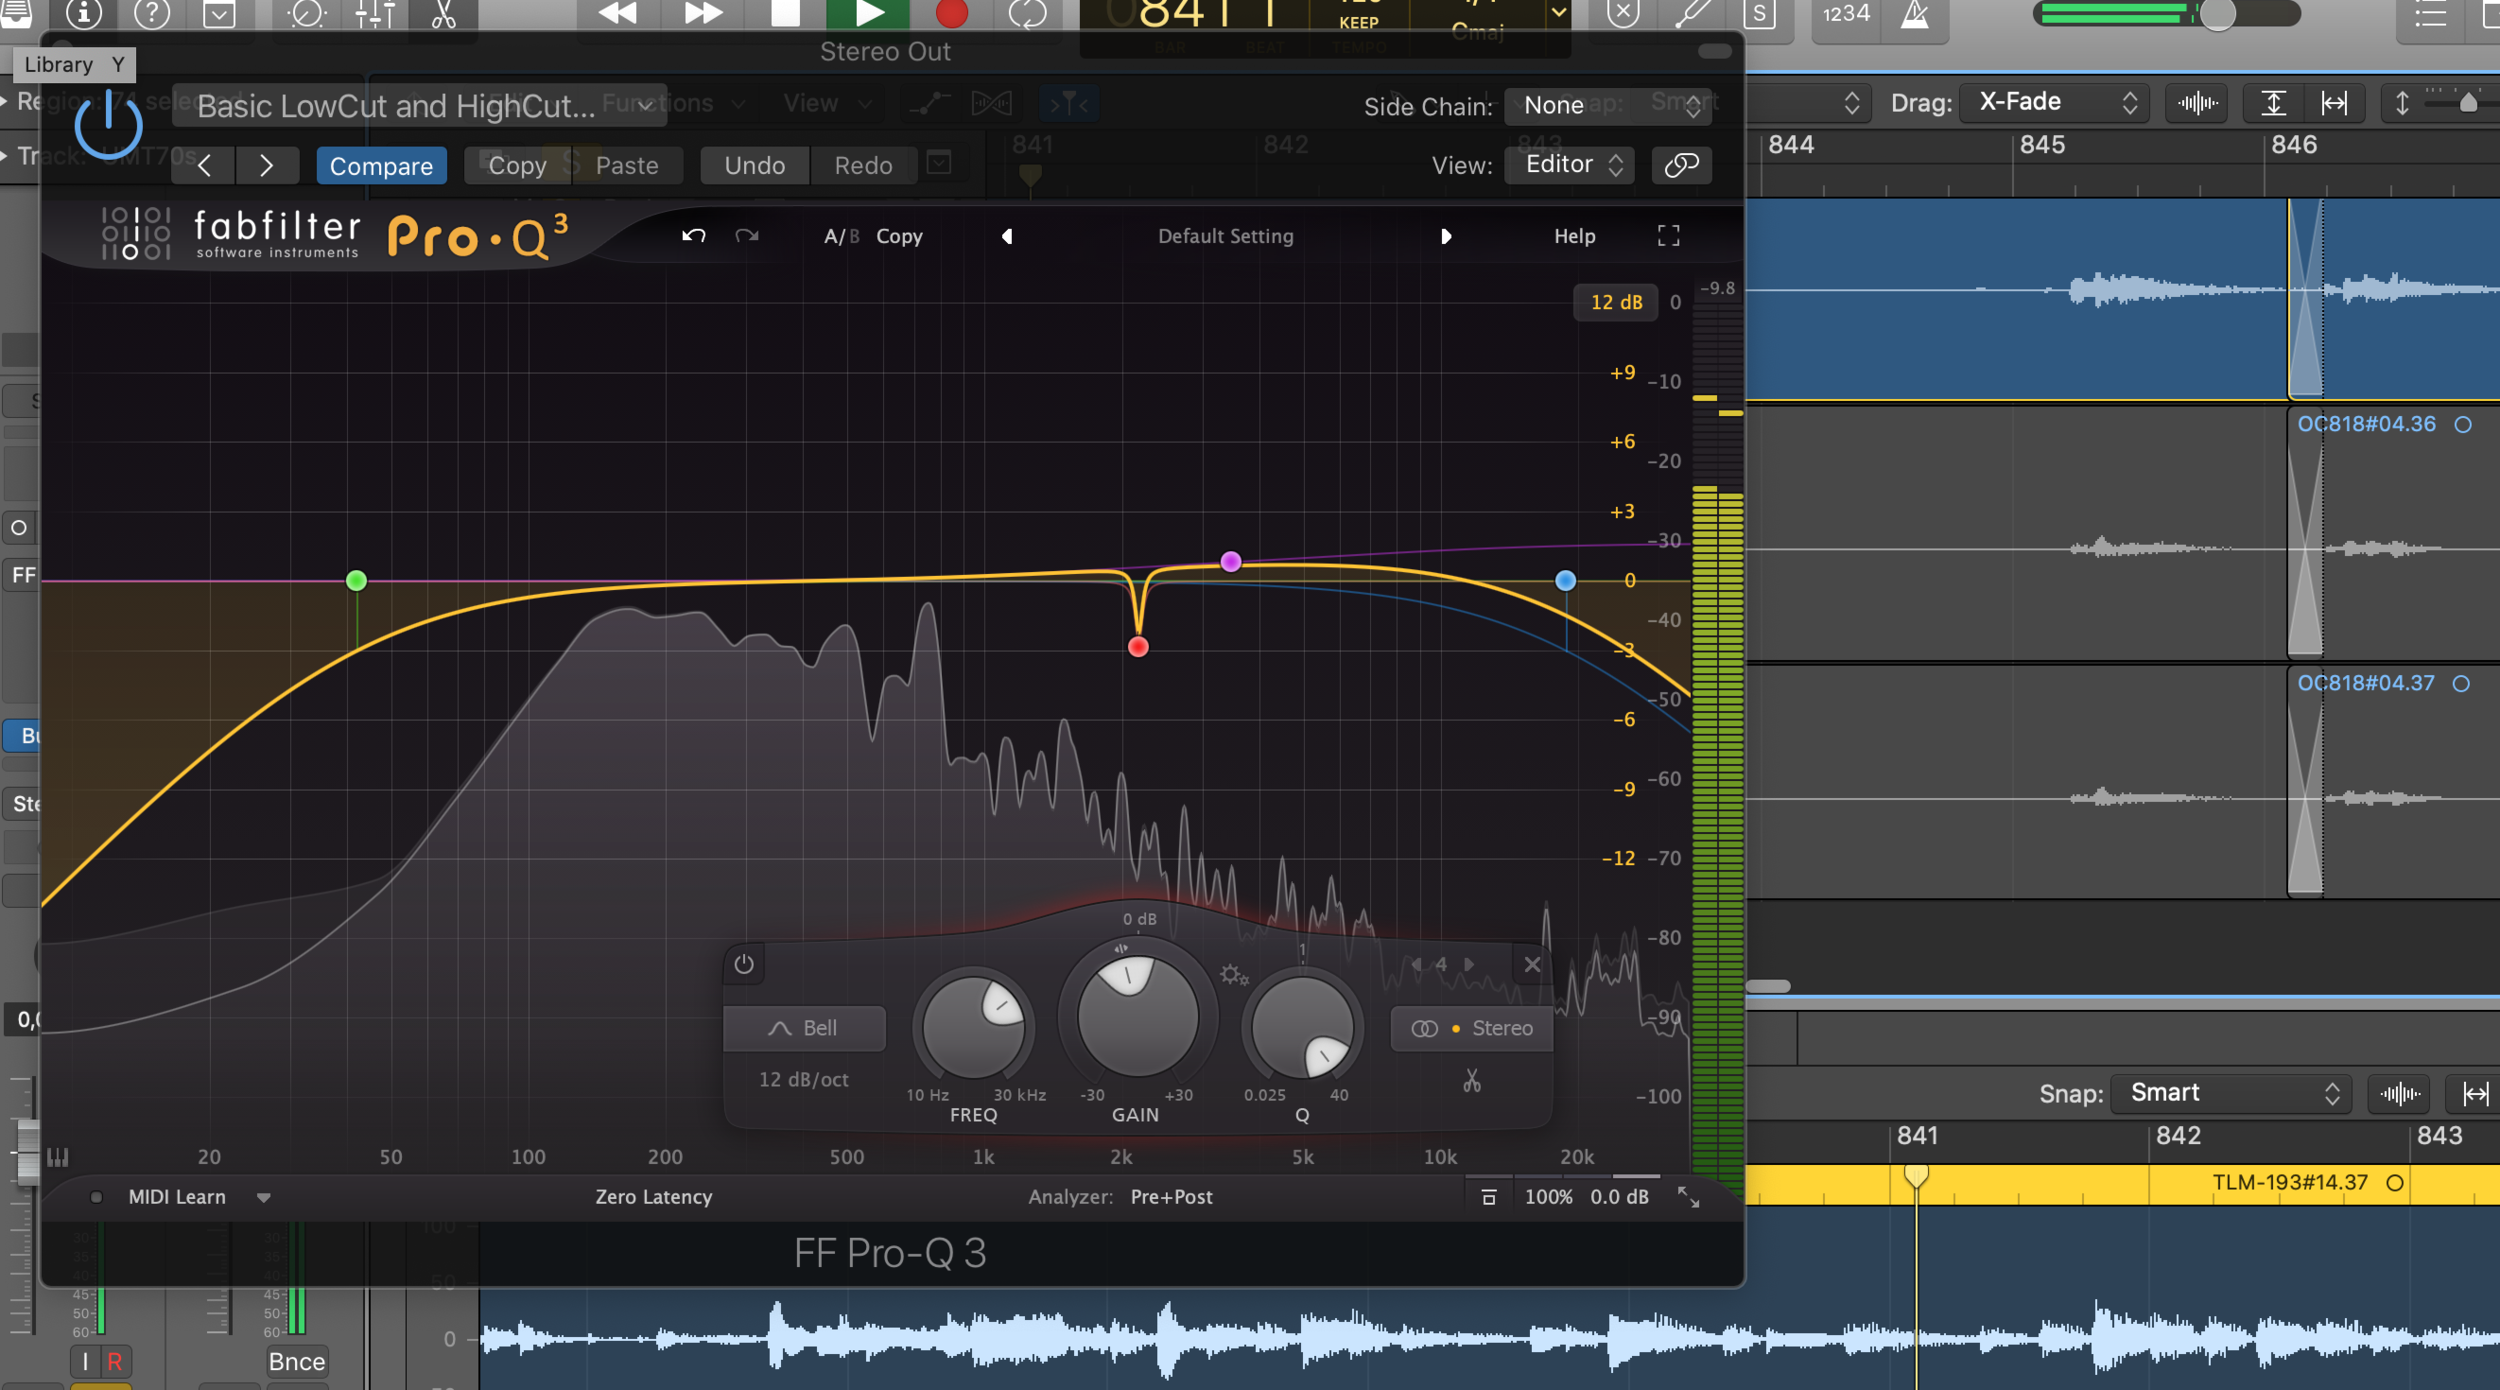
FabFilter Pro-Q 3 with HP & LP Filters, a narrow Q Cut and a High Shelf Boost
Another use for an EQ is to change the overall balance of the recording. Sometimes you'd prefer a slightly fuller recording, or there is just a bit too much low-end. Perhaps the treble is a bit piercing, or you'd like to add some more clarity and articulation. Making gentle adjustments like these are generally uncomplicated with the use of Low or High Shelf adjustments. Just a couple of dB's can make a drastic difference to the evenness and impact of our music.
Just be careful not to overdo it, and always compare your mixes to your favourite recordings.
Finally, you can also use an equalizer to completely change the sound of an instrument and shape it to your liking. But if you've been diligent with the microphone positioning, and you like your guitar sound, you won't have to.
Mistake no.6 - Too much reverb

Placing the music into an artificial hall is a necessary lie
As I write on the Three Most Essential Plugins for the Classical Guitar article, nothing will affect the listener more than the physical space that the music takes place.
When we record at home, most rooms are not interesting enough, and so we need to enhance their sound with artificial reverb. But it is easy to overuse reverb, as it makes everything sound "better". Or so we think when we first enter the home recording world.
Most beginner recordists tend to choose a random church preset without any consideration to requirements of the music, tempo and other aesthetic choices. The result is a flood of unnatural and unattractive recordings which instead of sounding realistic or enchanted, they feel cheap.
Learn how the Time, Size and EQ settings found on your reverb plugin of choice to fine-tune the sound the ambience. Then turn down the Mix a little bit more than what you think it should be. Lastly, compare your efforts to commercial recordings (not that those are not guilty of overusing fake church algorithms).
Closing thoughts

Proper mixing can turn a decent recording into a great one
I hope that this article will make you more conscious of your post-processing choices. I need to write dedicated articles for the use of equalizers and reverb as there is a ton of things to discuss.
I know that many guitarists don't want to fuzz around with plugins, but proper audio processing can transform a recording. Mixing is an art in itself; a necessary evil that can turn a decent recording to a great one. Quality classical guitar recordings are important for your audience and benefit the classical guitar community as a whole. Thus, it's definitely worth the time and effort to learn how to mix your audio. Alternatively, you may search for someone else to do that for you.
Tip: You don't have to mix every track from scratch; after all, you probably record the same instrument with the same microphone technique and in the same room all the time. Create a template in your DAW with your basic panning, filter and reverb settings. You'll still have to tweak around a bit, as not every piece favours the same settings, nor every day is the same. Templates are great time savers.