Crafting Your Sound: Shaping Classical Guitar Recordings with EQ
Part I - High-pass, Low-Pass Filtering and Shelving EQ
Many guitarists - and I plead guilty - spend a lot of money on new equipment to improve the sound of their recordings. I'm not suggesting that decent equipment isn't helpful, but the truth is that it's certainly easier to buy new stuff than to learn how to make the most of what you already have. In this article, I'm going to focus on a cheaper and more effective way to improve the sound of your classical guitar recordings: EQ.
Equalization is a powerful tool that allows you to boost or cut specific frequencies in your recording, which can drastically change its overall tone and character. Mastering EQ can help you create recordings that bring out the unique qualities of your guitar and playing technique. Instead of constantly buying new equipment, invest in experiences that enrich your musical journey, such as attending concerts or workshops.
Disclaimer: No two Classical Guitars are the same
One of the beautiful things about classical guitars is that each instrument has a unique voice. No two classical guitars are the same, therefore it's essential to choose an instrument that complements your playing style and taste. Besides, different genres require distinct guitars to sound authentic. Take the time to experiment with a diverse range of guitars and find the one that feels and sounds right for you, as, without doubt, it will have the most significant impact on the final result of your recordings - after the guitarist. Likewise, every recording space is unique. Your room will impose its character on the recording, so before even pressing the record button, make sure that your guitar sounds the way you want in your room.

Disclaimer: No one-size-fits-all
While it's helpful to learn from other guitarists and recordings, it's unlikely that you'll get the same results by blindly copying EQ settings or microphone techniques. Instead, it's crucial to develop the ability to identify what EQ is doing to the sound and use that knowledge to shape the recording to your liking. This means listening closely, experimenting, and learning to trust your ears. As you become more familiar with how different frequencies interact, you'll be better equipped to make informed EQ decisions that complement your music.
Also, take a look at the Best Studio Monitors for Classical Guitar guide, as they are essential to make reliable decisions regarding EQ.
Everything should work in tandem
Having a clear artistic vision is essential when using EQ. For example, if you're aiming for an intimate sound, you'll want to choose a microphone placement and EQ settings that complement each other to create a warm and cosy tone. In this case, you may want to experiment with mic placement options that bring the microphones closer to the guitar and EQ settings that emphasize the low-mid and mid-range frequencies. Microphone choice is also critical, as overly analytical microphones or ones designed for free-field use would capture too much detail.
On the other hand, if you're going for a concert hall experience, you'll want to experiment with microphone placement and EQ that gives the audience perspective and create a sense of space and depth. In this instance, you may want to use a pair of microphones further away or employ multiple microphones to capture different aspects of the guitar's response. Then, use complimentary EQ to shape the sound as though your guitar was captured in a larger space.
To get some inspiration take a look at the Three-Microphone Setup for Recording the Classical Guitar.
Using High- and Low-Pass Filters

High-pass and low-pass filters should be the first things you apply, even before you make any other decision on how you want to EQ your recording. Ideally, if your preamp or microphone has a high-pass filter, you should engage it. A gentle roll-off of low and high frequencies will remove unwanted sounds and give you a cleaner recording. Additionally, you will be able to make more informed EQ decisions. In some occasions, no further equalisation is necessary to achieve a well-balanced recording.
For classical guitar, I always start with a mild high-pass filter at about 60Hz (-6dB/Oct) and a low-pass filter at about 18KHz (-6dB/Oct), and then I work from that. You may need to apply sharper high-pass filter settings if your room isn't as quiet and noises such as street rumble creep into your recording. You could either adjust your settings to a higher frequency, use a -12dB/Oct slope, or try both). Similarly, to eliminate some of the finger-moving sounds or chair squeaks, you might need to set a lower low-pass frequency and a sharper slope.
Make sure to find a balance between removing unwanted frequencies and preserving the natural character of the recording. Overuse of these filters can lead to an unnatural, thin sound.
Shelving EQ

Shelving EQ allows us to adjust the amplitude of all frequencies above or below a certain point and is another extremely effective tool in our EQ toolkit. It can be useful for creating a more balanced sound or giving a subtle shape to the recording.
For example, if you find that the low end of your recording is overpowering, you can use a low-shelf filter to reduce the amplitude of all frequencies below a certain cutoff point (usually around 200-250Hz) a couple of dB. Thus, effectively reducing low-end boominess. Conversely, if your recording sounds somewhat thin, a low-shelf filter boost of a couple of dB at around 125Hz should rectify that.
Furthermore, if your recording sounds too bright or harsh, you can cut frequencies above about 3.5 kHz by a few dB with a high-shelf filter. Or boost all frequencies above 8-10Khz if the recording lucks brilliance and air. Be especially careful when boosting high frequencies, because they can expose the poor sound of your room or your playing.
Tip - And while most guitarists don't really like boosing the high-end as this might emphasize mechanical sounds, I find that a subtle boost of frequencies above 2,5KHz in combination with a bit more potent cut of frequencies below 250Hz, under the right circumstances, result in a very classy sound. Provided the recording isn't too sharp or harsh and the playing is short of non-musical sounds.
My Secret Weapon: The FabFilter Pro-Q3
One of my favourite plugins for classical guitar recordings is the FabFilter Pro-Q3. Admittedly, not much of a secret if you have been here for a while (read the Three Most Essential Plugins for the Classical Guitar) . The Pro-Q3 offers precise control over the frequency spectrum with a range of filter types and is easy to fine-tune via the graphical interface.
To make my life easier, I have created a set of custom presets that I use as a starting point for different recording scenarios. These presets are designed specifically for classical guitar and can save me a lot of time when mixing. My custom presets pack “EQ Essentials” is available in the CGT store, so if you also have the FabFilter Pro-Q3, you could use my presets in your workflow. But it's important to remember that there is no one-size-fits-all solution and that you'll need to adjust them for your recordings.
Final thoughts
In conclusion, EQ is an essential and powerful tool for creating professional-quality classical guitar recordings. However, it's important to remember that EQ is just one part of the recording production. Don't underestimate the quality of your recording space and microphone placement. Keep in your mind, creating great recordings is a journey. With practice and patience, these guidelines can help you enhance the sound of your recordings and capture the beauty and nuance of the classical guitar.
In part II of this series, we will delve deeper into the use of Parametric EQ to further enhance your recordings. Parametric EQ offers even more precise control over frequency adjustments, allowing you to zero in on problematic frequencies and carve out a more refined sound. We'll discuss how to identify and address problem areas in your recordings and provide tips for using the parametric EQ to shape the sound of your guitar. And finally, in part III, we will explore some of the more advanced settings of FabFilter Pro-Q3. Stay tuned!

6 Common Mistakes When Recording the Classical Guitar at Home, Part II
Part II - Post Processing
Professional sounding classical guitar at home is not a fantasy anymore or at least achieving a recording quality that is not embarrassing to share. Affordable audio interfaces, preamps and microphones have flooded the market these last decades, with increasing performance and processing power. Rooms, recording techniques and mixing are holding us back.
In the first part on the 6 Common Mistakes When Recording the Classical Guitar at Home, I tried to encourage you to try out different microphone positions and to study your room acoustics.
The second part focuses on some of the common mistakes of beginner classical guitar recordists on utilizing a proper signal chain and achieving satisfactory results in post-processing.
Mistake no.1 - Improper gain staging

AEA TRP2 Gain Knobs
The fear of clipping the converters leads some amateur recordists to use too little gain, resulting in recordings that are low in level. Without adequate signal-to-noise rations, these recordings will become noisy when any attempt is made to bring them at a normal level during mixing or playback. Contrarily, recording too “hot” will possibly clip the converters and can introduce nasty sonic artifacts to the audio. In either case, the recording will suffer from a limited dynamic range and high noise; attributes that we don't usually associate high-quality classical guitar recordings.
My advice is to aim between -6dB to -12dB as a maximum peak level (not average), per channel. Therefore, when you are happy with the placing and distance of your microphones, do a couple of test recordings, play as loud as you would normally do and set the gain levels accordingly. If you set the levels correctly, you will have a healthy and strong signal, but even if you (or another guitarist you are recording) eventually get carried away during the performance, you still have enough headroom to avoid digital clipping.
Mistake no.2 - Unrealistic panning
Classical guitar is a small instrument, radiating sound from a definite point in space. One of the worst choices you can make if you record in stereo (which you should) is to use a too wide panning. Regardless of if the listener is an audiophile type, sitting on his couch perfectly balanced in front of a pair of top-tier speakers, or a regular person listening to music with earbuds. A hard-panned left and right guitar will sound unnaturally wide and cloudy.

Proper panning of Stereo AB channels
A realistic classical guitar recording is one that creates a phantom image of the instrument right in the middle of the speakers, but with some space around it. Such recordings can remove the playback medium and transport the listener in the room with the player.
In typical AB Stereo scenarios, I pan one channel at 3 o'clock and the other at 9 o'clock. I fine-tune the panning according to the polar pattern of the microphones, how apart they are set, and the distance from the guitar.
Mistake no.3 - Limiting dynamics
Classical guitar is not the most dynamic instrument, and if anything, we should strive to capture as much dynamic range as possible (it starts from the player, so we should also prioritise dynamics in performance). Compressors, on the other hand, are designed to do just the opposite; minimize the dynamic information of an audio track by limiting the loudest notes and boosting the softest signal.
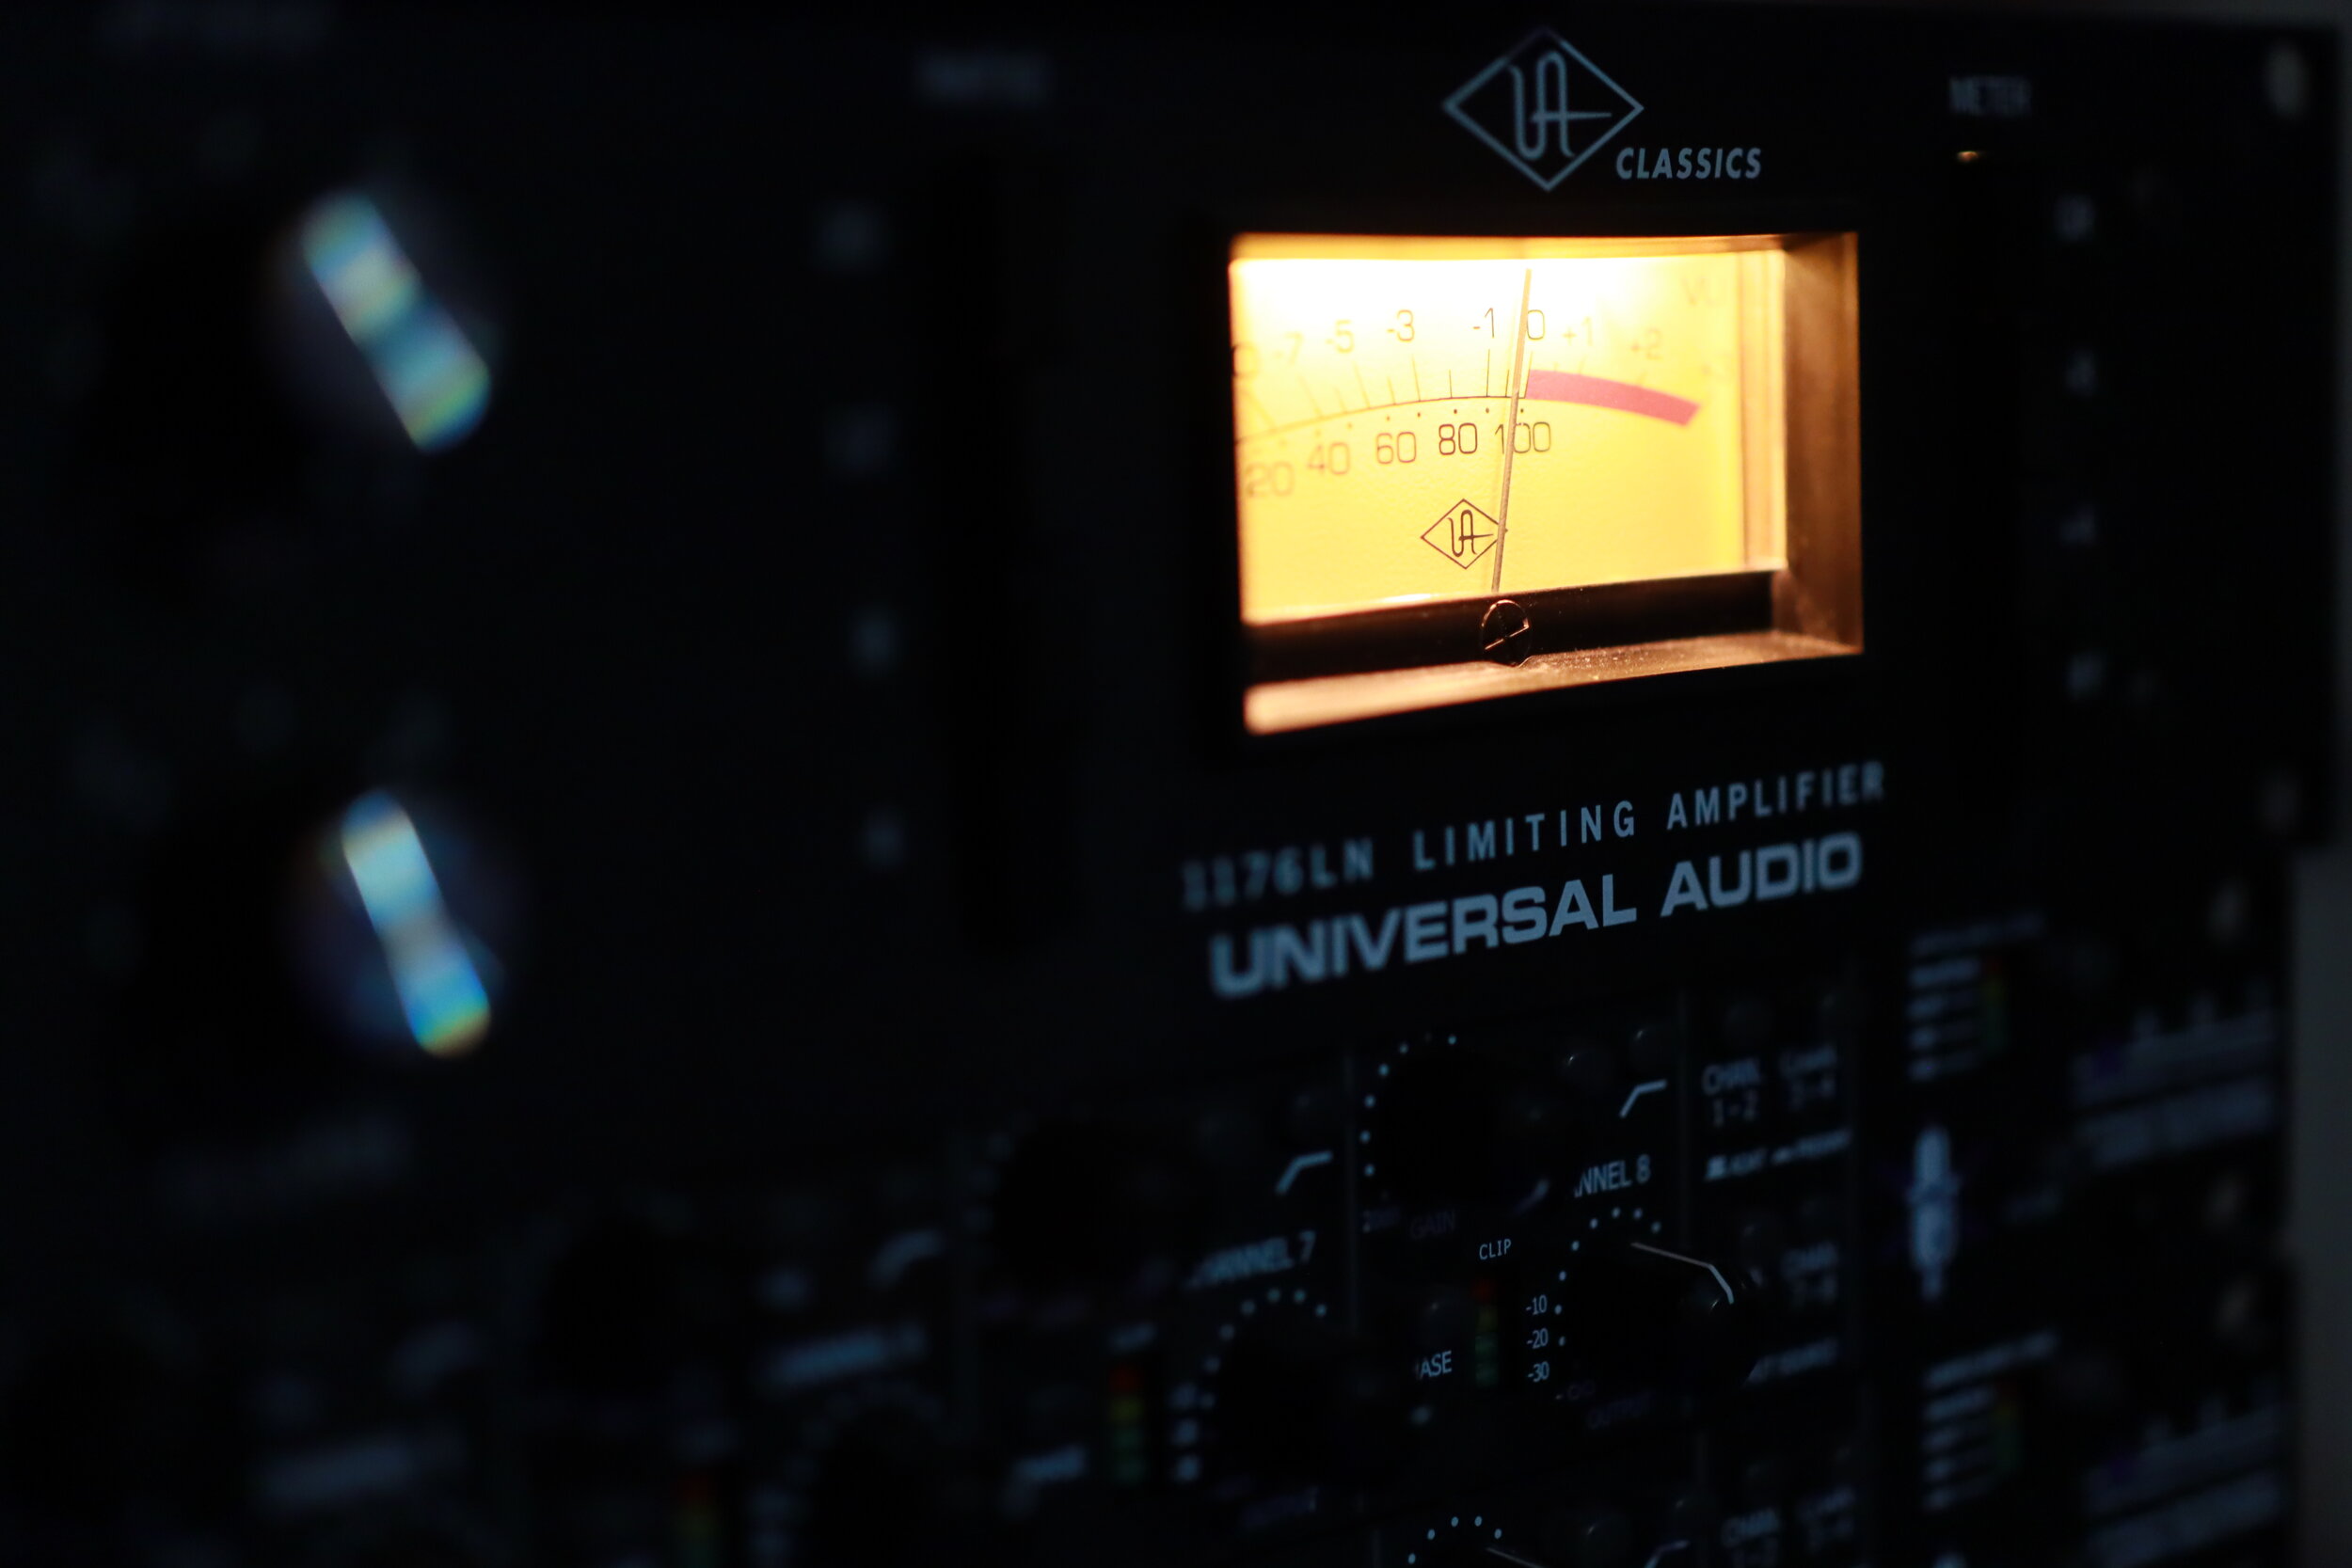
The classic Universal Audio limiting amplifier
Compressors do make the initial playback sound more exciting and powerful… for a few seconds, but in my opinion, it never pays back. Some of the problems that are introduced with the use of compressors in solo classical guitar recordings are squeezed dynamics, increased noise level and altered instrument tone.
Cross-genre guitarists employ compressors more often, as they learn that they can be invaluable in a dense mix. But I haven't found any use for dynamic limiting in a properly captured classical guitar recording.
Therefore, unless you have to deal with issues of the room or improper microphone positioning, don't use compressors on classical guitar recordings.
Mistake no. 4 - Being afraid of using filters

High-pass filter’s switch on an Austrian Audio OC18
Many microphones feature high-pass filters, the most common are 40Hz, 80Hz and 120Hz; the same is true for some dedicated outboard preamps. But many beginner recordists are afraid to take advantage of them. The truth is that in the context of the classical guitar, not much musical information is presented at the low-end frequencies. Most of what is below around 80Hz is unwanted room rumble and weird resonances; therefore by attenuating them, we end up with a cleaner recording. Capturing what is essential and leaving out the rest.
As low frequencies can have a lot of energy, it is preferable to cut undesirable low-end before the signal hits the converters, if possible. This tactic allows us to set the gain and levels appropriately and leads to better signal-to-noise ratios. But even if your microphones or preamps don't have any filters, you can still apply a high-pass filter in your DAW to remove non-essential information.
I also like to use a low-pass filter to remove high-end information that is inaudible, so that my audio consists of only the frequencies I can hear. A gentle roll-off of the low (below 50Hz) and high frequencies (above 18000Hz) is a good starting point. An EQ plugin with these basic filters is the first plugin I load on every track. You can read more on the article Three Most Essential Plugins for the Classical Guitar.
Mistake no.5 - Not learning how to use an equalizer
Other than the low- and high-end unwanted information that we can simply remove with the appropriate filters, undesirable resonances can occur in the audible range as well. These can be caused by the imperfect rooms that we are recording in, our instruments or our technique. Obnoxious resonances can and will distract the listener.
Learning how to use an equalizer to detect and attenuate or eliminate such issues will make the listening experience much more pleasurable.
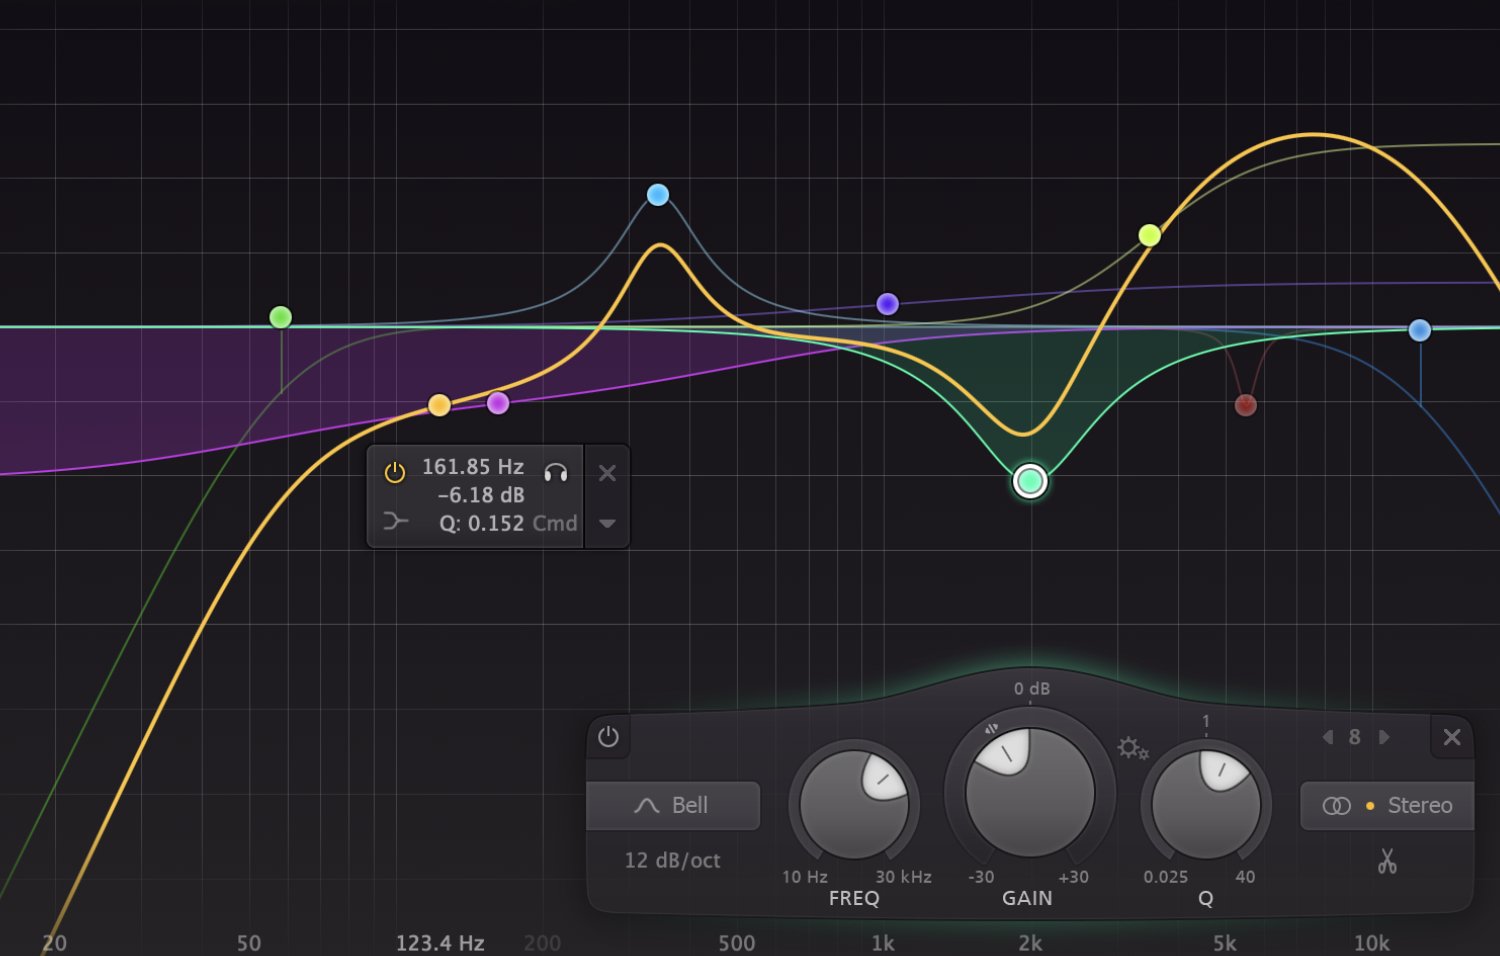
The best way to identify an offending frequency is by using your ears. I know that this doesn't sound like great advice, but keep reading. When you detect something that you don't like, add a bell-shaped point on your EQ with an extreme boost and search through the suspected range, like dialling in an analogue radio.
Once you find the irritating frequency, the sound should be quite disturbing at that point, apply a notch or a generous cut with a narrow Q. Toy around with the Q value to find the sweet spot; a setting that makes the problematic sound disappear but lets the rest of the audio unaffected.
FabFilter Pro-Q 3 with HP & LP Filters, a narrow Q Cut and a High Shelf Boost
Another use for an EQ is to change the overall balance of the recording. Sometimes you'd prefer a slightly fuller recording, or there is just a bit too much low-end. Perhaps the treble is a bit piercing, or you'd like to add some more clarity and articulation. Making gentle adjustments like these are generally uncomplicated with the use of Low or High Shelf adjustments. Just a couple of dB's can make a drastic difference to the evenness and impact of our music.
Just be careful not to overdo it, and always compare your mixes to your favourite recordings.
Finally, you can also use an equalizer to completely change the sound of an instrument and shape it to your liking. But if you've been diligent with the microphone positioning, and you like your guitar sound, you won't have to.
Mistake no.6 - Too much reverb

Placing the music into an artificial hall is a necessary lie
As I write on the Three Most Essential Plugins for the Classical Guitar article, nothing will affect the listener more than the physical space that the music takes place.
When we record at home, most rooms are not interesting enough, and so we need to enhance their sound with artificial reverb. But it is easy to overuse reverb, as it makes everything sound "better". Or so we think when we first enter the home recording world.
Most beginner recordists tend to choose a random church preset without any consideration to requirements of the music, tempo and other aesthetic choices. The result is a flood of unnatural and unattractive recordings which instead of sounding realistic or enchanted, they feel cheap.
Learn how the Time, Size and EQ settings found on your reverb plugin of choice to fine-tune the sound the ambience. Then turn down the Mix a little bit more than what you think it should be. Lastly, compare your efforts to commercial recordings (not that those are not guilty of overusing fake church algorithms).
Closing thoughts

Proper mixing can turn a decent recording into a great one
I hope that this article will make you more conscious of your post-processing choices. I need to write dedicated articles for the use of equalizers and reverb as there is a ton of things to discuss.
I know that many guitarists don't want to fuzz around with plugins, but proper audio processing can transform a recording. Mixing is an art in itself; a necessary evil that can turn a decent recording to a great one. Quality classical guitar recordings are important for your audience and benefit the classical guitar community as a whole. Thus, it's definitely worth the time and effort to learn how to mix your audio. Alternatively, you may search for someone else to do that for you.
Tip: You don't have to mix every track from scratch; after all, you probably record the same instrument with the same microphone technique and in the same room all the time. Create a template in your DAW with your basic panning, filter and reverb settings. You'll still have to tweak around a bit, as not every piece favours the same settings, nor every day is the same. Templates are great time savers.

Three Most Essential Plugins for the Classical Guitar
With the seemingly unlimited processing power of modern computers and affordability of recording equipment, it is not hard to make amazing recordings on location or even at our living rooms; and there is no need to wear a white coat to be able to use a microphone anymore.

Abbey Road recording engineers in white coats
This democratisation of music production brought an abundance of plugins; plugins that we can use to shape our music in any shape or form we can imagine. We don't need to buy expensive and bulky hardware equalizers and reverb units anymore.
Albeit the plethora of plugins, I adopt a minimal approach. There are just a few of them that I use every day and consider to be crucial for my workflow. Here are the three most essential plugins for the classical guitar:
Phase Metering with the 2CAudio Vector
The classical guitar is a rich and complex-sounding instrument, and as one, it can only be fully appreciated when recorded in stereo. Most of the stereo microphone techniques require the microphones to be placed at some distance with each other, and the more microphones you use, the easier it gets to face phasing problems.
Phasing occurs when the wave shapes of two or more microphones are not perfectly aligned in the time domain. This attribute is not entirely undesirable; as the sound begins its journey from the plucked strings and the vibrations of the top of the guitar, our notes travel as sound waves towards the microphones and reach them at slightly different times. Combined with additional waves that reflect on the walls and other objects around us, all with small but not insignificant delays, these slight differences help to create the stereo effect that we experience. Not dissimilar to how our ears and brains perceive and interpret the world around us.
When these differences are augmented to a greater degree, phasing occurs and has a noticeable influence on the sound quality of our recordings. Cancellations and comb filtering can potentially strip fundamental frequencies from our recording, leaving the recorded guitar sound thin and weak. Phase problems can be fixed during mixing by aligning the offending tracks, but it's always preferable to take the extra time and correct this when setting up the microphones.

2CAudio Vector
Here is my process. After finding the desired positions of the guitar(ist) and microphones, I make the first test recordings, then I immediately load the 2CAudio Vector plugin to check for any phase issues. If needed, I move one of the microphones a centimetre or two, closer or further away. Possibly, I need to adjust the angle of the microphone(s). I make small changes and repeat as many times as necessary.
Any result higher with than +70 is acceptable, I strive though for an average of +80 or higher.
Additionally to the phase-meter, the 2CAudio Vector displays a visual spatial meter, a long-term average level, and panning meters. It is a very important tool, and, it is free.
Alternatives - for those who are on a Mac and use Logic Pro X, Apple provides a bare essential but usable alternative; the Correlation Meter, found under the Metering group. If free options are not for you, iZotope offers the Insight 2 metering plugin at a substantial price, which offers a lot of additional metering tools that can be handy.
Filtering, Tone Shaping and Surgical Corrections with the FabFilter Pro-Q 3
Learning how to use an equalizer correctly can transform a good recording to a world-class one. Not to say that it can save your wallet from the need of better guitars, microphones and other gear.
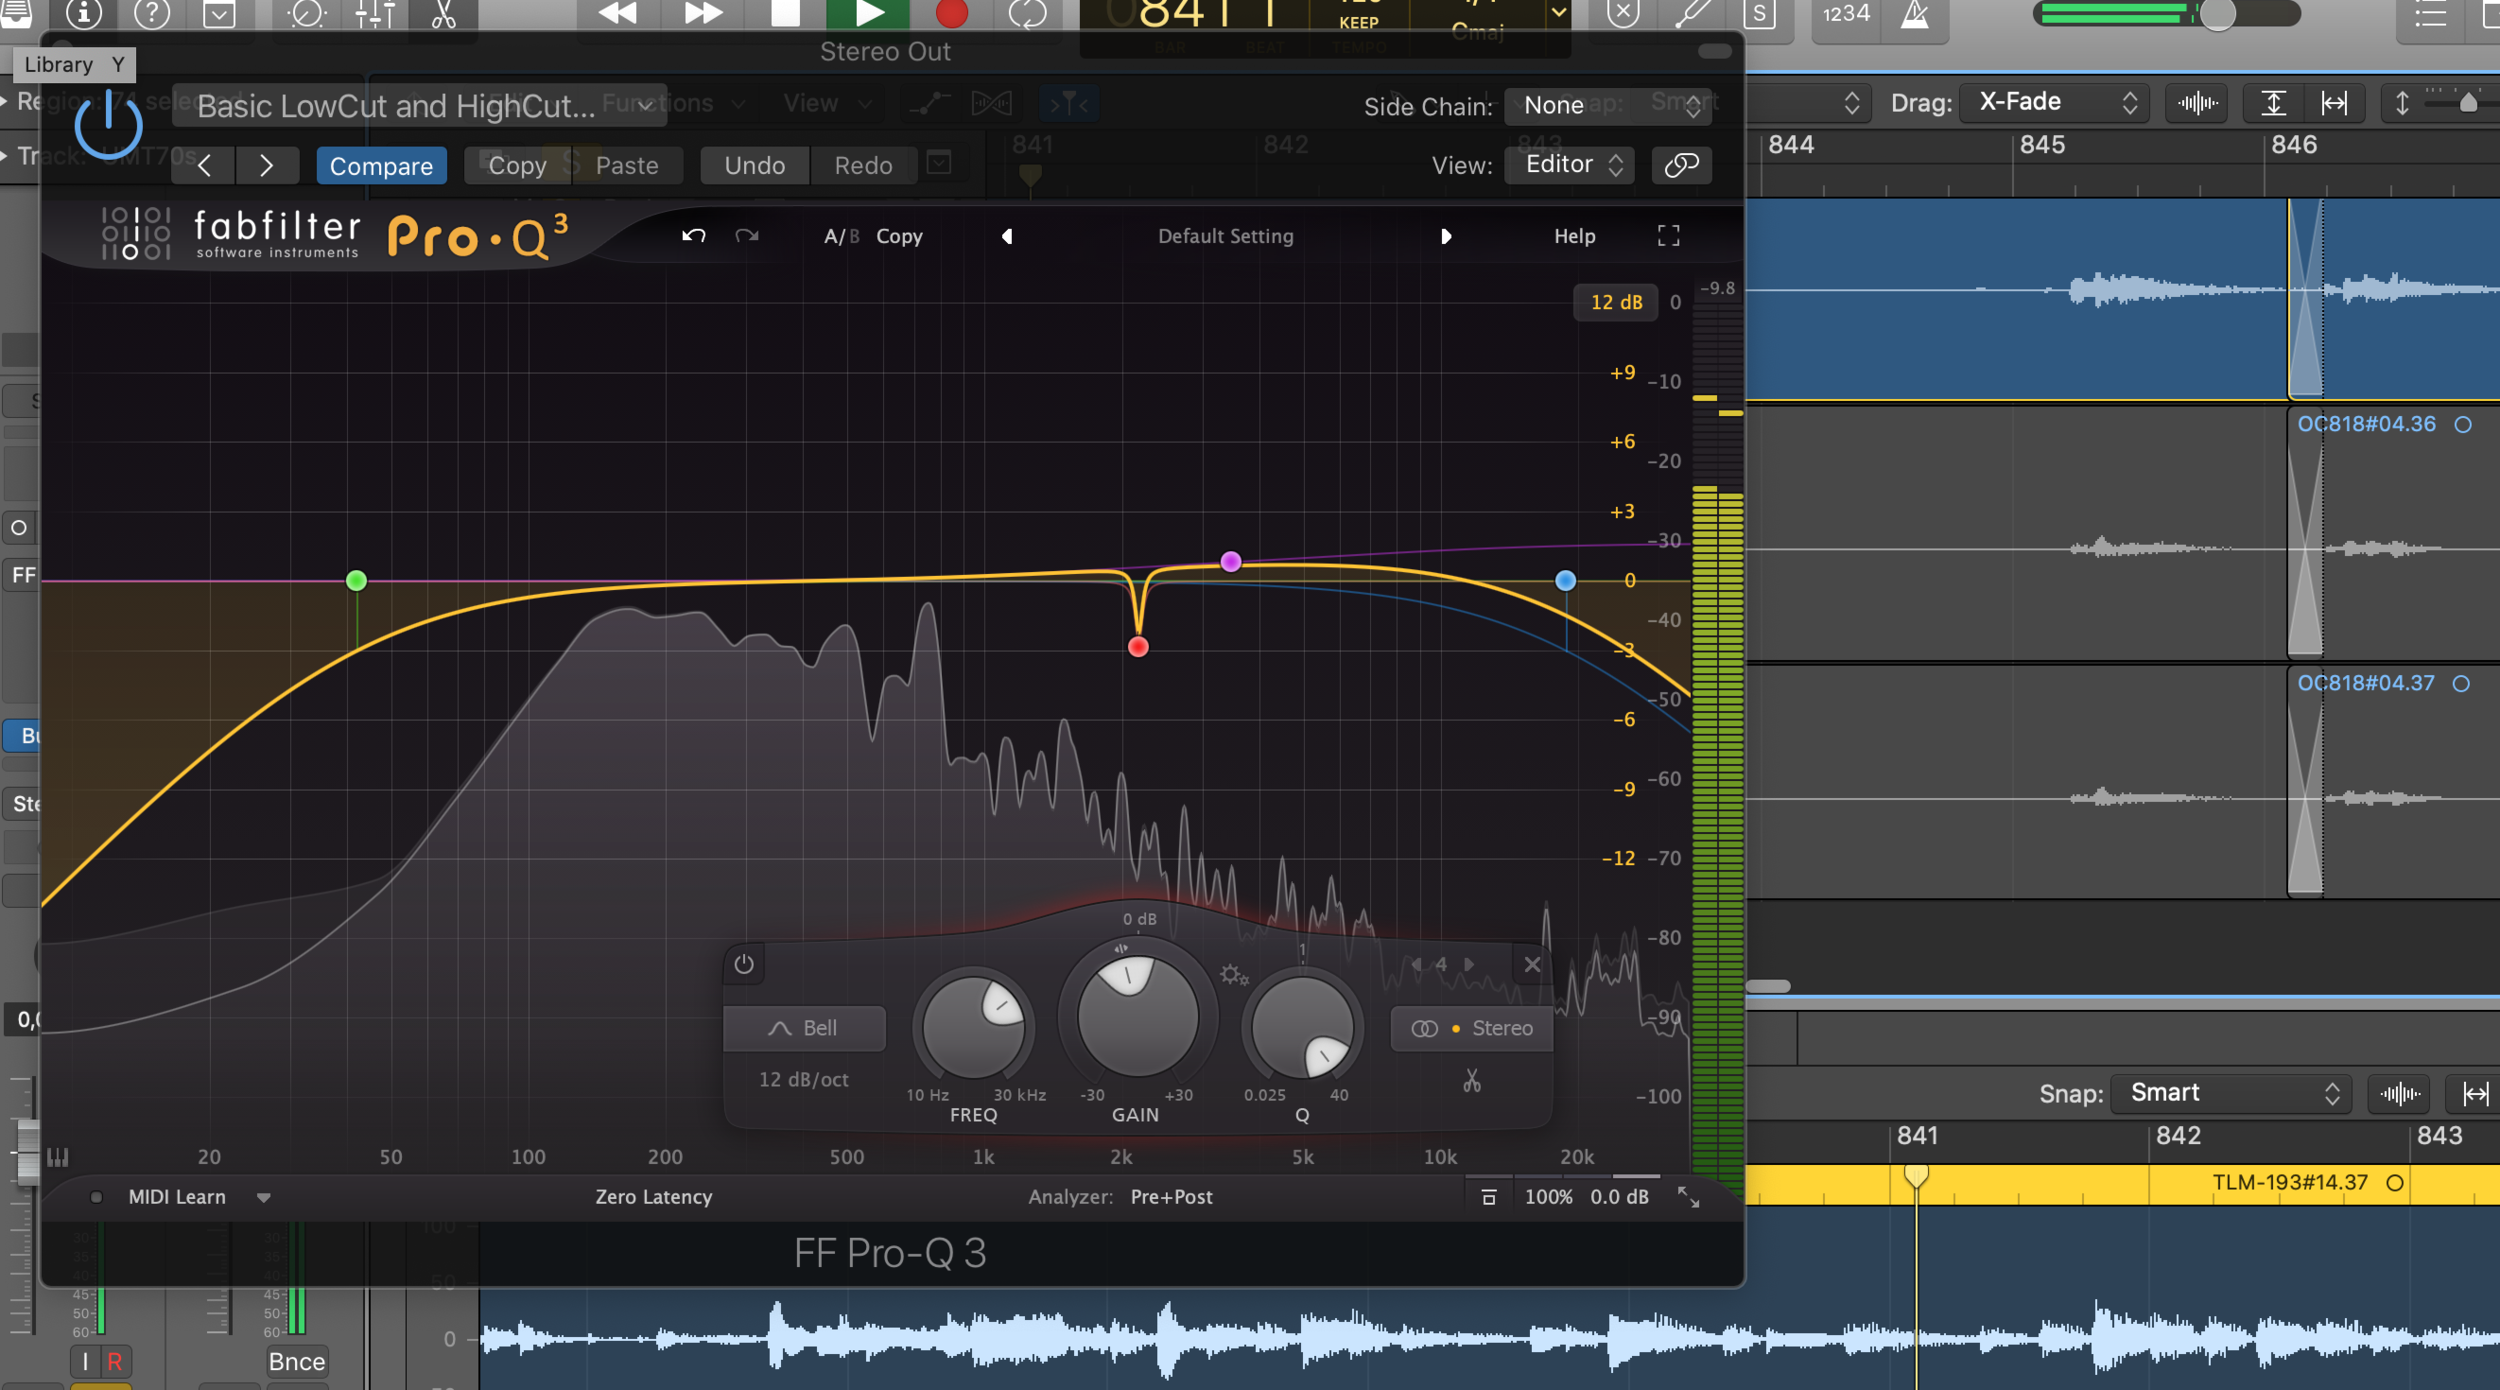
A gentle roll-off of the low (below 50Hz) and high frequencies (above 18000Hz) is my starting point. There is not much if any classical guitar information at these ranges and most speakers (for home, or even pro-audio) will attenuate these frequencies. I don't want my recordings to have much information that I cannot hear, anyway.

FabFilter Pro-Q 3 in Action
Tip: I've created a preset with these filters so that I don't have to set them up every time. Better yet, I have created a logic template with my plugins and panning presets that I load any time I start a new session. Small things can make our lives easier and save a lot of time.
Next, I'll try to see if there is any unwanted frequency or resonance that needs to be tamed or even eliminated. I use a wide Q band when boosting frequencies for the smoothest response, and a narrow Q band when cutting to eliminate the offending frequency without affecting nearby elements.
And finally, I might apply a mild high shelf, boost or cut of a couple of dBs, if I find the need to get a crisper or darker sound. If there is too much body or not enough fullness, I apply a mild low shelf cut or boost. A little goes a long way.
To be honest, most of my solo recordings nowadays have a very limited amount of EQ (needless to point out that all the microphone comparisons on this site have no EQ or other processing). I try to get it right before the signal converts to digital, taking a great deal of consideration on the room and microphone technique, and my fingers on the guitar. Yet sometimes this is not possible for various reasons, and learning how to sculpt your sound with an equalizer can be invaluable.
For example, last year I decided to record my classical guitar at a historic monument in Greece, Zalongo. I took my trusty Sony PCM D100 portable recorder with me... on top of the mountain. The high altitude proved to be very challenging, the wind didn't allow for any normal position of the recorder, so it ended up being too low and on the side. When I returned home, I thought that the recording was ruined, but careful equalization saved the day.
My recent series of articles exclusively focuses on how I utilize EQ. If you are interested in gaining more knowledge about it, these articles are a great resource to refer to: Crafting Your Sound: How to shape your classical guitar recordings with EQ
The FabFilter Pro-Q 3 is one of the finest equalizers on the market. The sound is clean and precise, yet with some extra dimensionality and sweetness. The GUI is as intuitive as is breathing, the possibilities offered are virtually endless. Besides, a convenient real-time spectrum analyser to better judge what your EQ choices are affecting is available, as well as other useful tools. It is not cheap, but it is the best!
Alternatives - any modern DAW would have a decent equalizer built-in, basic filtering will be effortless, but more complicated sculpturing will be somewhat limited. Waves Q10 is an affordable equalizer with somewhat similar functionality and interface.
Telling sweet lies with the 2CAudio Aether
Considering that the performance is excellent, the general tone and attributes of the guitar well captured; anything we add at this point is a lie. Adding reverb to a recording is a necessary lie, as nothing will affect the listener more than the physical space that the music takes place.
Contrarily, nothing is more repulsive than a terrible recording trying to hide behind a wash of cheap "church" ambience.
Tip: As reverb tends to smear the sound to a considerable degree, I make most judgments regarding EQ, microphone positioning, etc. without the plugin engaged. I want to have the best possible result, before applying any enhancing effects. I fine-tune my levels, panning and equalizer choices with the reverb later.

2CAudio Aether Algorithmic Reverb
Applying reverb needs to be a mindful process. To some extend it is a stylistic choice; what is appropriate for the music, what expressive and dramatic elements we want to convey. According to these questions, I choose an algorithm or preset, a starting point, but the settings need tweaking to fit the overall character of the music.
Room reverb has the power to make a recording feel real and accessible, friendly, like having a guitarist play for you in the same room. A medium or larger hall sound will present the audience with a feeling that they have attended a professional recital; a formal setting. Lastly, larger halls and churches can distance the musician from the audience, maybe even from the instrument itself, granting an elusive and ethereal mystique.
Some audiences might prefer the intimate warmth of the Segovia's recordings, while others find pleasure in the spaciousness of Julian Bream's recordings, yet others might seek a middle ground; not too dry, not too wet. For me, it primarily depends on the actual music.
When fine-tuning the settings, the tempo and rhythms of the piece must be considered; how much space exists between notes, how quick do they change, how dense is the harmony, etc. Faster pieces need shorter reverb tails or they will sound blurry, slower pieces might benefit by longer ambience tails. I fine-tune these parameters on a song to song basis, a few times I might even add automation to the adjustments.
All rooms have a sound, they accentuate and attenuate different frequencies, like employing a catholic EQ. Any decent reverb plugin will offer some adjustability for regulating the response of its algorithms. Most of the time, I tend to tune my reverbs a little darker so that they are not as obvious. Taming the low end can also be desirable to help the recording be a little clearer. At rare cases, I will use two instances of the plugin with different settings on high and low responses.
Tip: The place of the reverb on the signal chain matters, I sometimes like to put the Reverb before the EQ. Hence the general equalization applies to the recorded sound as a whole, almost like shaping a classical guitar tone recorded in a larger room. I avoid any drastic boosts or cuts in that case though.

2CAudio Aether’s intensive list of presets
The 2CAudio Aether is the most expressive and expensive-sounding reverb plugin I have ever witnessed. It is an algorithmic reverb and can sound quite realistic but always musical and impressive. It has excellent room and hall emulations, suitable for classical and acoustic music, still, it can create any ambience sound you can imagine. 2CAudio provides an enormous preset library for the Aether to get you started, and the adjustability is intense. Right now it is on sale.
Alternatives - I started with the 2CAudio Breeze, before migrating to its bigger brother. Breeze offers a similarly excellent sound, at a bare essential and affordable package. It offers less tweakability, but that might be a good thing as the Aether can sometimes overwhelm the inexperienced. Breeze 2 should be even better than the first version I was using. I have also heard good things about the Exponential Audio PhoenixVerb, but have yet to try it.
I’ve recently tested about a dozen different reverb plugins, to find the Best Reverb Plugin for Classical Guitar.
Closing thoughts
I have and sometimes use other plugins as well, but I try to keep an as-small-as-possible armoury. By limiting my plugin choices, I can concentrate on the music. I want to have to take as few unimportant decisions as I need.
If you are on the market for a new EQ or reverb plugin, this article can give you some fine options. But I also hope that this text might inspire you to learn and use what you already have, use your ears to make mindful adjustments, and finally present your music as you intend.