
Stereo Microphone Techniques for the Classical Guitar
Stereo recording is the technique that involves two microphones that due to the captures the time differences of sound waves coming from a source, which gives depth and space to the recording. Similar to how our ears and brains record and process sound.

The Classical Guitar, albeit small, is an instrument with a complex sound and subtle peculiarities; and as such, it sounds better when is captured in stereo. Various stereo recording techniques have been developed since the early 1940s; each with distinct advantages and disadvantages.
If you ask, which is the best microphone technique for capturing the classical guitar in stereo, I'm afraid that the answer is not so simple. Room size, acoustics, the instrument, and the purpose of the recording, play a significant role; as well as our individual preferences.
In this article, I describe the most common stereo techniques from the point of you of a classical guitar recordist. I discuss their strengths and weaknesses, as well as prefered uses for each setup.
Note: This article is a work in progress; X/Y, M/S, and NOS setups will be added in the following weeks.
Spaced Pair Setups
AB Stereo

AB Stereo Array
The AB Stereo recording technique is based on a pair of spaced Directional or Omnidirectional microphones and provides in a pleasing and accurate capture with useful spatial information.
For home recordings, AB Stereo is one of the best options as it is easy to implement and get a consistent sound. A pair of Cardioids is usually preferred as they can successfully attenuate the room ambience.
Omnidirectional microphones capture the true low-end of the instrument though and have no proximity effect. You can position them closer to the source in a small room, or further away if the acoustics allow.
Application
Use a (minimum) distance of 20cm between the microphones for the most natural result. You can use a greater width, as the distance from the instrument increases, for a wider capture. I prefer a width between 30 and 40cm, for small/medium rooms, and up to 60cm for large halls.
If you position the AB Setup close to the guitar, you should avoid placing any microphone opposite to the soundhole, to prevent boominess. A microphone on each side of the soundhole will give the most balanced sound, off-axis towards the fretboard for more articulation or opposite of the bridge for a fuller sound.
The microphones are most commonly parallel to each other; but, since most microphones show a degree high-end directivity, we can fine-tune their response by angling them on the horizontal plane. If you aim them slightly outwards, you can attenuate some of the unpleasing mechanical noises of the guitar (fretting noises, squeaking, nails, etc.) You can also angle them slightly inwards to reject some of the room reflections.
The directional information as captured by an AB Stereo is not as accurate as of the coincident and near-coincident setups. This attribute can be an advantage if the performer moves a lot and assists in avoiding off-balanced results. I hardly ever pan the channels hard left and right, to preserve the integrity of the central image of the classical guitar.
The biggest drawback of the AB Stereo is its leaser compatibility with MONO playback (for example, a youtube video played on a smartphone); as a result, comb-filtering may be introduced.
Suitable Polar Patterns: Omni, Cardioid
Advantages
Easy implementation
Pleasing sound
Useful spatial information
Control of room ambience
Disadvantages
Playback in MONO may introduce comb filtering
Not the most accurate directional information
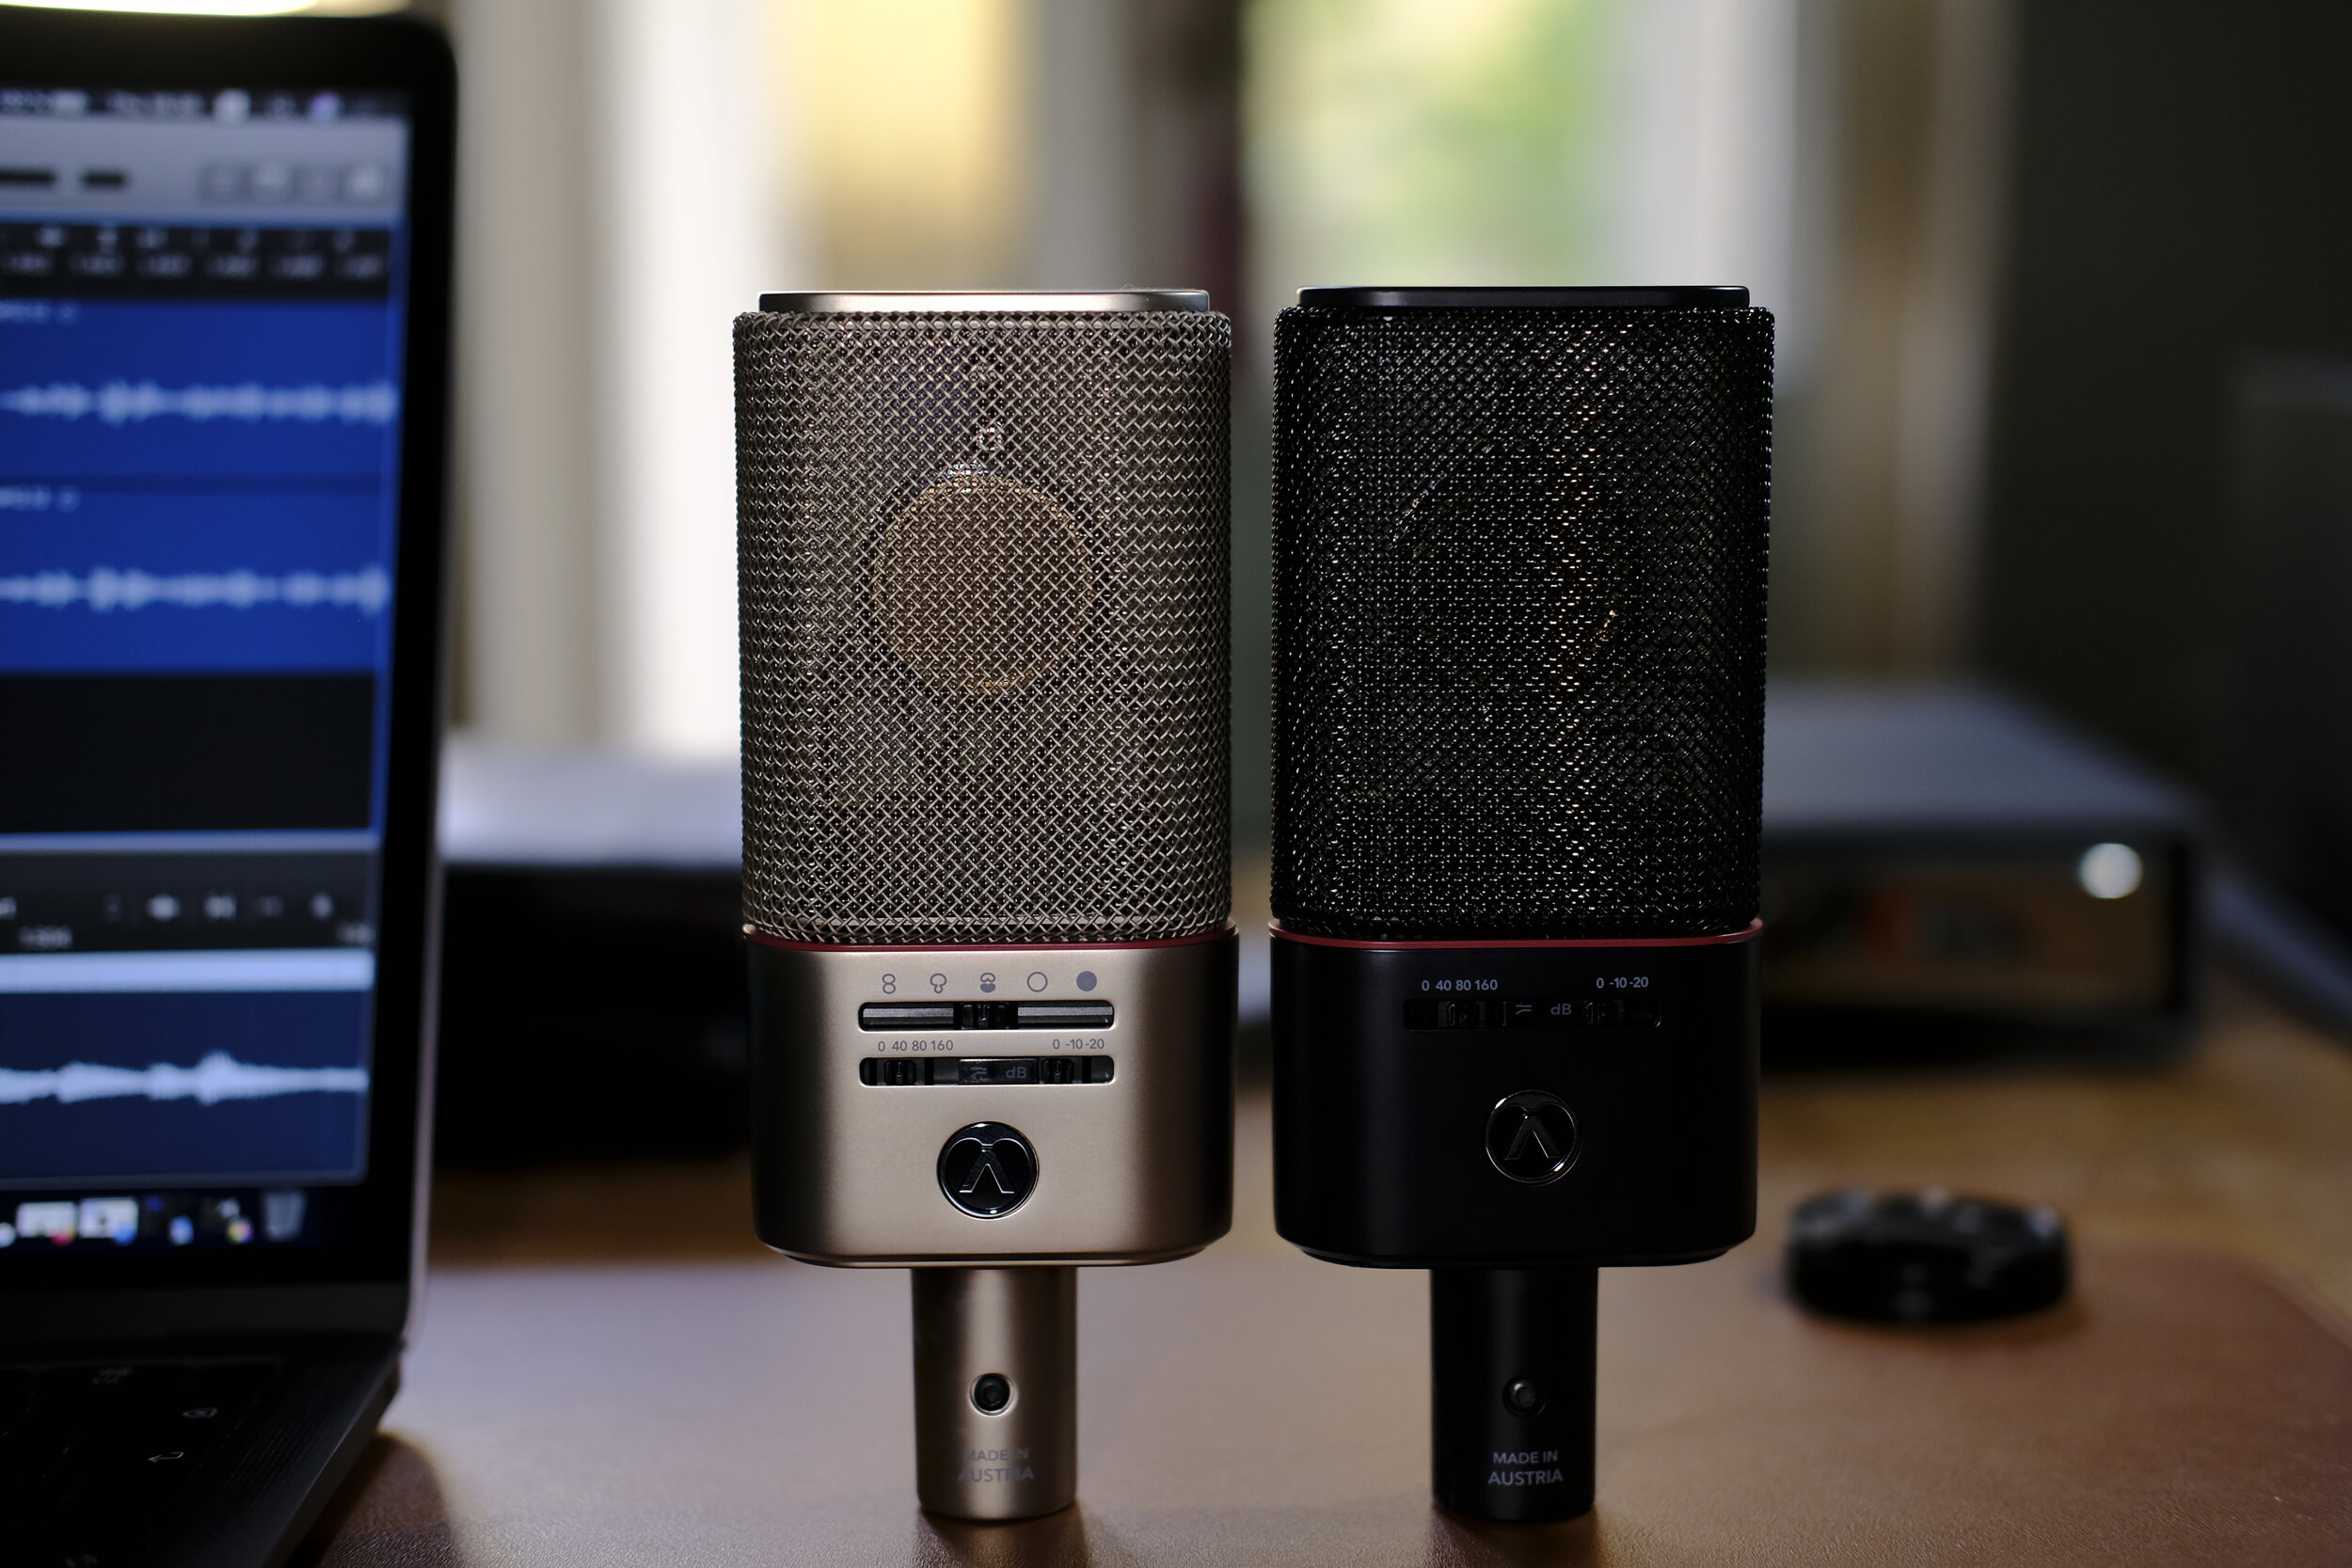
And here is a real-world example of the use of AB Stereo on Classical Guitar in a professional setting. I used a pair of Austrian Audio OC818 microphones set in a Custom Polar Pattern that combines the best of Cardioid and Omni qualities. The spacing of the microphones is 26cm. The goal was to capture the pure tone of my Angela Walter guitar together with the incredible sounding main hall of the Musikbrauerei in Berlin.
Near Coincident Setups
ORTF Stereo Technique

ORTF Stereo Array
Developed in the 1960s by the Office de Radiodiffusion Télévision Française, the ORTF is a stereo microphone configuration that with the use of two near coincident Cardioid microphones mimics the human ears.
The spacing of 17cm and 110° angle emulate respectively the distance between our ears and the shadow effect of the human head. The result is a realistic depiction of the sound field, both in directional and spatial areas, as well as a reasonable Mono compatibility.
Application
A pair of first-order Cardioid condensers is required for a proper ORTS, 17cm between the capsules and 110° angle. Other directional patterns can be used with respective changes in the width; for example, Schoeps suggests a distance of 21cm for the MK22 Open Cardioid capsules. You can also adjust slightly both the spacing and angle for the best sound.
The most critical aspect of ORTF is to balance the direct and diffuse sounds, as there is not much you can do in post-production afterwards. As always a minimum distance of 50cm is advised to avoid boominess, but I have had better results with a distance of 80cm to 110cm. At greater distances, a low-end boost might be required to compensate for the loss of low-end of directional microphones.
The ORTF main application is for large-scale sources, like orchestras and choirs. If positioned in a close distance, you might experience loss of focus with a perceived hole in the centre.
Consequently, depending on the room acoustics, the ORTF stereo array may be proved problematic in a home recording setting. As you might either have to place the microphones further away from the instrument, capturing the unattractive ambience of a small room, or suffer a smeary sound if you position the array closer.
Suitable Polar Patterns: Cardioid
Advantages
Realistic stereo field
Reasonable Mono compatibility
Disadvantages
Perceived Hole in the middle and loss of focus if positioned close to the source
Coda
Distance

The distance of the microphones to the source depends purely on the room size, the instrument, and the setup. As a rule of thumb, keep it smaller than that of the microphones to the front and side-walls. But never closer than 50cm.
Directional microphones have a sweet spot where the proximity effect eliminates, and the low-end frequency response becomes linear. If the microphones are not in the ideal position, you might need to apply a Low-Shelf EQ (boost or cut). Omnidirectional microphones have a better low-end response regardless of the distance but capture sound from all directions. So, be careful not to end up with an overly roomy recording.
Height
Most classical guitarists angle their guitars somewhat upwards to push the sound further back (and fill a concert hall). Correspondingly, the height of the microphones depends mainly on the distance to the guitar. The closer they are to the instrument the lower they need to be. If you place the microphones further away from the guitar, they need to be higher to retain definition and accuracy.
The sound travels as an impulse rather than a beam though, so there is some room for experimentation. If you prefer a fuller sound, you can position the microphones slightly lower. Contrarily, you can increase the clarity if you put the microphones higher. Use your ears and taste.
Vertical Angle
You can also exploit microphone angles in the vertical plane; you can increase clarity if they are on-axis with the top of the guitar, or aim them at a higher point to attenuate some of the high-end and undesired mechanical noises from the strings and nails.
About the Samples
Austrian Audio OC818 and OC18
I recorded all the examples with a pair of Austrian Audio OC818. I choose the OC818 for their clear sound, low self-noise, and multi-pattern options. The height of the microphones was 103cm (centre of the capsule), and the distance from the guitar was 90cm.
The signal chain was an AEA TRP2 Microphone Preamp into an RME ADI-2 Pro FS ADDA Converter.
I didn't provide samples in other distances as they would only give cues about my room and instrument, without adding value to you.
Closing thoughts
Recording the classical guitar is a meticulous exercise. Regardless, if you want to record your next album, a video for youtube, or your performances to share with your friends, it is an utterly satisfying process. It is also a reason to practice harder and become a better guitarist.
Before your press "rec" for the first take, allow some time to find the best position, height, and angle. It can be a matter of having an excellent recording or rendering the whole session useless. Small changes in this context may have dramatic results; they act as a physical equalizer.
There have been quite a few times that I had to re-record a performance because of a poor decision, or having to rely on heavy equalization to make it acceptable when it was (almost) impossible (or expensive) to record again at the same location.
I hope that this guide will be helpful in your recording adventures in the quest of capturing the best qualities of your instrument and room.

AEA N8 and KU5A Ribbon Microphones on a Classical Guitar

AEA N8 Nuvo Closeup
Ribbon microphones have a very long history, invented in the early 1920s by Telefunken in Germany, and have been used in countless historical recordings of all genres. An ultra-thin ridged aluminium (usually but not only) ribbon is placed between the poles of a magnet that translates vibrations (sound) to voltage.
Recordings made with Ribbon microphones sound very natural, have a full low-end, smooth mids and attenuated highs. They are never over-analytic if anything, they offer a relaxed presentation, making them excellent for instruments which mechanical sounds, like fretting or bowing, can be distracting. Furthermore, their pure characteristics and the bi-polar pattern generate a feeling of "being there" in the room with the musicians.
Ribbon microphones can be quite fragile and require a lot of attention even on how you store them; additionally, being passive they need a lot of very clean gain from the preamps otherwise the can appear noisy, especially with soft instruments and dynamic styles. The advances in HiFi recordings and playback systems, and their inherent downsides pushed Ribbon microphones out of fashion for several decades.
The last decades the trend seems to have shifted, at least partially. Musicians and engineers lust for the added warmth that Ribbon microphones exhibit naturally, and digital environments sometimes lack. For more than 20 years, AEA has dedicated its resources in developing and manufacturing high-quality Ribbon microphones that enable the listener to experience recordings as if he is in the same room with the musicians, and with the recent products, they hope to eliminate some of the inherent issues of this technology.
Nuvo N8 - Active Ribbon with an Extended Top-end

AEA Nuvo N8
Derived from the very well received and fantastic R88, the N8 is a mono version of the former with an added active circuit, meaning that it requires +48 phantom power to function and in exchange, it provides a higher output, making it less dependent on the preamp, and subsequently delivering cleaner recordings. The AEA TRP2 stereo preamp that I use, is specially designed for the AEA Ribbon microphones, and with its extremely clean hi-gain performance and high-impedance, it should deliver stunning recordings.
AEA designed the N8 to be used as in far-field applications, thus making it a better match for acoustic and classical recordings. And in contrast to vintage ribbon microphones, which can sometimes sound dark and murky, the N8, and the R88, capture plenty of high-end and present a controlled low-end.
Unfortunately, KMR Audio (AEA's European distributor) couldn't provide me with a pair to test some of the stereo arrays, like Blumlein or M/S Blumlein that Figure-8 Microphones excel, but I'm excited nevertheless.
KU5A - A Super-Cardioid Ribbon

AEA KU5A
The KU5A is a rather unique design in the world of Ribbon microphones, as not many non-bipolar Ribbons exist, and even less Super-Cardioid. The bi-directionality of most Ribbon microphones can sometimes be more of a burden than a blessing when used in smaller-unattractive sounding rooms. The KUA5 is a front address Super-Cardioid, that eliminates the room and presents the ribbon smoothness and warmth in all its glory, with the benefit of a detailed, extended top.
A high-pass filter of 6dB per Octave at 283Hz makes the AEA Super-Cardioid suitable for close-miking any instrument and the transformer-based, active electronics allow it to function perfectly with any decent preamplifier.
The attributes of the KUA5 make it a perfect choice for concert applications, both for amplifying the classical guitar along with recording purposes. Notably, if you play in an ensemble, The Super-Cardioid pattern will minimise the bleed from other instruments into your amplified sound. Ribbon microphones are also more forgiving than condensers, which can be a huge advantage in live recordings.
Lastly, A common issue with live acoustic recordings is that the Audience can sometimes be as loud as the instruments, the KUA5 will make sure that less of these distractions will find their way to your recordings.
Other Things

AEA KU5A Flight Case
AEA attaches the cables to the microphone on some of their products, and the KU5A is one of them, I'm not sure what to feel about this "feature" as it is nice to have, but makes the transportation awkward. The microphone itself is very well made, the built-it yoke is very sturdy and makes positioning very easy, and the is shipped in a very durable flight case. For concerts or location work, the flight case is undesirably big for the sole reason that it has to have space for the long cable.

N8 Case with Mount and Sock
The N8 is shipped with a durable plastic case which is very convenient for location recordings and for storing the microphone, a shock-like fabric cover to protect the microphone from dust, and a rubber mount that takes the place of a more regular spider mount and takes care of the low-end rumble and vibrations. The small size and weight of the N8 is also worth noting, as well as the standard XLR output, granting easy transportation and effortless positioning.
Conclusions
With active electronics for fewer noise-related headaches and an extended top-end, AEA carries the natural and calm presentation of vintage ribbon microphones to the demands of a modern workflow. Both the N8 and KU5A are excellent ribbon microphones that share the same DNA and are designed for particular situations.
If you want to remove the "room" from your recordings, the KU5A will do just that. While the N8, or better yer a pair of N8s in Blumlein, will put the listener directly into the hall that the performance takes place. Either way, a gorgeous sounding recording is guaranteed.

Three M/S Setups for Classical Guitar
Capturing the natural room sound of the guitar.
The Mid/Side microphone technique has almost a century of history. Developed by Alan Blumlein in the early 1930s, it became popular in the broadcast studios because of its compatibility with mono. Even in the recording studio, it appears to have many advantages over the most commonly used stereo techniques.
With small instruments like the guitar, it is easy to capture a too wide of an image, resulting in an unrealistic and often a blurry reproduction, especially with ORTF and AB techniques.

Neumann TLM 193 & TLM 170 in M/S Stereo
The "Mid" microphone of M/S provides a solid capture of the instrument, while the "Side" microphone is responsible for picking up the ambience of the room. The right balance of the two microphones allows for a truthful image of the guitar realistically placed in the sound field.
The M/S technique gives you the most control over the stereo spread, but the best part is that you don't have to commit to any balance until the mixdown, as you can always change the balance long time after the recording is finished.
Things to consider
As the "Mid" microphone is responsible for capturing the actual sound of the guitar, it is essential to take the time and make sure that it's placement is optimal. Otherwise, there is not a lot you can do to fix it. Also, if the room ambience is not pleasant there is not a lot you could do to improve it, so you are better off with a close AB technique and using artificial reverb in your DAW during mixing.
Here is one of several M/S setups that I've tried this week. I placed the "Mid" microphone at a distance of 55cm from the top of the guitar, aiming at the midpoint from the bridge and hole. With the capsule being at 96cm high, slightly angled downwards, placing it on-axis with the angle the I hold my classical guitar.
The "Side" microphone with a Figure-8 pattern was simply placed on top of the other at 90 degrees, aligning the capsules as close together as possible, minimizing phase issues. The whole setup was angled slightly to the sidewalls of my room. The room is medium-sized, with a wooden floor, high ceiling and a few interesting angles on the wall, making it relatively live-sounding.

Austrian Audio OC818 M/S Pair
Austrian Audio OC818 in M/S Setup
In this first example, I used an Austrian Audio OC818 pair with the "Mid" microphone was set to cardioid. The response of the Austrian Audio microphones is fairly natural, especially at the low and mid registers. A slight boost is present at the higher frequencies, but it retains the very smooth character of the classic ceramic capsule, making the classical guitar recording to sound polished and vivacious, without any sign of harshness.

Gefell UMT70s M/S Pair
Gefell UMT70s in M/S Setup
The second example utilises a Gefell UMT70s pair, these mics have a unique appearance, an incredibly small grill and an unquestionably satisfying feeling to the touch, the craftsmanship is second to none. The UMT70s shows a distinct bright character with slightly recessed lows in its cardioid pattern. The Gefell microphones offer coloured pickup but maintain a smooth quality. In a way, this combination produces a somewhat more finished recording, with nostalgic charm, it reminded me of some Julian Bream albums. The result is pleasing but differs from the sound that I hear when I play my guitar, in my room.

Neumann TLM 193 and AEA N8 in M/S
Neumann TLM193 and AEA N8 in M/S Setup
An often overlooked aspect of the M/S microphone technique is that it doesn't require a matched pair of microphones. So for the last test, I decided to combine the Neumann TLM 193 with a ribbon microphone for "Side" duties, in this case, an AEA N8.
The TLM 193 has a natural pickup, with good low-end extension, flat mids and unhyped high-end. The most gratifying aspect of the Neumann is that it captures all the nuances of the classical guitar without emphasising any frequency. Additionally, it is dead silent which enhances dynamic playing styles as it allows the notes to fade to complete silence.
The AEA N8 offers an extended high-end in comparison to more traditional ribbons and a very juicy low end. This combination in an M/S setup produces a bigger soundstage and a sound that is reminiscing of the what I hear when I play.
Conclusions
All three setups can produce high-quality recordings, although the perspectives of their designs are different. I'm used to the Neumann sound, and I gravitate towards that, together with the N8 I think they produce the purest and calmest recording, but with the expense of some definition and the higher noise floor of the ribbon. The Austrian Audio microphones are the most versatile and they take EQ well. They are detailed, without sounding overly analytical, and offer an elegant and smooth sounding result. The Gefell combo sounds like an excellent record from perhaps a different era, but if you love that sound, it is impossible to get it with the other microphones.
Coda
The M/S Stereo technique has the potential to create outstanding recordings, captures a full-bodied and defined sound while eliminating phasing issues. Larger halls and resonant spaces are where it excels as it allows us to concentrate on the recording and fine-tune the balance of ambience and close sound during mixing.